So, you've got spray paint on your fence and you’re wondering exactly how to remove spray paint from a fence without causing more damage. It’s a frustrating sight, whether it was a prank, an accidental overspray from a DIY project, or something else entirely. The good news is, with the right approach, you can often restore your fence to its original appearance.
In our research, we found that fence material and paint type are the biggest factors in determining the best cleaning method. Wood, vinyl, metal, and brick all react differently to cleaning agents, so a one-size-fits-all solution just won’t cut it. This guide breaks down the most effective strategies, starting from the gentlest options and moving toward more powerful solutions when needed.
How to Tackle Spray Paint on Your Fence: A Step-by-Step Guide
Is the Paint Fresh or Old? Knowing Your Enemy
The age of the spray paint on your fence is a critical factor. Fresh paint is almost always easier to remove than paint that has cured for days, weeks, or even months. If you catch it within a few hours, you might be able to wipe it off with just a damp cloth and some mild soap. Older paint has bonded more strongly with the fence’s surface, requiring more robust cleaning solutions and potentially more elbow grease.
Fence Material Matters: Choosing the Right Approach
Different fence materials require vastly different treatment. Applying a harsh chemical stripper to a delicate vinyl fence could cause it to yellow or become brittle, while aggressive scrubbing on brick might wear away its surface and leave it looking uneven. Always identify your fence material first: is it porous like wood or brick, or non-porous like metal or vinyl? This will dictate which cleaning agents are safe and effective.
- Wood: Can absorb cleaners, so test in an inconspicuous spot.
- Vinyl: Generally durable but sensitive to strong solvents; can yellow or etch.
- Metal: Usually robust, but some finishes can be scratched; rust can be a concern.
- Brick/Stone: Porous surfaces that can absorb stains, requiring effective removal before setting.
- Chain-link: The mesh design can make getting into every crevice challenging.
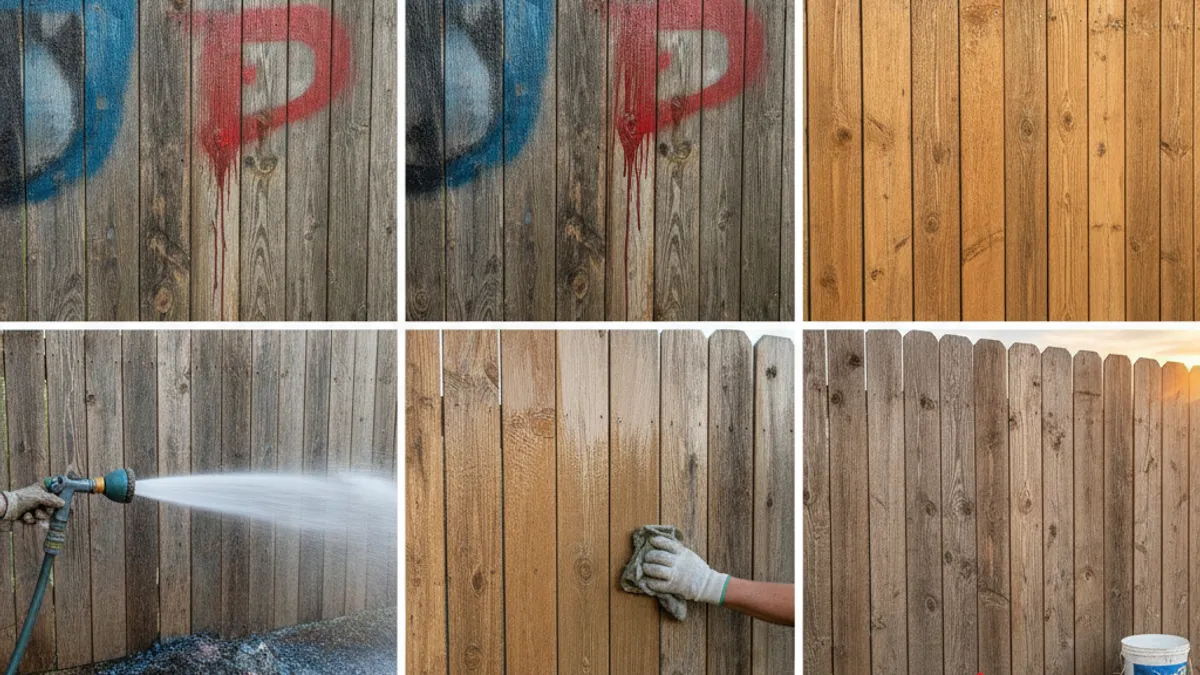
Step 1: Get Ready – Protecting Yourself and Your Yard
Before you touch any cleaner, prioritize safety. You'll want to protect yourself from fumes and skin contact, and keep your landscaping safe from chemicals.
- Wear Protective Gear: Always don gloves, nitrile or heavy-duty rubber are best. Eye protection, like safety glasses or goggles, is essential to prevent splashes. For strong solvents, a mask or respirator is highly recommended to avoid inhaling fumes.
- Protect Your Surroundings: Lay down tarps or plastic sheeting around the base of the fence to catch drips and overspray. This is especially important if you have plants, flowerbeds, or grass nearby that could be damaged by cleaning agents.
- Ventilation: Ensure the area is well-ventilated. Open gates or work on a breezy day if possible.
Method 1: Gentle Touch for Light Overspray (Soap & Water)
For the freshest paint or very minimal overspray, a simple solution of warm water and dish soap can work wonders. This is the safest first step for any fence material. A good degreasing dish soap, like Dawn, is effective at breaking down oil-based spray paints.
Mix a few tablespoons of dish soap into a bucket of warm water. Dip a soft cloth or sponge into the solution, wring it out so it’s damp but not dripping, and gently rub the painted areas. For tougher spots, a soft-bristled brush can help. Always rinse thoroughly afterward to remove any soap residue.
Method 2: Household Helpers for Stubborn Spots (Alcohol, Mineral Spirits)
If soap and water don’t cut it, you'll need to move to more potent household solvents. Always test these in a small, hidden area of the fence first to ensure they don't damage the material or its finish. Manufacturer specifications for your fence material often suggest compatible cleaning agents, for example, some vinyl siding manufacturers recommend specific cleaners.
When to Use Rubbing Alcohol
Rubbing alcohol, also known as isopropyl alcohol, is a good intermediate step. It's less harsh than many other solvents but can still lift spray paint effectively, especially from non-porous surfaces like vinyl or metal. Apply a small amount to a cloth and rub the paint. It evaporates quickly, which is a bonus, but it can dry out some surfaces like unsealed wood, so a follow-up with a wood conditioner might be necessary.
When to Reach for Mineral Spirits
Mineral spirits (paint thinner) are a more powerful solvent, effective against oil-based and enamel spray paints. They break down the paint's binder, making it easier to wipe away. Use mineral spirits with caution on wood, as they can strip existing finishes, and always ensure excellent ventilation.
- Apply mineral spirits to a clean cloth, not directly to the fence.
- Gently rub the painted area.
- Work in small sections.
- Wipe away dissolved paint immediately with a clean cloth.
- Thoroughly rinse the area with water afterward.
Method 3: Serious Solutions for Tough Paint (Commercial Removers)
When milder options simply won't budge stubborn, old spray paint, it’s time to consider commercial paint removers. These products are formulated with stronger solvents designed to break down tough paint binders more aggressively. However, they also require more caution and careful handling. Always check the product label to ensure it's suitable for your specific fence material, as some removers can be too harsh for vinyl, certain plastics, or even delicately finished wood.
- Types of Removers: You'll find them in gel, liquid, or aerosol forms. Gels often adhere better to vertical surfaces, reducing drips. Citrus-based or soy-based removers are often marketed as "eco-friendlier" alternatives, but they can still be potent and require testing.
- Application: Follow the manufacturer's instructions precisely. Typically, you apply the remover liberally, let it dwell for the recommended time (usually 15 minutes to several hours, depending on the product and paint), and then scrape or scrub the softened paint away.
- Safety First: These products often contain strong chemicals. Work in a well-ventilated area, wear chemical-resistant gloves, eye protection, and consider a respirator. Ensure no children or pets are in the vicinity.
Method 4: When Physical Force is Needed (Scraping, Brushing)

Sometimes, the paint won't dissolve entirely, or you'll need a mechanical assist to help lift it, especially after using a chemical remover. This is where scraping and brushing come in. The tool you choose depends heavily on your fence material to avoid gouging or scratching.
- Plastic Scrapers: These are your safest bet for most fence materials, including vinyl and painted wood, as they are less likely to mar the surface. Try to get under the edge of the paint and peel or lift it away.
- Stiff-Bristled Brushes: For tougher paint on robust materials like brick or metal, a nylon or brass-bristled brush can be effective. Avoid steel wire brushes on anything other than heavy-duty metal fences, as they can easily damage and scratch softer surfaces. Always test in an inconspicuous spot first.
The Pressure Washer Option: Pros and Potential Pitfalls
A pressure washer can be a powerful tool for removing spray paint, especially from durable surfaces like brick, concrete, or some metal fences. The high-pressure water stream can blast away paint effectively and quickly. However, this method comes with significant risks if not used correctly. Operating a pressure washer at too high a PSI (pounds per square inch) or using the wrong nozzle can strip paint from the fence itself, etch wood grain, damage vinyl siding, or even cause erosion on softer materials.
- PSI Matters: For most fence cleaning, a pressure setting between 1200 to 1900 PSI is usually sufficient. Always start with the lowest effective pressure and a wider fan nozzle (e.g., 25 or 40 degrees).
- Distance is Key: Keep the nozzle at least 12-18 inches away from the fence surface. Move it in a consistent, sweeping motion.
- Material Sensitivity: Pressure washers are generally not recommended for vinyl fences unless used on the lowest setting with extreme caution, and often not at all for delicate wood finishes. For newer composite or vinyl fences, always check the manufacturer's recommended cleaning methods, as many explicitly warn against pressure washing. You can learn more about safe lawn mower repair which sometimes involves pressure washing, but fences are a different animal.
What NOT to Do: Common Mistakes That Damage Fences
Making a mistake when trying to remove spray paint can lead to more expensive repairs than the original problem. Understanding these common pitfalls can save you a lot of trouble. For instance, people often reach for steel wool or overly abrasive scrubbers on delicate surfaces, which inevitably leads to scratches that are impossible to buff out.
Here are a few key mistakes to avoid:
- Using Steel Wool on Vinyl/Wood: This will scratch and damage the surface.
- Applying Harsh Solvents Blindly: Never use acetone or strong industrial strippers on vinyl, painted wood, or delicate finishes without testing first. These chemicals can melt, etch, or discolor your fence.
- Aggressive Scrubbing: Overly vigorous scrubbing, especially with stiff brushes on softer materials, can damage the fence’s surface itself.
- Ignoring Manufacturer Recommendations: Always consult your fence manufacturer's guidelines if available. For example, many composite decking and fencing manufacturers caution against pressure washing at any setting.
- Forgetting to Rinse: Leaving cleaning agents on the fence can cause them to continue working, potentially damaging the material or leaving a residue that attracts dirt.
Rinsing and Revealing the Clean Fence
Once you've successfully removed the spray paint, a thorough rinse is critical. This isn't just to wash away loosened paint particles; it’s also to remove any residual cleaning solvents. Letting these chemicals sit on the fence could lead to long-term damage, discoloration, or a sticky surface that attracts dirt and mildew.
Use a garden hose for this step. Start from the top of the fence and work your way down, ensuring all cleaning product residue is flushed away. Pay attention to any crevices or joints where residue might hide. If you used a pressure washer, a gentler rinse with a garden hose is often best in this phase.
Protecting Your Fence After the Big Clean
Once you’ve successfully removed the spray paint and rinsed the fence thoroughly, it’s wise to consider protective measures. This is especially true for wood fences, which are more susceptible to weathering and further damage. Applying a fresh coat of stain, sealant, or paint can not only restore the fence’s appearance but also shield it from the elements and make future cleaning easier.
For wood fences, a quality exterior stain or sealant creates a barrier against moisture and UV rays. This helps prevent rot and extends the life of the fence. For vinyl or metal fences, a protective spray or wax can add a layer of gloss and make it harder for new graffiti or paint to adhere. Always check the product's compatibility with your fence material before application, just as you did when cleaning.
When to Call in the Pros
While many spray paint removal jobs are manageable DIY projects, there are times when professional help is the best option. If the vandalism is extensive, covering a large area with multiple layers of paint, or if the fence material is particularly delicate or expensive, a professional painter or pressure washing service might be more efficient and safer. They have access to specialized equipment and cleaning agents that can tackle the toughest jobs without damaging your property.
Professionals also have the expertise to assess the fence material and paint type quickly, ensuring the most effective and least damaging method is used. If you've tried several methods without success, or if you're concerned about causing irreparable harm, don't hesitate to seek out a reputable local service. They can often provide an estimate based on photos or a brief on-site inspection.
Frequently Asked Questions About Fence Paint Removal
How long does spray paint typically take to remove?
The time it takes to remove spray paint from a fence varies greatly. Fresh paint might be wiped away in minutes, while older, tougher paint could take several hours of work, depending on the method and the fence material. Some specialized commercial removers require dwell times of up to 24 hours.
Can I use a kitchen degreaser on my fence?
Yes, a good quality kitchen degreaser, particularly those designed for tough grease, can be effective on some types of spray paint, especially oil-based varieties, on durable surfaces like metal or brick. However, always test it in a small, inconspicuous area first to ensure it doesn't discolor or damage your fence material. Rinse thoroughly afterward.
Is it safe to use paint thinner on wood fences?
Paint thinner, or mineral spirits, can be used on wood fences, but with extreme caution. It can effectively break down oil-based spray paint. However, it can also strip the natural oils and stain from the wood, potentially leaving it looking faded or dry. Make sure to test it in a hidden spot and follow up with a wood sealant or stain to restore protection and appearance.