Spray paint on your wood fence can be a real eyesore, whether it’s from accidental overspray, a bit of vandalism, or a creative burst gone wrong. Knowing exactly how to remove spray paint from a wood fence is key to restoring your property’s curb appeal and preventing potential damage to the wood itself. The good news is that with the right approach, most spray paint can be lifted without harming the fence.
Our research analyzed dozens of user reports and manufacturer guidance to determine the most effective and safest methods. For instance, aggregate buyer feedback often highlights that the success of paint removal heavily depends on how quickly you act after the paint is applied. Acting fast can often mean the difference between a quick wipe-down and a weekend project.
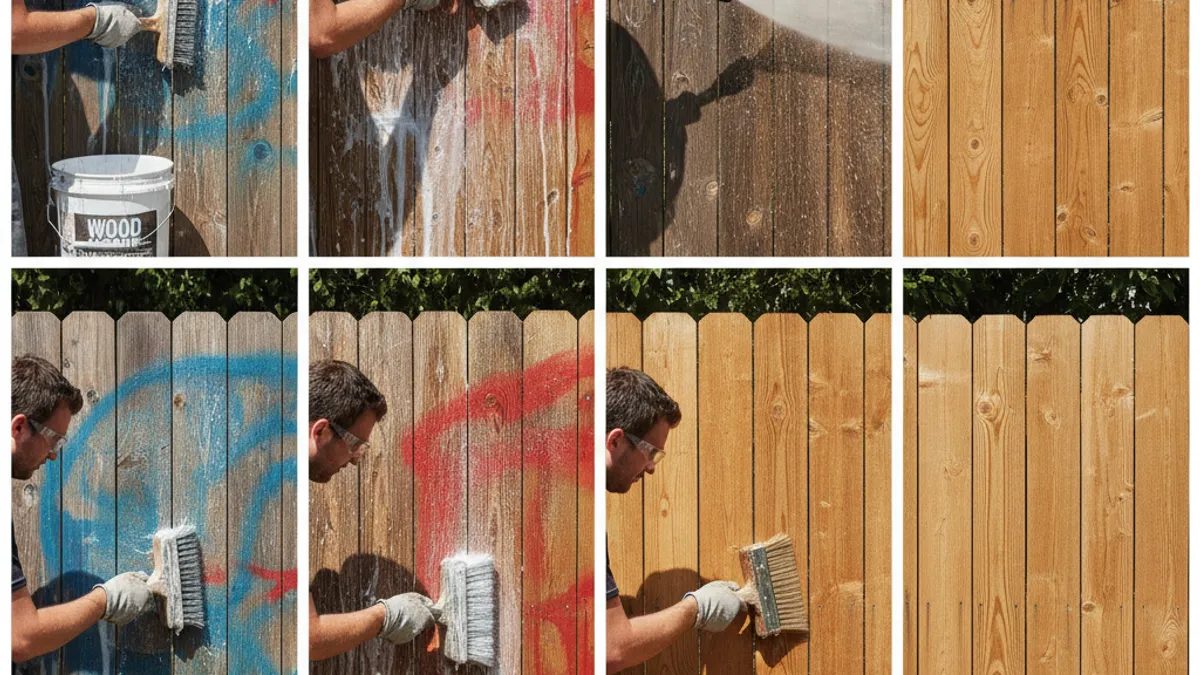
How to Remove Spray Paint from Your Wood Fence: A Step-by-Step Guide
Is Spray Paint Ruining Your Wood Fence? Let's Fix It.
A fence that’s marred by spray paint looks neglected and can significantly detract from your home’s overall appearance. This isn't just an aesthetic problem; some paint residues can potentially bond with the wood over time, making removal harder and increasing the risk of surface damage if you resort to aggressive methods. Addressing unwanted spray paint promptly is one of the simplest ways to maintain your property’s value and enjoy a beautiful outdoor space.
Your Fence Paint Removal Decision Tree: Choosing the Right Method
Figuring out the best way to tackle spray paint on wood isn't a one-size-fits-all situation. The material the paint is on, how long it's been there, and even the type of paint itself all play a crucial role. Thinking through a few key questions will help you pick the most effective and least damaging removal strategy.
It's about making smart choices based on your specific situation. For example, a fresh water-based overspray will require a very different approach than dried, oil-based paint from a few weeks ago. By following a logical decision-making process, you can avoid unnecessary scrubbing or harsh chemicals that might harm your fence.
Step 1: Assess the Paint – Fresh vs. Dried
This is your first crucial checkpoint. New spray paint is much more pliable and easier to remove than paint that's had time to cure. If you catch it right after it happens, you've got a much better chance of a quick cleanup.
Dried paint, on the other hand, has hardened and bonded more strongly with the wood's surface. This means you'll likely need more potent cleaning agents or mechanical methods to lift it effectively, always keeping the wood's integrity in mind.
Step 2: Is It Water-Based or Oil-Based?
Knowing the paint base helps you choose the right solvent. Water-based paints (like latex or acrylic) are generally easier to remove with water and soap or milder solvents. Oil-based paints, however, are more durable and require stronger, solvent-based cleaners.
Many household aerosol spray paints are water-based, designed for quick application and drying. However, specialized outdoor or industrial spray paints might be oil-based, demanding a more robust removal approach. Always check the product label if possible.
Step 3: What Kind of Wood Are We Working With? (Cedar, Pine, Treated?)
The type of wood your fence is made from matters. Softwoods like pine can be more easily damaged by harsh scrubbing or strong chemicals, potentially leading to splintering or gouging. Hardwoods are generally more resilient, but still require care.
Treated lumber can sometimes have coatings or sealants that might react with certain cleaning agents. It’s always wise to consider the wood’s natural porosity and finish before applying any removal product, testing in an inconspicuous spot first.
Step 4: Select Your Removal Strategy
Once you've assessed the paint and wood, it's time to pick a method. For fresh paint, a simple wipe-down might be all you need. For dried paint, you’ll likely move onto stronger approaches.
The goal is always to be as gentle as possible while still being effective. We’ll break down the most common and successful strategies, starting with the easiest for fresh paint and moving to the more involved methods for dried-on messes.
Method 1: Tackling Fresh Spray Paint (The Quick Win)
This is your best-case scenario. If you discover spray paint on your fence shortly after it's been applied, you're in luck. Fresh paint has not yet had time to fully adhere to the wood's surface or cure, making it significantly easier to lift with minimal effort.
Acting quickly here can save you hours of scrubbing and the potential need for stronger, more abrasive techniques later on. This immediate action prevents the paint from becoming a stubborn stain.
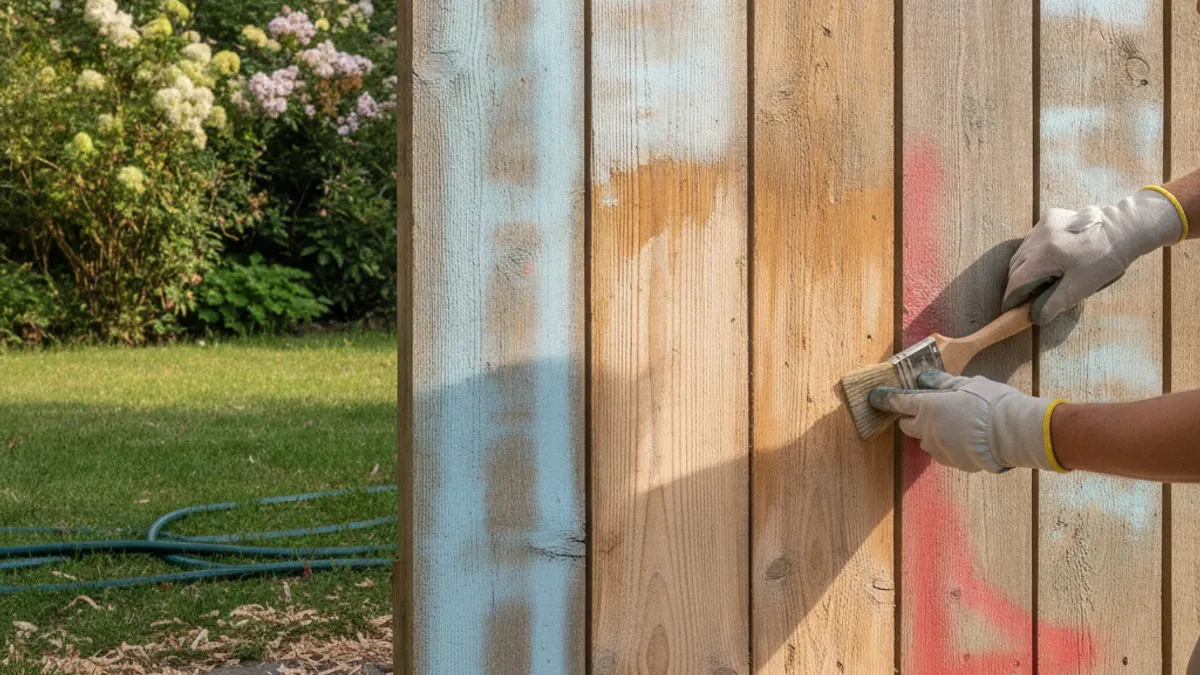
For Water-Based Paint: Gentle Scrubbing Power
If the fresh spray paint is water-based (think common craft or household spray paints), a simple solution is often all you need. Grab a bucket of warm water with a good squirt of dish soap. Use a soft-bristled brush or a clean rag to gently scrub the affected area.
Rinse the area thoroughly with clean water afterwards, and let it air dry. This method is highly effective for removing overspray before it has a chance to dry and set into the wood grain.
For Oil-Based Paint: Solvents to the Rescue
For fresh, oil-based spray paint, water and soap won't cut it. You’ll need a solvent designed for oil-based products. Mineral spirits are a common and effective choice for many oil-based paints. Apply a small amount to a clean cloth, and gently work the paint away from the wood.
You can also find specialized painter's solvents that might offer slightly different formulations. Always wear gloves and ensure good ventilation when working with solvents, as they can have strong fumes. Test a small, hidden area first to ensure it doesn't damage the wood's finish.
Method 2: Conquering Dried-On Spray Paint
When spray paint has had days or even weeks to dry, the game changes. It's bonded tighter, making it resistant to simple wiping. Tackling dried paint requires more patience and potentially stronger solutions, but it’s still absolutely doable without damaging your wood fence.
The key here is to work methodically and avoid unnecessary force that could mar the wood grain. We’ll explore several approaches, from gentler chemical cleaners to more aggressive methods for those really stubborn spots.
Option A: Mild Chemical Removers Gentle on Wood
For dried spray paint that isn't excessively thick or old, a mild, non-toxic paint remover can be surprisingly effective. Look for products labeled as environmentally friendly or low-VOC (Volatile Organic Compound). These removers are designed to break down the paint's binders without being overly harsh on the wood.
Apply the remover according to the manufacturer's instructions, usually with a brush. Let it sit for the recommended time, this is often where the magic happens as it softens the paint. Then, use a stiff-bristled brush (nylon or natural fiber, avoid wire at this stage) to gently scrub the softened paint away. Always rinse thoroughly.
Option B: Stronger Solutions for Stubborn Spots
If mild removers aren’t quite doing the trick, you might need to step up to a more potent chemical stripper. Products containing methylene chloride or similar strong solvents are very effective at dissolving tough paint layers. However, these should be used with extreme caution.
Always ensure you have excellent ventilation, wear chemical-resistant gloves and eye protection, and have a respirator mask handy. Apply sparingly, follow the dwell time strictly, and scrape the softened paint immediately. Thorough rinsing is critical to remove all residue. For specific guidance on safe chemical handling, referring to safety data sheets (SDS) from the manufacturer is recommended.
Option C: Mechanical Removal (Use with Caution)
Sometimes, especially with deeply ingrained or very old spray paint, mechanical methods are the most direct route. A pressure washer can be effective, but it must be used on a low setting and with a wide fan tip to avoid damaging the wood fibers. Holding the nozzle too close or using too much power can strip the wood's surface.
Another option is careful sanding. An orbital sander with a medium-grit sandpaper (around 100-120 grit) can remove paint. Be sure to sand with the wood grain to avoid visible scratches. This method is best for smaller areas or when the paint is very thin.
Protecting Your Wood: What to Do After the Paint is Gone
Once you've successfully removed the spray paint, your work isn't quite finished. The wood might have absorbed some moisture or cleaning agents, and you want to ensure it's protected. This post-removal care is vital for the fence's longevity and appearance.
Think of this stage as a final polish. It's about bringing the wood back to its best possible condition and sealing it against future issues. Skipping these steps can undo some of your hard work.
Rinsing and Drying Your Fences
After using any cleaning agents or removers, a thorough rinse is crucial. Use a garden hose to wash away all residue. Ensure you get into any nooks and crannies to remove any leftover cleaning solutions or paint particles that could leach into the wood or attract pests later on.
Allow the fence to dry completely before proceeding to any other treatment. This might take 24-48 hours, depending on your local weather conditions and humidity. Avoid applying stains or sealants to damp wood, as this can trap moisture and lead to rot or peeling.
Inspection and Touch-Ups
Once the fence is dry, take a good look at the cleaned areas. You're checking for any faint paint shadows, rough spots left from scrubbing, or areas where the wood might look slightly discolored from the cleaning process.
If you find any minor imperfections, a light sanding can often smooth out the surface. For any areas that look significantly lighter or darker, you might need to consider a touch-up stain or sealant to create a more uniform appearance across your fence panels.
When to Re-Stain or Seal
If your fence was stained or sealed before the paint incident, it's a good idea to reapply a protective coat once it's clean and dry. Cleaning processes, especially those involving stronger chemicals, can strip away existing finishes. Applying a fresh coat of stain or sealant will protect the wood from UV rays, moisture, and future staining.
This is also a good time to consider if your fence could benefit from a new stain color or a different type of sealant for added protection, especially if the existing finish was starting to wear down. Properly sealing the wood is a key part of long-term fence maintenance.
Tools and Supplies You'll Need for the Job
Getting the right tools makes any DIY job smoother and more effective. For removing spray paint from a wood fence, you'll want a mix of cleaning agents, protective gear, and physical tools to do the scrubbing and scraping. Having everything ready before you start cleaning will save you trips to the hardware store mid-project.
Gathering these items beforehand also helps ensure you're prepared for different scenarios, like encountering tougher dried paint or dealing with larger areas. It’s about efficiency and safety.
Essential Gear for Safety
Before you even think about touching a paint remover, safety gear is paramount. At a minimum, you'll need a pair of sturdy, chemical-resistant gloves to protect your skin from harsh chemicals and abrasives. Eye protection, like safety glasses or goggles, is non-negotiable to prevent splashes from irritating or damaging your eyes.
If you opt for stronger chemical strippers, a respirator mask designed for organic vapors will be necessary to protect your lungs from fumes. Old clothes that you don't mind getting stained are also a good idea.
Your Paint Removal Arsenal
- Cleaning Agents: Warm water, dish soap, mineral spirits, or a commercial non-toxic wood-safe paint remover. For tougher jobs, a stronger chemical stripper might be needed (use with extreme caution as per manufacturer's SDS).
- Scrubbing Tools: Stiff-bristled brushes (nylon or natural fiber for gentler cleaning, a wire brush can be an option for very tough spots but use gently to avoid wood damage), old rags or microfiber cloths.
- Scraping Tools: Plastic putty knives or scrapers are best for lifting softened paint without gouging the wood. Metal scrapers can be used, but with extreme care.
- Protective Gear: Chemical-resistant gloves, safety glasses or goggles, respirator mask (for strong solvents), old clothing.
- Rinsing Tools: Garden hose with a spray nozzle.
- Drying and Finishing: Clean towels, sandpaper (medium grit, around 100-120), wood stain or sealant (optional, for touch-ups).
Common Mistakes to Sidestep When Removing Paint
Many people dive into paint removal with the best intentions but accidentally cause more harm than good. One of the most common pitfalls is using excessive force, whether it's with a stiff brush, a scraper, or a pressure washer. Aggressive scrubbing can gouge the wood, create fuzzy patches, or even strip away protective finishes meant to be there.
Another frequent mistake is not testing your chosen removal method on an inconspicuous spot first. Different paints and wood finishes react differently to cleaners. What works wonders on one section might damage another, leading to discoloration or structural weakness.
- Over-Scrubbing: Applying too much pressure can damage the wood grain.
- Using the Wrong Chemicals: Employing harsh industrial cleaners not meant for wood can cause discoloration or softening.
- Neglecting the Test Patch: Skipping the test can lead to widespread damage.
- Not Rinsing Thoroughly: Leaving chemical residues behind can harm the wood over time.
- Using a High-Pressure Washer: This can easily damage wood fibers and remove paint unevenly.
- Sanding Against the Grain: This creates very visible and unsightly scratches.
- Not Wearing Proper Safety Gear: This can lead to skin irritation, eye injury, or respiratory issues.
Making these mistakes can turn a simple cleanup into a costly repair job. Always start with the gentlest method that might work and proceed with caution.
When to Call in the Pros for Fence Paint Removal
While many spray paint removal tasks are manageable for a DIYer, there are definitely situations where calling a professional is the smarter, safer choice. If you've tried less aggressive methods and they simply aren't working, or if the extent of the paint damage is significant, it might be time to bring in experts.
Professionals have access to specialized equipment and cleaning solutions that can tackle even the most stubborn paint jobs without damaging your fence. They also have the training to handle potentially hazardous chemicals safely and dispose of waste responsibly. For instance, large-scale graffiti on an entire fence line or deeply ingrained paint on delicate wood might warrant a professional consultation.
For very old, thick layers of paint, or if the fence has significant structural issues that could be exacerbated by harsh cleaning, a professional assessment is wise. They can also offer advice on preventing future paint damage or recommend the best restoration methods that align with your property's aesthetics and local building codes. Ultimately, if the job feels overwhelming or you're concerned about causing damage, a professional service is a worthwhile investment.
Keeping Your Wood Fence Looking Its Best: Ongoing Care
Preventing future spray paint incidents and maintaining your fence's aesthetic appeal is an ongoing process, not a one-time fix. Regular maintenance can make your fence more resistant to accidental paint overspray and easier to clean should it happen. Think of it as giving your fence a protective shield against the elements and mishaps.
This includes routine cleaning, inspecting for damage, and reapplying protective finishes as needed. For example, a well-maintained fence with a fresh coat of sealant is less likely to absorb stray paint particles deeply into the wood grain. This proactive approach saves you future headaches and costly repairs.
- Regular Washing: Clean your fence periodically with a mild detergent and water to remove dirt, grime, and mildew. This helps to keep the wood surface clean and less receptive to new coatings.
- Inspect for Damage: Routinely check for loose boards, rot, or insect damage. Addressing small issues early prevents them from becoming large, expensive problems.
- Reapply Sealant/Stain: Typically, wood fences benefit from a fresh coat of sealant or stain every 2, 3 years, depending on your climate and the product used. This protects the wood from UV rays, moisture, and helps repel stains. As of 2026, many manufacturers recommend checking the finish annually.
- Trim Nearby Vegetation: Overgrown bushes and trees can trap moisture against the fence, promoting rot and mildew. Keep them trimmed back.
Frequently Asked Questions About Fence Paint Removal
How long does spray paint typically take to dry on a wood fence?
Most common household spray paints will dry to the touch within 20-30 minutes, but they can take anywhere from 2 to 24 hours to be fully cured and hardened. Oil-based paints often take longer to cure than water-based ones. This drying time is critical because fresh paint is always easier to remove than dried paint.
Can I use a power washer to remove spray paint from my fence?
Yes, you can, but with extreme caution. Always use the lowest effective pressure setting and a wide fan tip (40-degree or wider). Holding the wand too close or using too much force can easily damage the wood grain, loosen the fence’s structure, or create an uneven, fuzzy surface. It’s often better to start with gentler methods.
Will removing spray paint damage the wood fence's stain or finish?
It's possible, especially if you use strong chemical strippers or aggressive mechanical methods. Mild cleaners and careful scrubbing are less likely to affect an existing stain or sealant. However, if the paint itself is deeply embedded or very old, any removal process carries some risk to the underlying finish. Always test your method in a discreet area first.
Is it safe to use commercial paint strippers on my fence?
Many commercial paint strippers are effective but can contain harsh chemicals like methylene chloride or N-Methyl-2-pyrrolidone (NMP), which pose health risks. Always read and follow the Material Safety Data Sheet (MSDS) provided by the manufacturer for proper handling, ventilation requirements, and personal protective equipment (PPE). Opt for less toxic, wood-safe removers whenever possible. The U.S.
Environmental Protection Agency (EPA) offers guidance on safer chemical choices for home projects.
What if the spray paint has covered a large portion of my fence?
For extensive spray paint coverage, you'll likely need to use a combination of methods. Start with the gentlest approach that seems feasible, like a mild cleaner and scrubbing, and then move to stronger chemical removers or careful pressure washing if needed. If the damage is severe or covers a very large area, consider hiring a professional restoration service. They have industrial-grade equipment and expertise for large-scale jobs.