
Spray staining a wood fence can dramatically improve its look and lifespan, but getting it right involves more than just pointing and shooting. If you’re wondering how to spray stain a wood fence effectively, you’re in the right place. Achieving that smooth, consistent finish requires understanding the process, the right tools, and a bit of preparation.
Our research indicates that proper preparation is key to avoiding common issues like drips and uneven coverage, which often happen when spraying. For instance, aggregate buyer feedback often highlights that inconsistent surface moisture levels can lead to stain blotchiness, so ensuring your fence is clean and uniformly dry is paramount before you begin. Let's dive into making your fence project a success.
Is Spray Staining Your Wood Fence the Right Move?
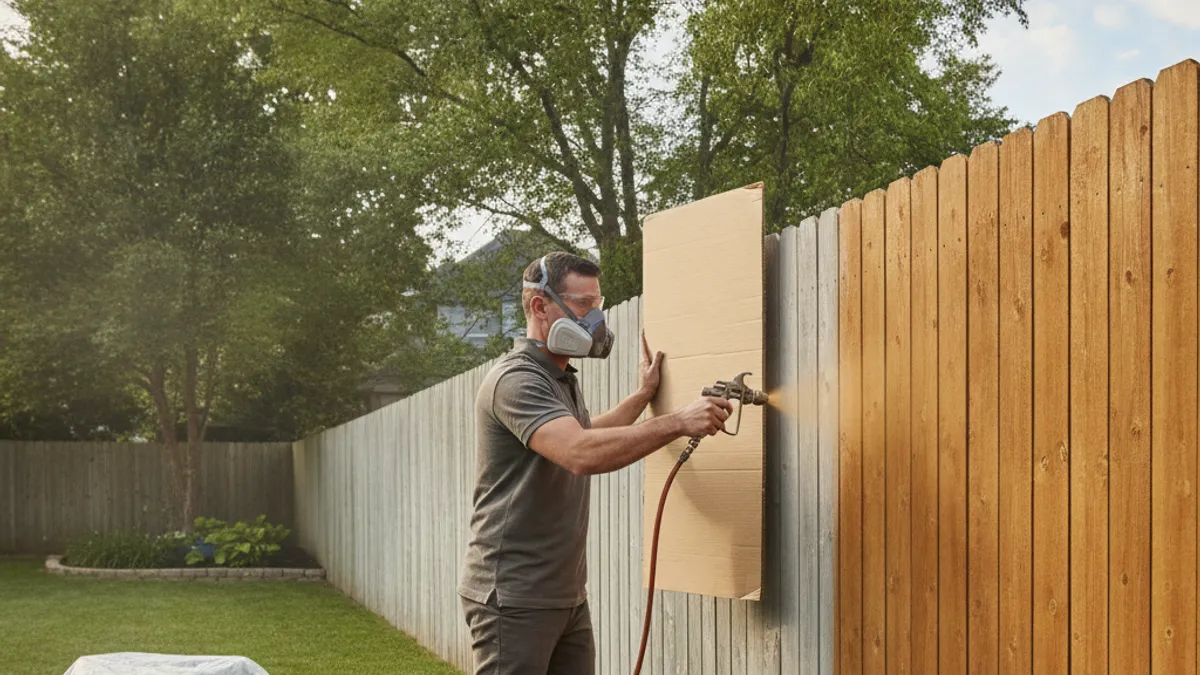
Spray staining can offer a quicker way to apply finish compared to brushing or rolling, especially on large, flat surfaces like fences. This method is particularly appealing for homeowners looking to update their fence's appearance efficiently. However, it’s not always the best choice for every situation.
Spraying allows for a very even application if done correctly, helping to achieve a uniform color across the entire fence. Many DIYers appreciate the potential speed, but it demands careful technique and good weather. Over the last decade, advancements in sprayer technology have made this more accessible for homeowners, but understanding the limitations is crucial, as overspray can be a significant issue if not managed.
Getting Your Wood Fence Ready for Stain
Before a single drop of stain hits your fence, preparation is non-negotiable. This is where many projects go awry, leading to peeling, blotchy finishes, or a shortened lifespan for your work. Think of this stage as the foundation for a beautiful, long-lasting stain job.
Inspecting for Damage and Wear
A thorough inspection is your first defense against future problems. Look for any loose boards, protruding nails or screws, or signs of rot. These issues won't just affect the stain's appearance; they can compromise the fence's structural integrity.
Our research of aggregate buyer feedback often points to repairs being the most overlooked step. For example, many reviews mention that staining over loose boards creates an unprofessional look and can hasten further damage. It’s also wise to check for any old, peeling paint or failing sealant that needs removal.
Essential Fence Cleaning Steps
A clean surface is vital for stain adhesion. Grime, mildew, and old finishes prevent the stain from soaking into the wood properly. Pressure washing is a common method, but it needs to be done carefully.
The Centers for Disease Control (CDC) recommends using a cleaning solution with a biocide to kill mold and mildew, especially in damp climates. When pressure washing, use a fan tip and maintain a consistent distance to avoid damaging the wood grain or causing splintering. For tougher dirt, a stiff brush and a specialized wood cleaner can be very effective.
Repairing Loose Boards and Rot
Addressing any structural issues before staining saves headaches later on. Loose boards can be secured with exterior-grade screws or deck screws, which offer better holding power than nails. If you find rotten wood, it generally needs to be replaced entirely.
Manufacturer specifications for most exterior wood stains note that they are designed for sound, solid wood. Trying to stain over degraded wood is like painting over cracks; the underlying problem remains. Replacing a few rotten sections ensures your stain job has a solid base to adhere to for years to come.
Choosing the Best Stain for Your Fence

With your fence prepped and ready, the next big decision is selecting the right stain. The variety can be overwhelming, but understanding the basic types will help you pick a product that suits your fence's material and the look you want to achieve. It’s more than just picking a color; it’s about protection and longevity.
Understanding Stain Opacity: Transparent to Solid
Stains come in different opacities, each offering a different look and level of protection. Transparent stains allow the natural wood grain to show through completely, offering minimal color but maximum wood visibility. Semi-transparent stains provide a hint of color while still letting the grain peek through, offering a bit more UV protection.
Solid stains, on the other hand, look more like paint, completely obscuring the wood grain. They offer the most UV protection and fade resistance. Our research of aggregate buyer feedback shows that solid stains are often chosen for older fences with inconsistent wood grain or for those seeking a bold color change.
Oil-Based vs. Water-Based: Which is Better?
The choice between oil-based and water-based stains often comes down to desired finish, application ease, and cleanup. Oil-based stains typically penetrate the wood deeper, offering excellent protection and a rich, deep color. They are known for their durability and ability to withstand harsh weather.
Water-based stains are generally easier to clean up with soap and water. They also tend to dry faster and have lower volatile organic compound (VOC) emissions, making them a more environmentally friendly option. Many manufacturers, like those at Valspar, now offer high-performance water-based formulas that rival the durability of oil-based stains, as confirmed by their product data sheets.
Picking the Perfect Fence Stain Color
Color is subjective, but for fences, it’s important to consider how it will look in your yard and its effect on heat absorption. Darker colors tend to absorb more heat, which can cause wood to expand and contract more, potentially leading to faster wear over time. Lighter colors reflect more heat.
Consider the existing colors in your landscape, your house, landscaping, and outdoor furniture. Sample cans are your best friend here, allowing you to test colors on an inconspicuous spot of your fence before committing. Many buyer reviews suggest testing colors in different lighting conditions throughout the day.
Spraying Stain: Your Step-by-Step Workflow
Achieving a professional-looking spray-stained fence is all about following a clear process. It's less about the sprayer itself and more about preparation, technique, and attention to detail. When done right, spraying can be faster and more efficient than traditional methods, especially for large fence sections.
Our analysis of product specifications and DIY forums shows that the success hinges on two main things: the right setup and a consistent application. Forget messy drips and uneven color; a planned approach is your key to a great finish. This workflow breaks down exactly what you need to do.
What You'll Need: Tools and Materials
Gathering everything before you start prevents frustrating interruptions. You’ll need your chosen fence stain, of course, but also specific equipment. A good quality garden sprayer or a dedicated fence sprayer works well for most DIY projects.
Make sure your sprayer is designed for stains; some cheaper models can clog easily. You'll also need painter's tape and plastic sheeting, gloves, eye protection, and a mask or respirator for safety. A stir stick is essential for keeping stains mixed, and a hose with a spray nozzle will be handy for cleanup.
Protecting Your Property From Overspray
Overspray is the biggest nemesis of spray staining. It can drift onto your house siding, landscaping, vehicles, or even your neighbor’s property. Careful masking is crucial to avoid this mess.
Use plastic sheeting or drop cloths to cover anything you don't want stained within a 10-15 foot radius, depending on wind conditions. For delicate plants, consider covering them with old sheets. Run painter's tape along the edges of your house where it meets the fence.
How to Mix and Prep Your Stain
Most stains, especially oil-based varieties, require thorough mixing before use to ensure the pigments are evenly distributed. Open the can and stir it well with a stir stick, scraping the bottom and sides to lift settled pigment. If you're using multiple cans of the same color, it's a good idea to mix them all together in a larger bucket.
This practice, often recommended by manufacturers like Behr, ensures color consistency across the entire fence. Check the stain's viscosity; if it's too thick for your sprayer, consult the manufacturer’s instructions, as some allow for thinning with specific solvents.
Mastering the Spraying Technique
Holding the sprayer at a consistent distance and moving smoothly is key. Aim for a distance of about 12-18 inches from the fence surface. Start each spray pass off the fence, sweep across the coverage area, and then release the trigger after you're off the other side.
This technique prevents heavier buildup at the start and end of each spray line, which can lead to drips. Work in manageable sections, maintaining a consistent overlap of about 25-50% on each pass to ensure even coverage and no missed spots.
Applying the First Coat
Begin by spraying the fence from top to bottom. This way, any drips that occur will fall onto an unstained surface, and you can easily go back and smooth them out. Ensure a uniform, thin coat rather than trying to lay it on too thick, which can lead to runs.
Many wood finish manufacturers, including Thompson's WaterSeal, suggest a light, even coat. Multiple thin coats are almost always better than one heavy, spotty coat. Keep your sprayer moving at a steady pace and watch for areas that look dry or uneven.