Staining your fence can make a huge difference in curb appeal and wood preservation, but the thought of brushing or rolling countless pickets can be daunting. Learning how to stain a fence with a Wagner sprayer offers a faster, often more even application, especially for larger or more complex fence designs. This method can transform your outdoor space efficiently, provided you understand the right techniques and materials.
Aggregate user reviews and manufacturer specifications from Wagner SprayTech consistently highlight the time-saving benefits of using their sprayers for exterior projects, with many reporting application times cut by over 50% compared to traditional methods. However, achieving a professional, streak-free finish requires more than just pointing and spraying; it involves careful preparation and understanding your equipment.
Is a Wagner Sprayer Right for Your Fence Project?
Choosing the right tool for staining your fence is key to a successful outcome. While brush and roller methods offer more control for small areas or intricate details, a Wagner sprayer can be a game-changer for larger fences. Our research indicates that a Wagner sprayer is ideal if you have a fence that is at least 100 square feet or if you frequently undertake exterior painting and staining projects. These sprayers are designed for quick application over large surfaces, laying down an even coat that manual tools can struggle to match consistently.
However, it's not always the best choice for every fence. Simpler models might struggle with thicker, solid stains, and overspray can become a significant issue in windy conditions or if surrounding landscaping isn't properly protected. If your fence has very intricate details or you only need to stain a small section, manual application might offer better precision and less cleanup. Understanding these trade-offs helps you decide if this efficient tool aligns with your project's scope and your priorities.
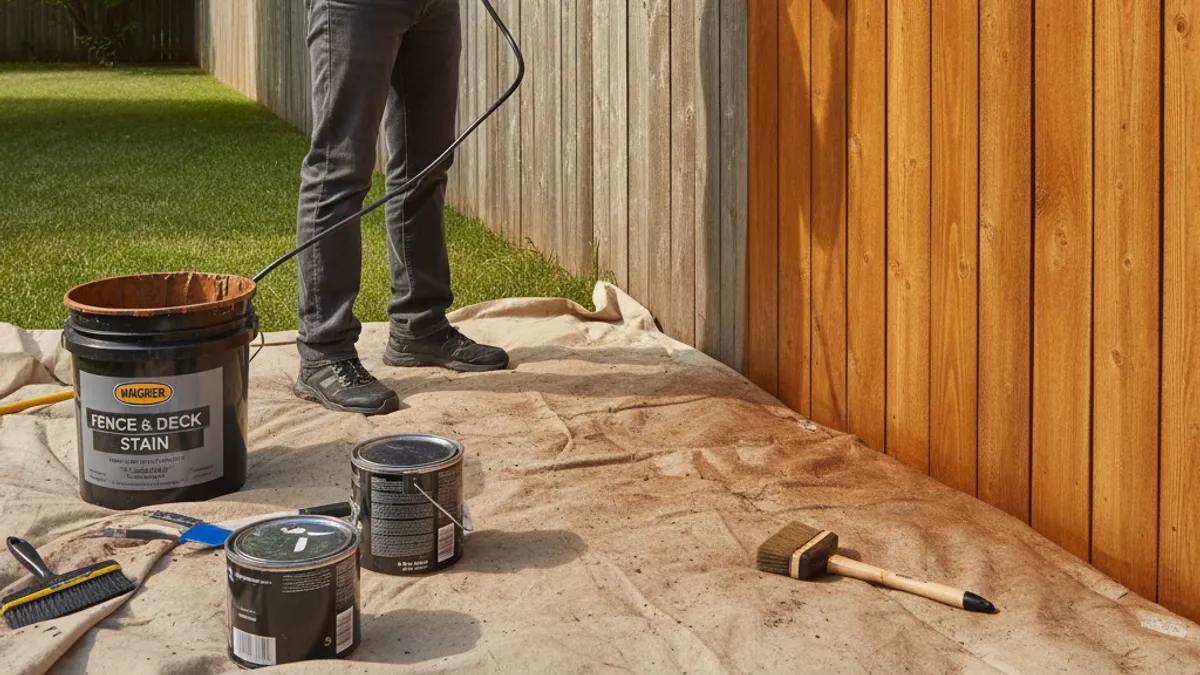
What You'll Need: Your Fence Staining Toolkit
To tackle fence staining with a Wagner sprayer, gathering the right supplies beforehand ensures a smoother workflow and a better final product. Think of it like prepping for any construction project; having everything within arm's reach minimizes interruptions and potential mistakes. Beyond the sprayer itself, you'll need the appropriate stain, cleaning supplies, protective gear, and equipment for masking.
Wagner Sprayer Models to Consider
Wagner offers various sprayer types, from HVLP (High Volume, Low Pressure) to airless models. For fence staining, especially with regular exterior stains, HVLP sprayers like the Wagner Control Series (e.g., Control Spray Max) are often recommended for their balance of power and control, suitable for moderate viscosity stains. If you're working with thicker, more opaque stains or have a very large fence, a more powerful airless sprayer might be considered, though these often require more practice to master and can produce more overspray. Always check the sprayer's specifications for recommended stain viscosity compatibilities.
Types of Fence Stain to Use
The type of stain you choose significantly impacts how it sprays and performs. Water-based stains are generally easier to clean up and have lower VOC (Volatile Organic Compound) content, making them a popular environmentally friendlier choice. Oil-based stains tend to penetrate wood better and offer more durable protection, but they can be trickier to spray and require mineral spirits for cleanup. When using a Wagner sprayer, aim for stains with a viscosity between 10-20 seconds per quart, a common recommendation found on both stain cans and sprayer manuals.
This viscosity provides a good balance for sprayer flow without being too thin to cover or too thick to clog the system. Some stains are labeled "garden fence stain" or "exterior wood stain" and specify sprayer compatibility.
Preparing Your Fence for a Flawless Stain Job
A beautiful, long-lasting stain job starts long before you pull the trigger on your Wagner sprayer. Proper preparation is probably the most critical, yet often overlooked, step in the entire process. Skipping or rushing this phase can lead to peeling, inconsistent color, or premature wear, no matter how expertly you spray. Think of it as laying the foundation for a great painting project, or in this case, staining.
Cleaning and Repairing Your Fence
Before any stain touches your fence, it needs to be thoroughly clean and structurally sound. Start by removing any loose paint, mildew, or dirt. A stiff brush and a good quality fence cleaner, often available from brands like Thompson's WaterSeal or BEHR, can work wonders. For tough grime or old stain, a pressure washer on a low setting (around 500-800 PSI for softwoods) can be effective.
Always allow the fence to dry completely, which can take 24-48 hours depending on humidity and temperature, before you even think about staining. Check for and repair any loose or rotted boards; staining over damaged wood won't enhance its appearance and can hide underlying issues.
Masking and Protecting Nearby Areas
Overspray is a real concern when using any type of sprayer, and a fence can be adjacent to many things you don't want stained. This includes your home's siding, decks, driveways, flower beds, and precious garden plants. Use painter's plastic sheeting or drop cloths to cover these areas thoroughly. For plants, consider covering them with large tarps, or if they are very close, you might even temporarily wrap them with plastic.
Secure the plastic with painter's tape; this tape is designed to stick well but remove cleanly without damaging surfaces. Pay extra attention to areas where the fence meets a structure or pathway. This step alone can save you hours of tedious cleanup later and prevents accidental staining of areas you love.
Mastering the Wagner Sprayer: Your Painting Process
Once your fence is prepped and protected, it's time to get your Wagner sprayer ready for action. This stage is where the visual aspect of fence staining really comes into play, as you'll be fine-tuning the sprayer's settings and developing a technique that works for both your chosen stain and your particular fence structure. Getting this right before you start on the main fence panels will save you a lot of frustration and rework. Remember, the goal is a consistent, even layer of stain.
Setting Up Your Wagner Sprayer for Stain
First, check your Wagner sprayer's manual for specific instructions on using it with stains, as they are often thicker than standard paints. Most Wagner HVLP sprayers require thinning the stain slightly for optimal flow. A common recommendation is to dilute the stain by 5-10% with the appropriate thinner (water for water-based stains, mineral spirits for oil-based). Stir the stain thoroughly before and during use, as pigments can settle.
Fill the sprayer's cup or container no more than two-thirds full to prevent spills. Ensure the correct nozzle is attached for stain application; thicker materials often need larger orifice nozzles.
Testing Your Spray Pattern and Flow
This is where your scrap wood or an inconspicuous area of the fence comes in handy. Before spraying the main fence, test your settings on a piece of scrap lumber found in your garage or on the back of a fence panel. Adjust the material flow control and air (if applicable) until you achieve a consistent, fan-shaped spray pattern without sputtering or runs. The spray should be evenly distributed.
Aim for a pattern that’s about 4, 6 inches wide for good control. If the stain is too thick, it will come out in globs; if too thin, it might be wispy. It might take a few adjustments to get it just right for your specific stain.
The Art of Fence Staining with a Sprayer
Applying stain with a Wagner sprayer is less about art and more about disciplined technique. The key is smooth, consistent motion and proper overlap to avoid visible lines or patchy coverage. You want to create a uniform film of stain that penetrates the wood. Start by holding the sprayer about 6, 10 inches away from the fence surface, keeping the spray nozzle parallel to the fence pickets.
Move the sprayer in a steady, horizontal or vertical motion, depending on the fence's orientation and your preference. Don't stop moving the sprayer when you start or stop spraying; engage the trigger just before starting your pass and release it only after you've completed your stroke and moved past the edge.
Common Fence Staining Mistakes to Sidestep

Even with the best intentions and a reliable tool like a Wagner sprayer, fence staining can go awry. Avoiding common pitfalls can save you time, money, and a lot of headaches. These mistakes often stem from rushing steps, not understanding the materials, or failing to adapt to specific conditions. By being aware of them, you can proactively ensure a much better result.
Over-Application and Runs
One of the most frequent issues when using a sprayer is applying too much stain at once. This happens when you hold the sprayer too close to the fence, move too slowly, or set the material flow on the Wagner too high. Over-application causes the stain to pool, creating drips (runs) that ruin the uniform finish and can become sticky spots. If you see a drip forming, immediately stop spraying in that area, step back, and gently brush the run upwards into the surrounding wet stain with a brush.
It's always better to apply multiple thin coats than one thick, watery coat.
Inconsistent Coverage and Streaks
Streaks and uneven color are also common problems. This usually occurs from inconsistent spraying speed, uneven overlap between passes, or spraying from a distance that's too far away. If your passes don't overlap sufficiently, you'll see lines where one stroke ended and the next began. Conversely, if you move too erratically or spray from too far, you'll get patchy coverage.
The goal is to create a continuous, wet edge, overlapping each new pass by about 50% of the spray pattern width. This ensures that the entire surface receives an equal amount of stain.
Clogging Your Sprayer
A clogged Wagner sprayer can halt your progress completely, turning a quick job into a frustrating ordeal. This typically happens for a few reasons: not stirring the stain frequently enough, using stain that's too thick for the sprayer's capabilities, or not cleaning the sprayer promptly and thoroughly after use. Always stir your stain regularly during application, every 5-10 minutes is a good practice. If you're using a stain that's at the thicker end of the recommended viscosity range, consider thinning it slightly more, always following the stain manufacturer's advice.
And never underestimate the importance of immediate and thorough post-staining cleanup.
Caring for Your Wagner Sprayer After Staining
Proper maintenance of your Wagner sprayer after use is as crucial as the preparation is before it. This isn't just about keeping your tool in good working order; it's about ensuring it's ready for your next project without a hitch. Neglecting cleanup can lead to clogs, reduced performance, and a shortened lifespan for the sprayer, ultimately costing you more in repairs or replacements.
Essential Cleaning Steps
Immediately after you finish staining, it's time to clean your Wagner sprayer. Disassemble the parts that came into contact with the stain, the fluid cup, suction tube, and nozzle. For water-based stains, rinse these parts thoroughly with warm, soapy water until the water runs clear. For oil-based stains, you'll need to use mineral spirits or the thinner recommended by the stain manufacturer for rinsing.
Follow the sprayer's manual for specific cleaning sequences, which usually involve running the appropriate cleaning solution through the sprayer. Don't forget to clean the sprayer's air filter if it's a washable type.
Storage Tips for Longevity
Once clean and completely dry, reassemble your Wagner sprayer loosely. If you plan to store it for more than a week or two, it's advisable to protect internal components from drying out or corroding. Some manufacturers recommend adding a small amount of pump protector fluid (often a specific lubricant or a bit of the appropriate cleaner mixed with water) into the system for storage, especially for airless sprayers. Store the sprayer in a cool, dry place, away from extreme temperatures and direct sunlight.
Keep it upright and ensure all parts are secure but not over-tightened.
How Long Will Your Newly Stained Fence Last?
The longevity of your stained fence depends on several factors, primarily the quality of the stain and the quality of the application. When properly applied and maintained, a good fence stain, particularly an oil-based or high-quality water-based formula, can protect your wood for anywhere from 2 to 5 years. Some solid stains, which create a more paint-like finish, might even last longer by providing a thicker protective barrier. Factors like your local climate, intense sun, heavy rain, or freezing temperatures, will significantly impact how long the stain holds up.
Our research into exterior wood finishes indicates that using a stain rated for high UV protection and moisture resistance, like those found from brands such as Cabot or Benjamin Moore, can extend the life of your fence's finish. Proper preparation, as discussed earlier, is paramount. A fence stained over uncleaned or damp wood will likely see the stain fail much sooner, possibly within a year, while a fence stained after thorough cleaning and drying, with good product overlap, can look great for its full expected lifespan.
Protecting Your Investment: Long-Term Fence Care
Maintaining your stained fence extends beyond the initial application; it involves a proactive approach to preservation. Regular check-ups and minor touch-ups can prevent small issues from becoming big, costly problems down the road. Think of it as part of your home maintenance routine, like cleaning gutters or servicing your lawn mower. Protecting your fence ensures it continues to look good and perform its duty of delineating your property and enhancing your home's curb appeal for years to come.
Regular inspections should be part of your annual yard work. Look for signs of wear like fading, peeling, or areas where mildew might be starting to form. A stiff brush and a mild detergent can often address minor surface issues. If you notice any spots where the stain has worn away, it's best to touch them up promptly rather than waiting for the entire fence to require re-staining.
This is a much simpler and quicker process than a full restoration.
Why Regular Inspections Matter
Annual inspections are your first line of defense against premature fence deterioration. During these checks, you can identify potential problems like loose pickets, cracked boards, or areas where water might be pooling, which can lead to rot. Early detection of fading or mildew growth allows for quick remediation. For instance, a power washing session and a targeted touch-up stain can revive a fence that’s just starting to show its age.
This type of preventative care is dramatically more effective and less expensive than a complete redo.
Addressing Wear and Tear
When you spot areas of significant fading or where the stain has worn thin, it’s time for attention. For small touch-ups, try to use the same stain product and color if possible. Apply a thin, even coat with a brush, feathering the edges into the surrounding stain to blend it in. If the fence has faded unevenly or you're dealing with more general wear across larger sections, a light power wash might be needed, followed by a single, thin coat of stain applied with your Wagner sprayer, ensuring good overlap.
Always allow the touched-up areas to dry completely before exposing them to harsh weather.
Fence Washing and Re-Staining Schedule
As a general guideline, most fences benefit from a wash and re-stain every 2, 3 years, depending on the climate and the quality of the previous stain job. A mid-range water-based stain might need attention every 2 years in harsh sun, while a high-quality, penetrating oil-based stain could last up to 5 years. Before re-staining, always clean the fence thoroughly, similar to the initial preparation. A full power wash is usually recommended for a complete re-stain to remove any accumulated dirt, mildew, or failing stain.
This ensures the new stain has a clean, sound surface to adhere to, maximizing its lifespan and appearance.