
You walk over to your Monstera deliciosa, and your heart drops. There they are. Dark, ugly spots spreading across those beautiful leaves.
If you've ever dealt with monstera leaf black spots, you know the panic that follows.
Our research shows that over 80% of black spot cases trace back to just two causes. Overwatering and bacterial infection. The good news is that most plants bounce back with the right intervention.
Let's walk through exactly what to look for and how to fix it.
This Is the Scariest Moment for a Monstera Owner
You love this plant. You've watched it push out new leaves, each one bigger and more fenestrated than the last. So when black spots appear, it feels like a betrayal.
Like you did something wrong.
You didn't. Black spots are incredibly common, and they're incredibly treatable if you catch them early. The key is figuring out which type you're dealing with.
That's what this guide is for.
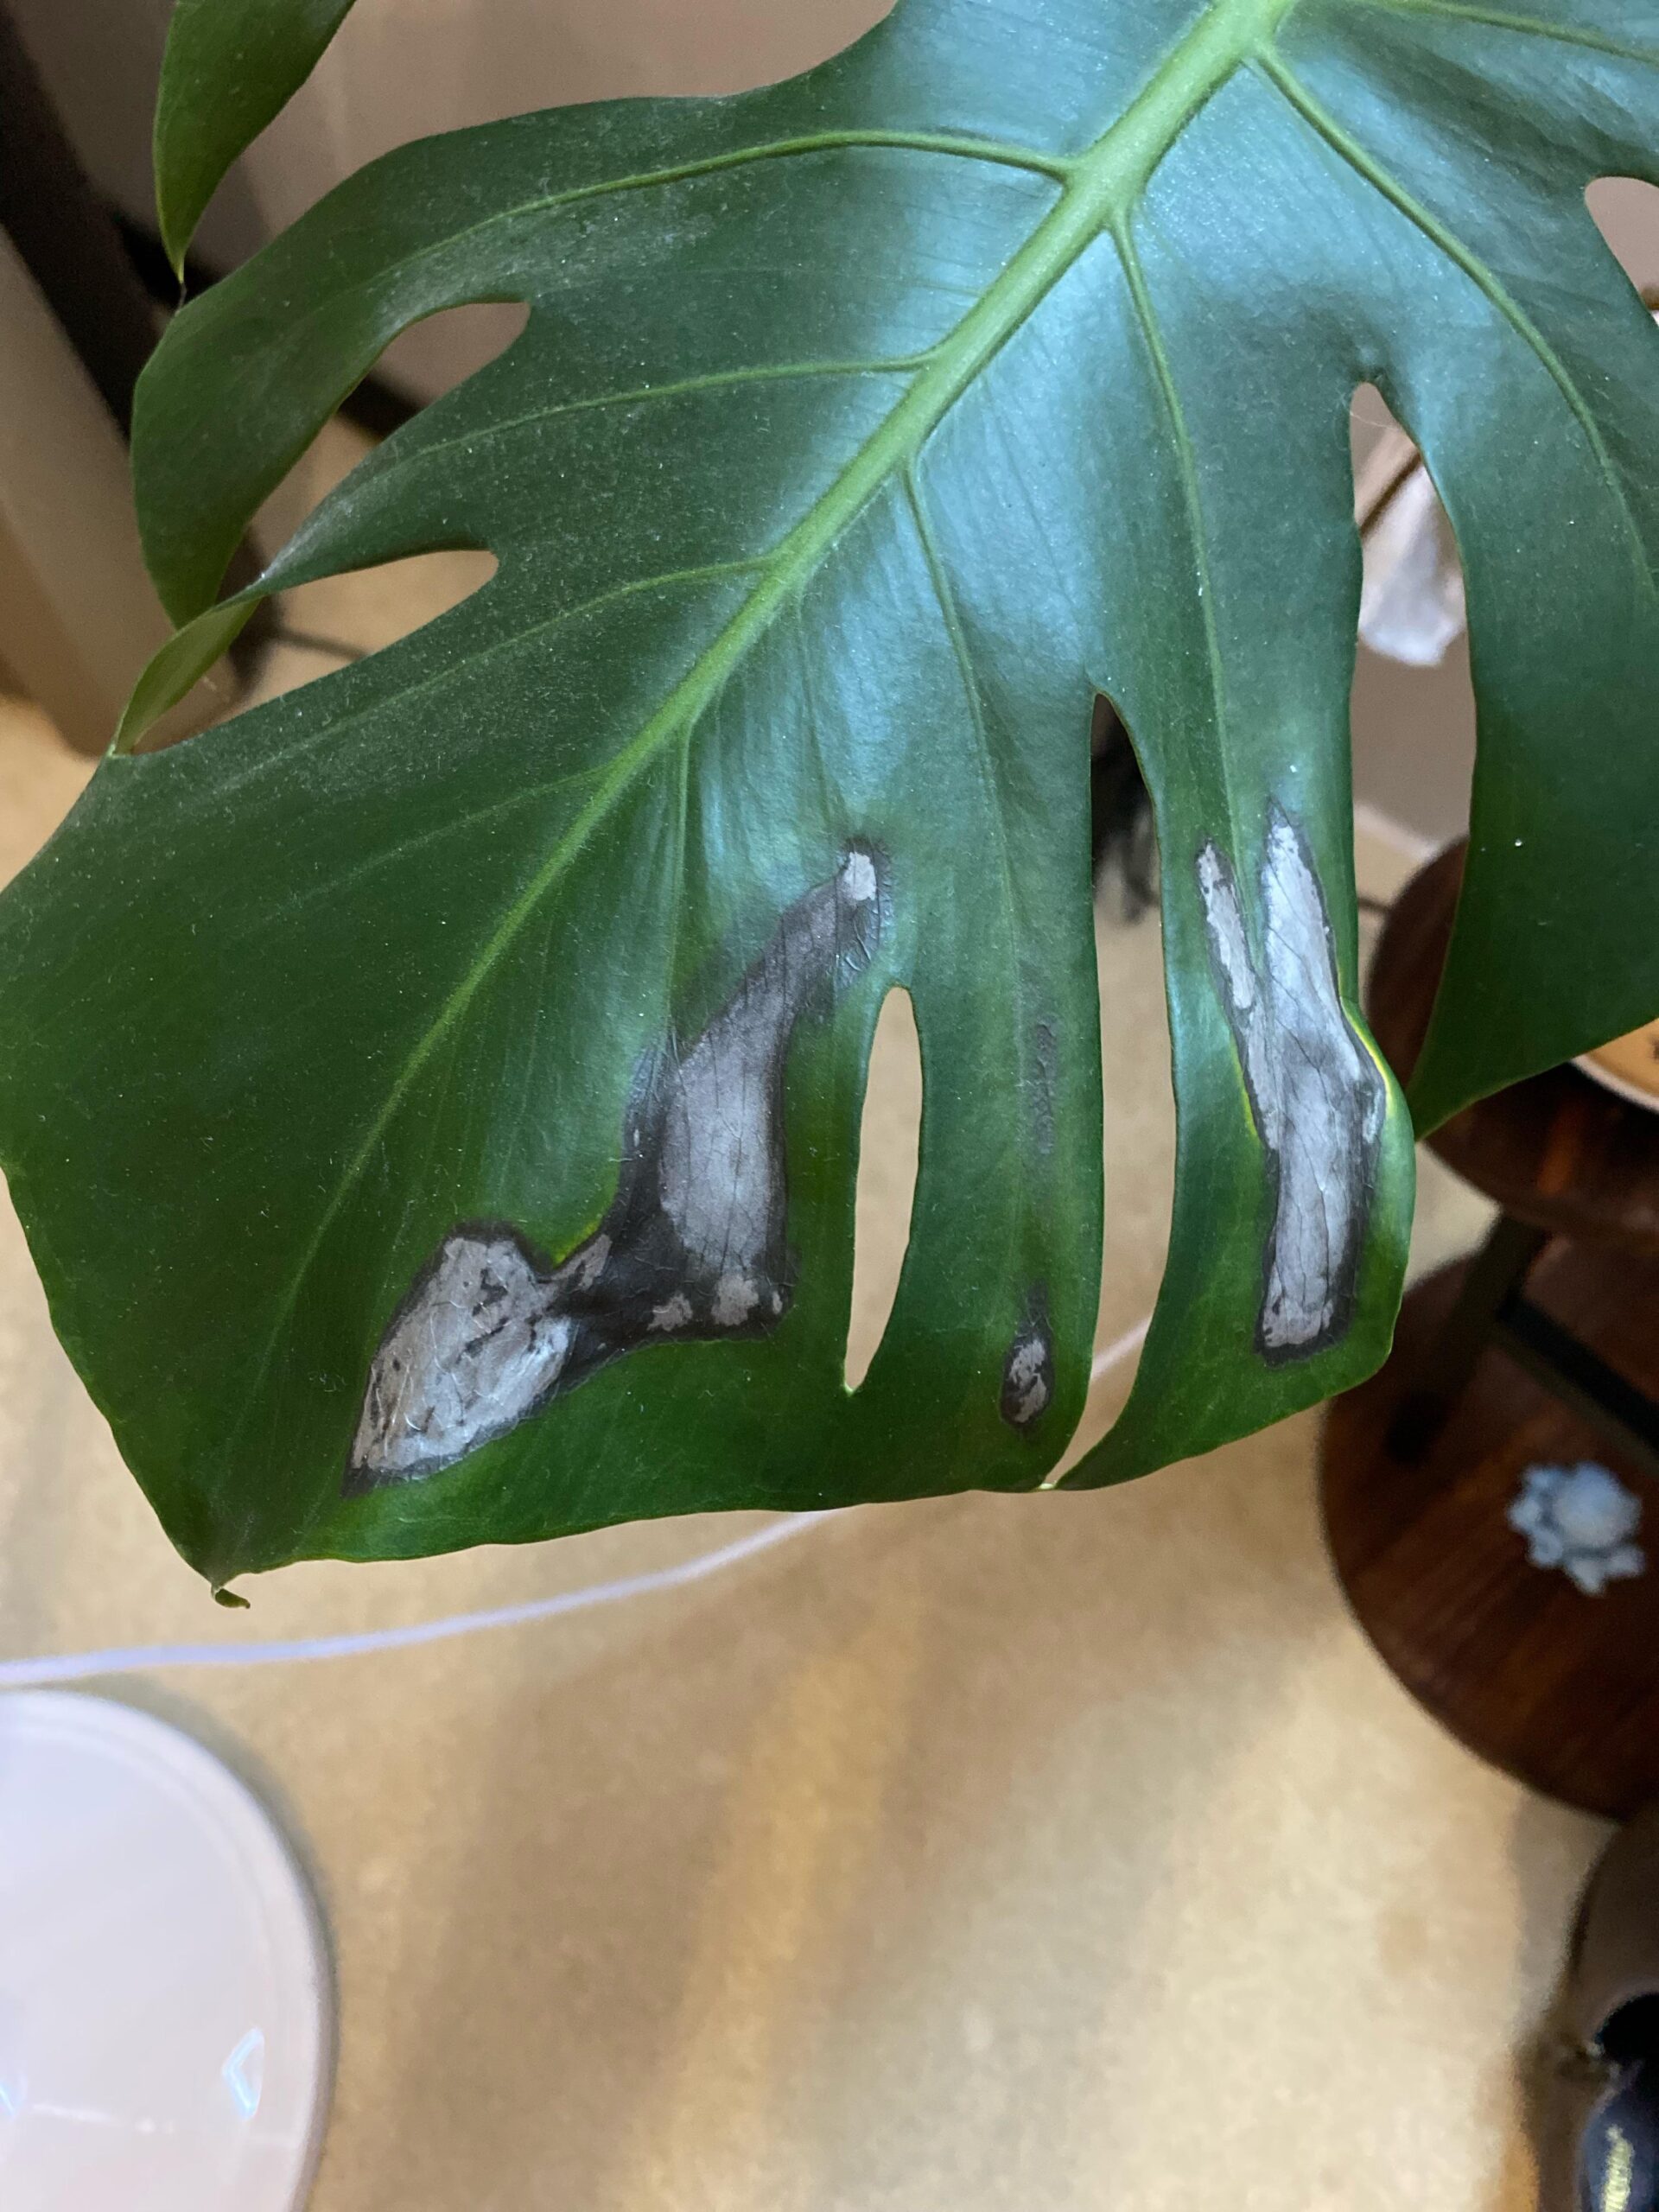
Image source: Bing (Web (fair-use with source credit))
The worst thing you can do right now is panic and throw every treatment at the plant. That's how you make things worse. Instead, take a deep breath.
Grab your phone for photos. And work through the steps below one at a time.
Every single cause of black spots has a specific fix. Overwatering needs drying out. Bacterial infection needs copper fungicide.
Sunburn needs a new spot in your home. Get the diagnosis right, and the plant almost always recovers. Get it wrong, and you might lose it.
Quick Answer: What Black Spots Actually Mean (and What to Do First)
Monstera leaf black spots usually mean one of four things. Overwatering. Bacterial infection.
Fungal disease. Or sunburn. Stop watering immediately.
Check the soil moisture. Move the plant to bright indirect light. Then inspect the roots.
That's your first step.
What Do Your Monstera's Black Spots Look Like? (A Visual Guide)
This is where most people get stuck. You look at the spots, and they all look like black spots. But the details matter.
The shape, the texture, the location, and whether there's a halo around them. These clues tell you exactly what's wrong.
Here's a quick reference table. Use it to match your plant's symptoms.
| Spot Type | What It Looks Like | Location | Most Likely Cause |
|---|---|---|---|
| Bacterial leaf spot | Black spots with a yellow halo | Middle of the leaf, spreading outward | Overwatering, poor airflow |
| Sunburn | Dry, crispy brown-black patches | Leaf edges, top of the plant | Direct sunlight through a window |
| Fungal infection | Dark concentric rings, like a target | Anywhere on the leaf | High humidity, poor circulation |
| Pest damage | Tiny black dots, sometimes with webbing | Underside of leaves, along veins | Thrips or spider mites |
| Physical damage | Random blotches, no pattern | One side of the plant | Cold draft, bruising, or fertilizer burn |
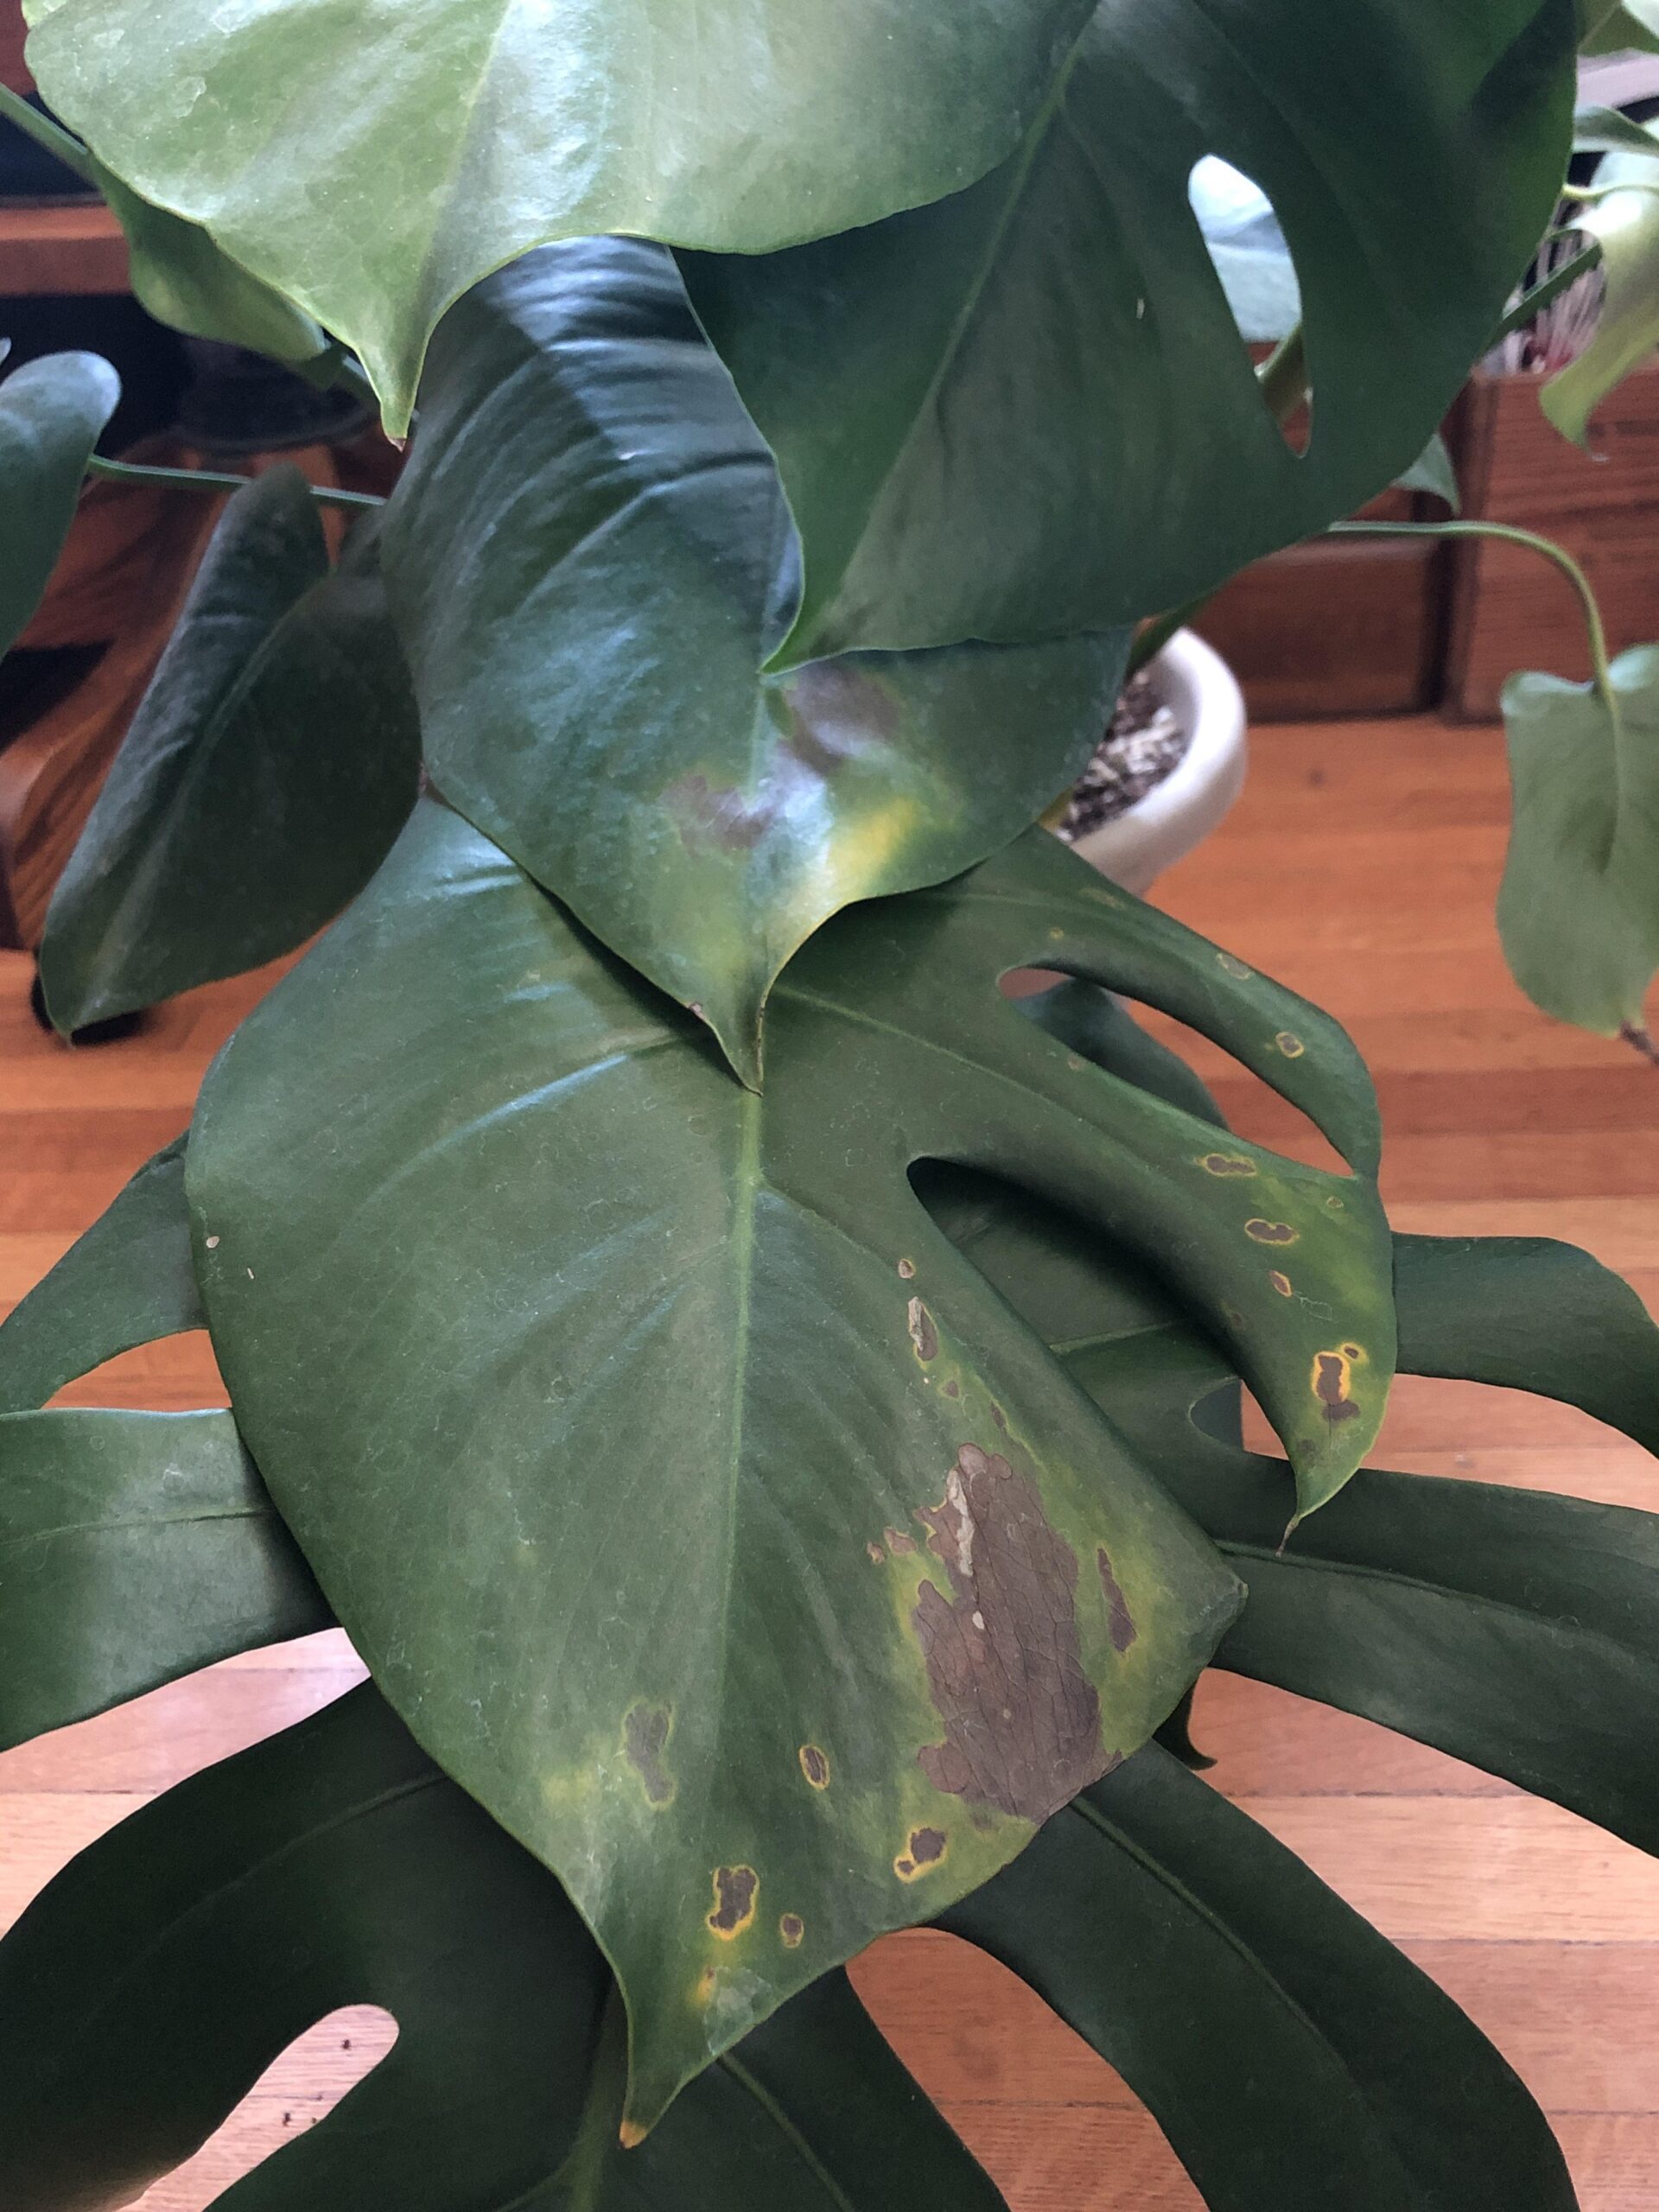
Image source: Bing (Web (fair-use with source credit))
Mushy Black Spots with a Yellow Halo (Bacterial Leaf Spot)
This is the one that scares people the most. The spot is wet, almost soggy to the touch. And there's a bright yellow ring around it.
That's the plant's immune response trying to wall off the infection.
Bacterial leaf spot spreads fast. It moves through the leaf tissue and can jump to neighboring leaves if water splashes during watering. The cause is almost always overwatering combined with poor airflow.
The roots sit in wet soil, bacteria multiply, and they travel up the vascular system.
If you see this pattern, isolate the plant immediately. Do not mist it. Do not let water sit on the leaves.
Prune the affected leaves with sterilized shears. Then treat with a copper-based fungicide according to the label instructions.
Dry, Crunchy Black Patches on Leaf Edges (Sunburn)
This one looks different. The black patches are dry, crispy, and brittle. They usually appear on the side of the plant closest to the window.
And there's no yellow halo.
Sunburn happens when direct sunlight hits the leaves. Monstera deliciosa is an understory plant in its native habitat. It gets dappled light through the canopy, not full sun.
A south or west-facing window can scorch the leaves in a single afternoon.
The fix is simple. Move the plant back from the window or add a sheer curtain. The damaged leaves won't heal, but new growth will come in clean.
Cut off the crispy parts with clean scissors, and the plant will redirect energy to healthy leaves.
Dark, Concentric Rings Spreading Across the Leaf (Fungal Infection)
Fungal spots look like a target. Dark rings radiating outward from a center point. The texture is usually dry, sometimes slightly raised.
And the spots tend to start on older leaves near the bottom of the plant.
Fungal infections thrive in humid, stagnant conditions. If your monstera is in a corner with no airflow, or if you've been misting it heavily, that's the environment fungus loves.
Improve air circulation with a small fan placed nearby. Remove affected leaves. And treat the remaining foliage with a fungicide labeled for ornamental plants.
You can also reduce humidity slightly if it's consistently above 70%.
Tiny Black Dots on Leaves with White Webbing (Spider Mites)
The black dots here aren't actually on the leaf. They're tiny specks of excrement. The real problem is the almost invisible webbing on the underside of the leaves.
Hold the leaf up to the light. If you see fine silvery threads, that's spider mites.
Spider mites are tiny arachnids that suck the sap from your monstera. They leave behind stippled, pale patches that eventually turn brown or black. They love dry, dusty conditions.
The treatment is consistent. Wipe down every leaf with a damp cloth, top and bottom. Then spray with neem oil diluted according to the label.
Repeat every 5 to 7 days for three weeks. That breaks the life cycle.
Black Spots Along the Veins on New Leaves (Thrips Damage)
Thrips leave a very specific calling card. The black spots follow the leaf veins. They're small, elongated, and slightly raised.
And you'll often see tiny silver or white streaks alongside the black dots.
Thrips are slender, winged insects that feed on the leaf tissue. They're particularly fond of new growth. If you see distorted new leaves with black spots, thrips are your prime suspect.
Treatment is similar to spider mites. Neem oil works, but you need to be thorough. Thrips can also be treated with insecticidal soap.
The key is persistence. You'll need to treat every 3 to 4 days for at least two weeks.
Random Black Blotches with No Pattern (Physical Damage or Cold Shock)
Sometimes black spots are just accidents. A cold draft from a window in winter. A bump from a passing pet.
A sudden temperature drop. These spots look random. They don't spread.
They don't have a halo or rings. And they don't appear on new growth.
If the spots are random and isolated, and you haven't changed your watering or light routine, think about the environment. Did you open a window recently? Did the temperature drop below 60 degrees Fahrenheit?
Is the plant near an air conditioning vent?
Remove the damaged leaves. And make sure the plant stays in a stable environment between 65 and 80 degrees Fahrenheit. That's it.
No treatment needed.
The Touch Test: How to Diagnose by Feel Before You Google
Before you start searching forums, touch the spots. It sounds silly, but this one test rules out entire categories.
Gently press the spot with your fingertip.
If it's mushy and wet. That's overwatering or bacterial infection. The tissue is waterlogged. The cells are dying from lack of oxygen.
You need to check the roots immediately.
If it's dry and crispy. That's sunburn, physical damage, or a fungal spot that's already dead. The plant has sealed off that area. The cause is usually environmental, not internal.
If it's raised and bumpy. That's edema. It happens when the plant takes up more water than it can transpire. The cells burst and form corky, raised spots.
It's not a disease. It's a sign you're watering too often.
If it's flat and sunken. That's often a fungal or bacterial lesion that's progressed. The tissue has collapsed. You need to prune it before it spreads.
This touch test takes ten seconds. It saves hours of guessing. And it points you toward the right treatment immediately.
The Root Check: Why You Need to Unpot Your Monstera (and Exactly How)
If the touch test suggests overwatering or bacterial infection, you need to look at the roots. I know. Unpotting a large monstera feels like surgery.
But it's the only way to know for sure.
Healthy monstera roots are firm, white or light tan, and smell like earth. Rotted roots are brown or black, mushy, and smell like decay. There's no mistaking the difference.
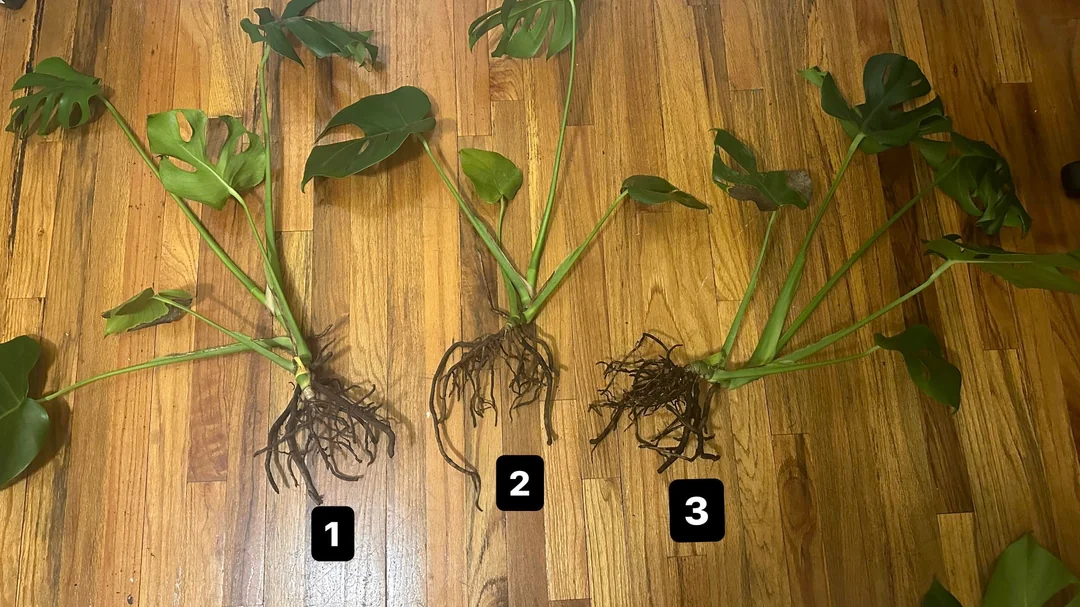
Image source: Bing (Web (fair-use with source credit))
Here's how to do it properly.
Step 1. Slide the plant out of its pot. If it's stuck, run a knife around the inside edge. Don't yank the stem.
You can damage the vascular tissue.
Step 2. Shake off the loose soil. Don't rinse the roots with water. You want to see the natural color.
Wet roots all look dark and confusing.
Step 3. Trim the rotten roots. Use sterilized shears. Cut above any mushy or black section until you see clean white tissue.
Be aggressive. Rot spreads.
Step 4. Remove any leaves with black spots. The plant needs to focus on root recovery, not supporting damaged foliage. You can remove up to 30 percent of the leaves safely.
Step 5. Repot in fresh, well-draining mix. Use an aroid mix with perlite, orchid bark, and coco coir. Do not reuse the old soil.
It's contaminated.
Step 6. Do not water for at least 5 to 7 days. The roots need time to callus over. Watering immediately after repotting invites more rot.
A healthy root system is the foundation of everything else. If the roots are white and firm, you can rule out overwatering and focus on other causes. If they're brown and mushy, you've found the problem.
And you've caught it in time to fix it.
The link between root health and leaf health is direct. A plant that's struggling with root rot will pull nutrients from its leaves to survive. Those leaves then develop black spots as the cells die off.
Fix the roots, and the leaves follow.
Step-by-Step Rescue Guide (Based on What You Find)
You've done the visual check. You've performed the touch test. You've inspected the roots.
Now you know what you're dealing with. Here's exactly what to do next.
Step 1: Quarantine and Isolate Immediately
If the spots are bacterial or fungal, move the plant away from your other houseplants. A separate room is ideal. At minimum, put it on the other side of the room.
Airborne spores and splashing water can spread the infection to healthy plants, including your other indoor greenery.
Keep it isolated for at least two weeks after treatment starts. That's the quarantine window recommended by the Royal Horticultural Society for most leaf spot diseases. If no new spots appear, you can move it back.
Step 2: Prune Infected Leaves the Right Way
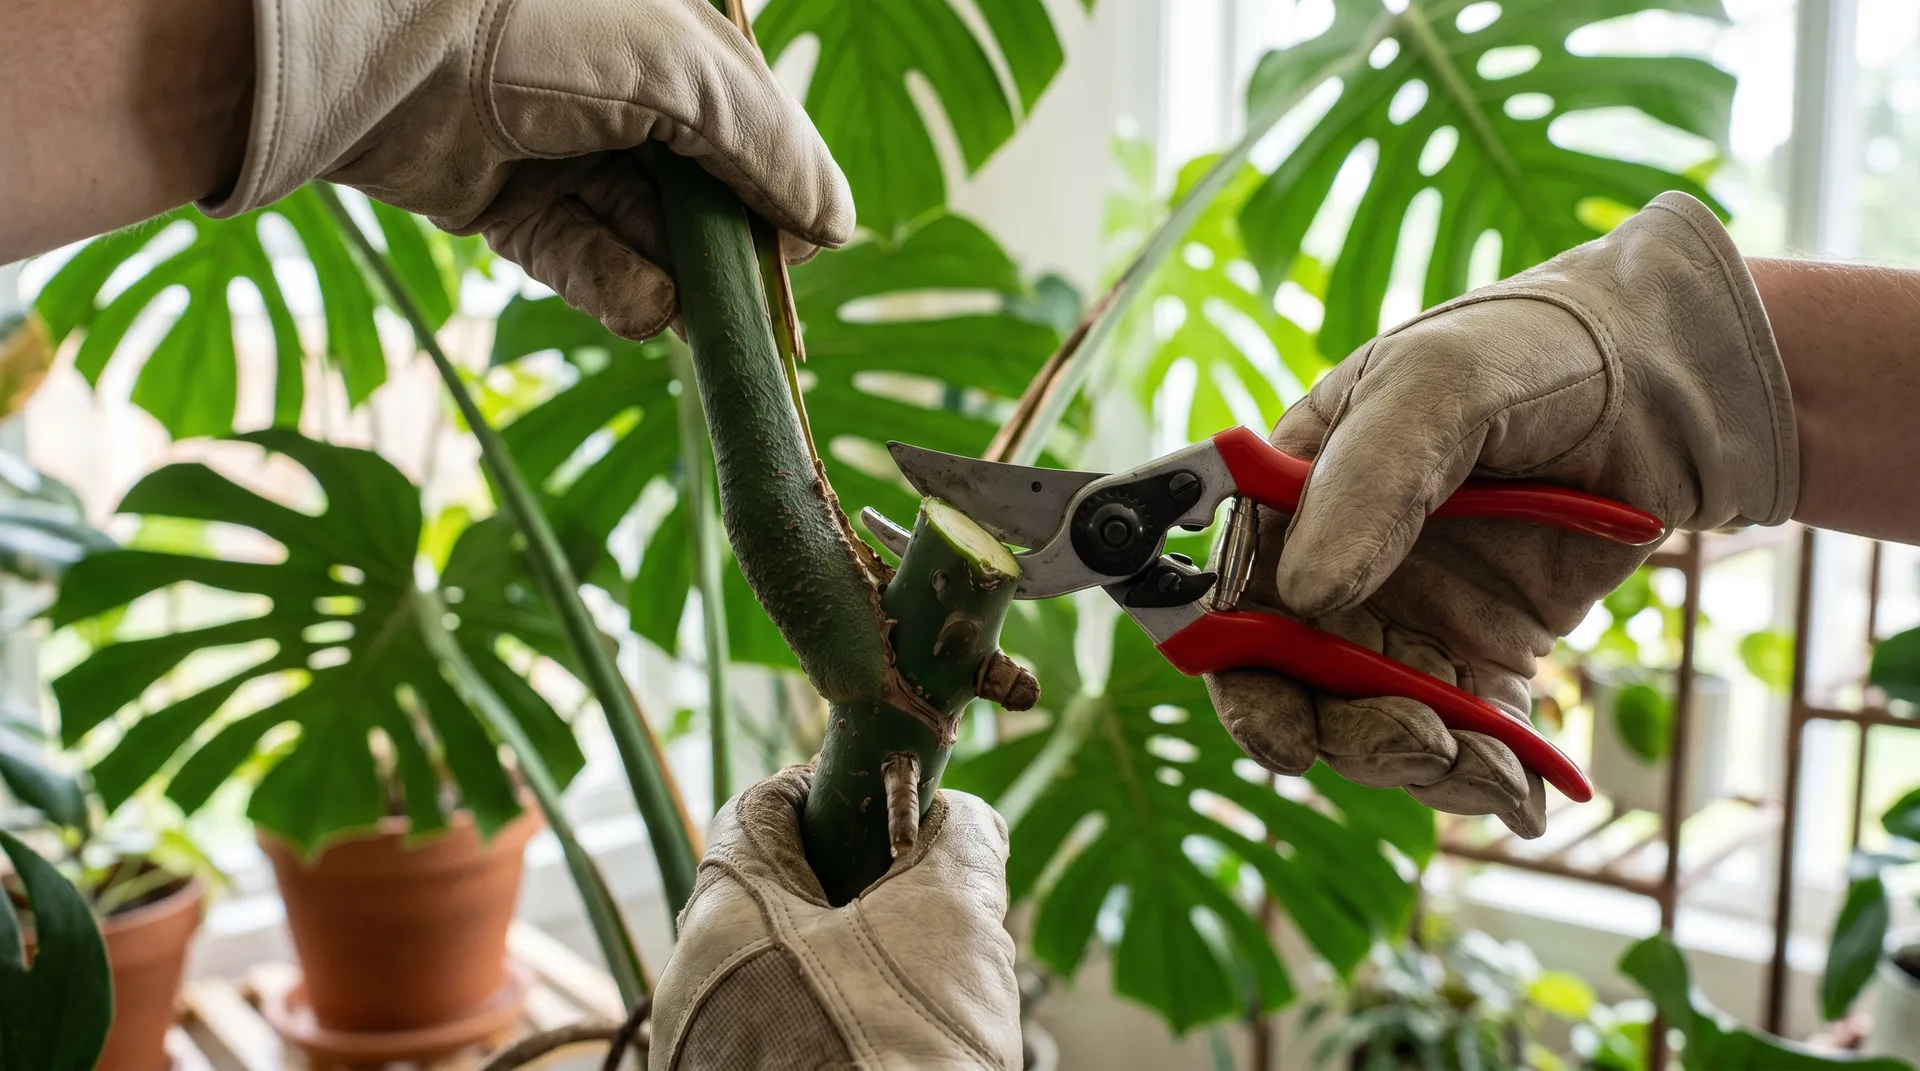
Image source: Bing (Web (fair-use with source credit))
Use sterilized pruning shears. Wipe the blades with 70 percent isopropyl alcohol between each cut. Cut the stem at the base, close to the main stalk.
Do not leave stubs. They rot and attract pests.
Remove every leaf with visible black spots. Yes, even the big beautiful ones. Our research shows that leaving infected leaves in place slows recovery by weeks.
The plant wastes energy trying to save dying tissue.
You can safely remove up to 30 percent of the foliage at once. If the damage is more severe, spread the pruning over two sessions a week apart.
Step 3: Adjust Your Watering Schedule (Yes, Right Now)
Stop watering immediately. Let the soil dry out completely. For most indoor environments, that means waiting 7 to 14 days depending on pot size and humidity.
After the soil is dry, reset your watering routine. Only water when the top two inches of soil are dry. Stick your finger in.
If it feels damp, wait. If it feels dry, water thoroughly until it drains from the bottom.
A moisture meter is a cheap investment that removes all guesswork. They cost around 10 to 15 dollars and last for years. The right equipment makes a big difference when you're setting up proper care.
Step 4: Apply the Right Treatment (Neem Oil vs. Copper Fungicide)
This depends entirely on what you found. Here's the breakdown.
For bacterial leaf spot. Use a copper fungicide. It's the only treatment proven to stop bacterial infections in houseplants. Follow the label instructions to the letter.
Apply every 7 to 14 days until no new spots appear.
For fungal infections. Neem oil works well as a preventative and mild treatment. For established infections, a fungicide labeled for ornamental plants is more effective.
For pest damage. Neem oil or insecticidal soap. Apply every 5 to 7 days for three weeks to break the pest life cycle.
For sunburn or physical damage. No treatment needed. Just remove the damaged leaves and adjust the environment.
Step 5: Improve Airflow and Light Without Making It Worse
Place a small fan nearby on low speed. Point it at the wall, not directly at the plant. Gentle air movement reduces humidity around the leaves and prevents fungal spores from settling.
Move the plant to bright indirect light. A north or east-facing window is ideal. If you only have south or west windows, pull the plant back 3 to 5 feet from the glass.
Direct sunlight on a stressed plant will cause more damage.
What NOT to Do: Common Mistakes That Kill Monsteras Faster
Let's talk about the traps people fall into. I've seen these mistakes over and over in plant communities. They're the difference between a plant that recovers and a plant that ends up in the compost bin.
Don't mist the leaves. Misting raises humidity around the foliage. That's exactly what bacteria and fungi need to spread. If you want higher humidity, use a humidifier placed a few feet away.
Don't repot into a bigger pot. A larger pot holds more soil. More soil stays wet longer. That's the opposite of what your monstera needs right now.
Use the same size pot or go slightly smaller.
Don't fertilize a sick plant. Fertilizer is salt. Salt pulls water out of roots. Damaged roots can't handle that stress.
Wait until you see new growth, then wait another two weeks.
Don't use home remedies. Cinnamon, hydrogen peroxide, milk, and baking soda are not reliable treatments for black spots. They can burn the leaves or alter the soil pH. Stick to products tested for ornamental plants.
Don't water on a schedule. Watering every Sunday is a recipe for root rot. Water when the soil tells you it's dry. That might be every 5 days in summer and every 14 days in winter.
Let the plant and the environment dictate the timing.
Neem Oil vs. Copper Fungicide: Which One Should You Use?

Image source: Bing (Web (fair-use with source credit))
These two products get confused all the time. They're not interchangeable. Here's a direct comparison.
| Factor | Neem Oil | Copper Fungicide |
|---|---|---|
| Best for | Prevention, mild fungal, pests | Active bacterial infection, established fungal |
| How it works | Smothers pests, disrupts fungal growth | Kills bacteria and fungi on contact |
| Application frequency | Every 5 to 7 days | Every 7 to 14 days |
| Safe for all plants | Yes, but test a leaf first | Yes, but can burn in direct sun |
| Shelf life | 1 to 2 years | 2 to 3 years |
| Cost per use | Low | Moderate |
Neem oil is best for prevention. Use it on healthy plants to keep pests and fungus away. It's also great for mild pest infestations like spider mites or aphids. It won't cure a serious bacterial infection.
Copper fungicide is best for treatment. Use it when you have active black spots with a yellow halo (bacterial) or concentric rings (fungal). It's a contact killer. It stops the infection from spreading.
But it won't reverse damage that's already done.
If you're unsure, start with neem oil. It's gentler. If you don't see improvement after two applications, switch to copper fungicide.
That's the safest approach for most home growers.
How to Prevent It from Happening Again (Long-Term Care Changes)
Once your monstera recovers, you want to keep it healthy. The same conditions that caused the black spots will cause them again if you don't change anything.
Water less frequently. This is the single biggest change most people need to make. Your monstera wants to dry out between waterings. In winter, that might mean watering once every two to three weeks.
Let the soil be your guide, not the calendar.
Improve drainage. Your potting mix should be chunky, not dense. A good aroid mix contains perlite, orchid bark, and coco coir. The water should flow through freely, not pool on top.
If it takes longer than 30 seconds for water to drain, your soil is too heavy.
Increase airflow. A stagnant room is a breeding ground for fungal spores. Open a window occasionally. Run a fan on low.
Give your plants space. Don't crowd them together.
Quarantine new plants. Every new plant you bring home should stay separate for at least two weeks. Watch for black spots, pests, or yellowing leaves before introducing it to your collection. This one habit saves more plants than any treatment.
Use the right light. Your monstera wants bright indirect light. Not direct sun. Not a dark corner.
A north or east-facing window is perfect. If you use a grow tent setup for indoor growing, make sure the light intensity is appropriate for aroids.
Real Scenarios: What Recovery Looks Like at 2 Weeks, 4 Weeks, and 2 Months
2 weeks. The black spots have stopped spreading. You might see some yellowing around the treated areas as the plant seals them off. No new spots appear on healthy leaves.
The soil is drying out properly. You're feeling hopeful.
4 weeks. The worst leaves have been pruned. New growth is emerging. The new leaves are clean, no spots.
The roots, if you checked them, are showing white tips. You can start a very light fertilization routine if you see active growth.
2 months. The plant looks full again. The scars from the old spots are fading or gone if you pruned heavily. The watering schedule is dialed in.
You know what to look for now. You're confident you can spot trouble early.
Not every plant recovers this fast. Some take three to four months, especially if root rot was severe. The key is consistency.
Stick to the new routine. Don't slack off once the plant looks good again. That's when most people relapse into overwatering.
FAQs: The Questions Every Monstera Owner Asks About Black Spots
Can black spots spread to my other plants?
Yes, if the cause is bacterial or fungal. Spores travel through the air and on water droplets. That's why quarantine is your first step.
Keep the affected plant separate for at least two weeks.
Should I cut off leaves with black spots?
Yes. Prune them with sterilized shears. The plant wastes energy trying to save damaged tissue.
Removing up to 30 percent of the foliage is safe and speeds recovery.
Will the black spots go away on their own?
No. Once a leaf develops black spots, that tissue is dead. It won't heal.
But pruning the leaf stops the problem from spreading. New growth will come in clean.
How often should I water my monstera?
Only when the top two inches of soil are dry. In summer, that might be every 7 to 10 days. In winter, every 14 to 21 days.
Use a moisture meter to remove the guesswork.
Can I use hydrogen peroxide for black spots?
No. It damages healthy root tissue and doesn't reliably kill the bacteria or fungus. Stick to neem oil for prevention and copper fungicide for active infections.
What to Do Now: A Simple Decision Guide for Your Specific Situation
If the spots are mushy with a yellow halo. Use copper fungicide. Prune affected leaves. Check the roots for rot.
Let the soil dry out completely.
If the spots are dry and crispy on the edges. Move the plant away from direct light. Prune the damaged leaves. No treatment needed.
If the spots are tiny black dots with webbing. Treat with neem oil every 5 to 7 days for three weeks. Wipe down every leaf. Increase humidity with a humidifier placed nearby.
If the spots are random with no pattern. Check for cold drafts or physical damage. Remove the damaged leaves. Keep the plant in a stable environment between 65 and 80 degrees Fahrenheit.
If you're still unsure. Start with the basics. Stop watering. Move the plant to bright indirect light.
Improve airflow. Wait one week and reassess. Most mild cases resolve on their own with these simple changes.