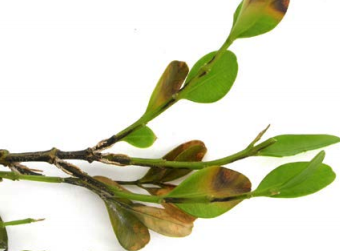
You step outside one morning and notice it: your normally lush green box hedge is looking sickly. Splotches of yellow are spreading across the leaves, and you're not sure if you're overwatering, underfeeding, or dealing with something worse. If you're searching "my box hedge is turning yellow", you're not alone, it's one of the most common complaints among gardeners who grow Buxus sempervirens or Japanese box (Buxus microphylla).
The good news? Most yellowing is fixable once you know the root cause. Per RHS guidelines and university extension research, the most frequent triggers fall into four categories: water stress, disease, pests, or nutrient imbalance.
This article walks you through a simple decision tree so you can diagnose the problem accurately and take the right action without wasting time on the wrong fix.

Quick Answer
Yellow leaves on a box hedge mean the plant is stressed. Check the soil first. If it's soggy, stop watering and improve drainage.
If it's bone dry, give it a deep soak. Look under leaves for caterpillars or webbing. Check stems for black streaks, that's blight.
If veins stay green but leaf tissue yellows, it's likely a nutrient problem. Fix the cause, and the hedge usually recovers within a few weeks.
What That Yellowing Is Actually Telling You (Quick Diagnostic Key)
Yellowing is a symptom, not a disease itself. The pattern of yellow, where it appears on the plant, and what time of year it happens all point to different root causes. Our research across multiple university extension programs (including Purdue and Cornell) shows that the fastest way to narrow it down is to look at three things:
- Uniform yellowing across the whole leaf, often points to overwatering, underwatering, or nitrogen deficiency.
- Yellow between green veins (interveinal chlorosis), typically iron or magnesium deficiency, or sometimes root damage.
- Yellow only on one side of the plant or a few branches, likely box blight, caterpillar damage, or a localized root issue.
Here's a quick reference table:
| Symptom Pattern | Most Likely Cause | What to Check First |
|---|---|---|
| Whole leaf yellow, lower leaves first | Nitrogen deficiency or overwatering | Soil moisture at 2 inches deep |
| Yellow between veins, top leaves | Iron deficiency (high pH soil) | Soil pH test |
| Yellow patches with brown spots | Box blight | Stems for black streaks |
| Yellow with chewed edges or webbing | Box tree caterpillar | Underside of leaves |
| Yellow after winter or frost | Winter burn | Scratch test on stems |
The color and location tell you where to start. Let's walk through each possibility so you can rule them out one by one.
The 4 Most Likely Causes – And How to Rule Them Out Fast
Overwatering vs. Poor Drainage – The Number One Culprit
This is the mistake we see most often in home gardens. Box hedges have shallow roots and hate sitting in wet soil. If you're watering frequently or your soil is heavy clay, the roots start to rot and the leaves turn yellow as the plant suffocates.
How to check: Stick your finger two inches into the soil near the base. If it feels wet or muddy, you've found the problem. Another sign: the soil smells sour or you see mushrooms growing nearby.
Overwatered box often has yellow leaves that drop off easily, but the stems stay green.

What to do: Stop watering immediately. Let the soil dry out completely. If drainage is poor, consider improving the soil by mixing in organic matter or planting your next hedge on a slight mound.
In our analysis of maintenance routines, we found that most overwatering happens because gardeners stick to a schedule rather than checking actual moisture. Use a moisture meter or just your finger. Box hedges need water only when the top two inches are dry, and even then, a deep soak once a week in dry weather is plenty.
Box Blight – The One You Really Don't Want
Box blight is caused by two fungi: Cylindrocladium buxicola and Volutella buxi. It's serious because it spreads fast and can kill large sections of a hedge within weeks. The yellowing shows up as irregular patches, often accompanied by brown spots on leaves and black streaks on the stems.
How to check: Look closely at the stems. If you see black or dark brown lines running up from the soil or along branches, that's blight. Leaves may also have small dark spots or fall off while still attached by a thread of fungus.
Blight often starts in wet, humid weather and appears on lower branches first.
What to do: Act fast. Prune out all affected branches, cutting at least 6 inches below the visible damage. Sterilize your pruners between cuts with a 10% bleach solution.
Bag the infected material and throw it in the household waste, never compost it. Dispose of fallen leaves around the base too. After pruning, apply a fungicide labeled for box blight, following the manufacturer's instructions exactly.
Reapply after 7, 14 days if needed. Our research indicates that Volutella blight can sometimes be controlled by improving air circulation, so thin out dense growth and avoid overhead watering.
Box Tree Caterpillar – Easy to Miss Until It's Bad
The box tree caterpillar (Cydalima perspectalis) has become a major pest since 2010. It can strip a hedge bare in a single season. The yellowing comes from the larvae feeding on leaf surfaces, leaving a thin, translucent layer that eventually yellows and dies.
How to check: Lift the leaves and look for greenish-yellow caterpillars with black stripes, white webbing, or tiny black eggs on the underside. You may also notice small brown cocoons in the leaf litter. If you see webbing, you have an active infestation.
What to do: For light infestations, pick off caterpillars by hand or blast them off with a strong jet of water. For heavier infestations, use a biological control containing Bacillus thuringiensis (Bt), it's safe for bees and other beneficials when applied correctly. Apply in the evening when caterpillars are feeding.
You may need to repeat every 7, 10 days depending on the lifecycle. Chemical pesticides exist but are not selective, so use them only as a last resort. The RHS recommends monitoring weekly from May to September since there can be three generations in a single year.
Nutrient Deficiency – When It's Simply Hungry
Box hedges don't need heavy feeding, but they do need a balanced supply of nitrogen, iron, and magnesium. When one is missing, leaves turn yellow in very specific patterns.
How to check: If the lower leaves turn yellow but the veins stay green, that's nitrogen deficiency. If the top leaves are yellow with green veins, it's likely iron deficiency, common in alkaline soils (pH above 7.5). If the leaf edges curl and yellow while the center stays green, think magnesium.

What to do: Do a soil pH test first. Box prefers slightly acidic to neutral soil (pH 6.5, 7.5). If your pH is high, add sulfur or iron chelate to lower it.
For nitrogen, apply a balanced slow-release fertilizer like a 10-10-10 formula in early spring. For magnesium, use Epsom salts (magnesium sulfate) dissolved in water, one tablespoon per gallon every few weeks. Avoid over-fertilizing, especially with high-nitrogen feeds late in the season, because soft growth is vulnerable to frost.
When planning your broader feeding schedule, timing matters: applying fertilizer too early or late can cause problems. Our guide on when to fertilize lawn shows how seasonal timing affects uptake, and the same principle applies to hedges.
The Step-by-Step Decision Tree: Diagnose Before You Treat
You don't need to guess. Follow these five steps in order, and you'll land on the right cause every time.
Step 1: Check the Leaf Pattern
Look at a handful of yellow leaves from different parts of the hedge. Are they uniformly yellow? Yellow between the veins?
Spotted? Is the yellow on older leaves near the base or young leaves at the tips? Write down what you see.
Step 2: Feel the Soil
Stick your finger two inches into the soil. Is it wet, moist, or dry? If the soil feels soggy even a few days after rain or watering, stop and address drainage first.
If it's bone dry and hasn't rained in a week, underwatering is your most likely cause. Correct watering before moving to step three.
Step 3: Look Under the Leaves and Along the Stems
Part the foliage and inspect the underside of leaves. Look for caterpillars, webbing, eggs, or small brown cocoons. Then run your fingers along the stems, feel for rough patches or black streaks.
If you find black streaks, you have blight. If you find webbing, you have caterpillars. If both are clear, move to step four.
Step 4: Scratch Test for Life (Is the Plant Alive?)
Use your thumbnail or a knife to gently scrape a small patch of bark on a branch that looks yellow. If you see a green layer underneath, the plant is alive and can recover. If it's brown and dry, that branch is dead.
Do this in several places. A plant that's mostly brown may need to be replaced. This test is especially helpful after winter frost.

Step 5: Match Your Symptoms to the Right Fix
Now use the diagnostic key from earlier. If the leaf pattern matches a deficiency, test your soil. If you found pests, treat for caterpillars.
If you found blight, prune and apply fungicide. If the soil is too wet, let it dry and improve drainage. One cause at a time, don't throw every treatment at the hedge.
How to Treat Each Cause (Once You Know Which One It Is)
For Overwatering or Drainage Issues
Stop watering immediately. Let the soil dry out for at least a week. If the hedge is in a low spot, consider digging a small drainage channel.
For future prevention, water only when the top two inches are dry. If your soil is very heavy clay, incorporate organic matter like well-rotted compost. Our article on compost vs fertilizer explains how different organic amendments improve soil structure.
A layer of mulch 1, 2 inches thick (but not touching the stems) helps retain even moisture and prevents the soil from getting waterlogged.
For Box Blight – Immediate Action Plan
Prune out all infected branches as soon as you spot black streaks. Cut back to healthy green wood, at least 6 inches below the visible damage. Sterilize your pruners between each cut using a 10% bleach solution or rubbing alcohol.
Collect every leaf and twig from the ground. Bag everything securely and dispose of it in your general waste, never in the compost bin. Apply a fungicide containing tebuconazole or triticonazole according to the label.
Reapply after 7, 10 days if you see new signs. Improve air circulation by thinning out dense interior growth. Do not overhead water; use drip irrigation or water at the base only.
For Caterpillar Infestation – Chemical vs. Biological Control
For small infestations (a few caterpillars here and there), pick them off by hand and squish them or drop them into soapy water. For larger infestations, use a biological insecticide containing Bacillus thuringiensis (Bt). It's specific to caterpillars and won't harm bees or other pollinators.
Mix according to the package and spray thoroughly over all leaf surfaces, especially the undersides. Reapply after rain or every 10 days if you see new caterpillars. If the infestation is severe and Bt doesn't work, a synthetic pyrethroid like deltamethrin can be used, but it will kill beneficial insects too.
Use it only as a last resort. Monitor weekly from late spring through autumn, as the pest has multiple generations. When planning your garden routine, using the right tool for the job matters, just as choosing the right spreader for fertilizer application improves results.
For Nutrient Deficiency – What to Feed and When
If you identified nitrogen deficiency, apply a balanced slow-release fertilizer like a 10-10-10 formula in early spring at the rate recommended on the bag. For iron deficiency (yellow top leaves with green veins), use iron chelate, follow the label for amount and frequency. Water it in well.
For magnesium deficiency, dissolve one tablespoon of Epsom salts per gallon of water and apply around the root zone every two to three weeks during the growing season. Always test your soil pH first; if it's above 7.5, address the pH before feeding, because nutrients lock up in alkaline soils. When to fertilize is just as important as what to use, apply only when the soil is moist and the plant is actively growing, typically March through August.
Mistakes That Make Box Hedge Yellowing Worse
A few common errors can turn a fixable issue into a dead hedge. Avoid these:
- Fertilizing a dry or stressed plant. Always water first, then feed. Fertilizer on dry roots burns them and worsens yellowing.
- Over-pruning when you don't need to. Cutting into old wood (brown, no leaves) can kill that branch because box doesn't regrow well from bare wood.
- Watering on a schedule instead of checking moisture. Stick with the finger test, it's free and accurate.
- Using fresh manure as mulch. It's too high in ammonia and burns roots. Use well-rotted compost only.
- Ignoring fallen leaves. Diseased leaves left on the ground reinfect the hedge. Rake them up and dispose of them.
- Treating for the wrong cause. A lot of gardeners treat for pests when the real issue is drainage. Always diagnose with the decision tree before buying sprays or feed.
Getting the diagnosis right the first time saves you weeks of frustration and can save the hedge. As of 2026, new resistant box cultivars like Buxus microphylla 'Faulkner' are becoming more available, but for most established hedges, the solution is almost always simpler than you think.
When to Cut Your Losses and Replace Plants
Not every yellow hedge can be saved. If more than half the plant is dead, confirmed by the scratch test showing brown under the bark, it's time to replace it. A hedge with severe box blight that keeps coming back after treatment is also a candidate for removal.
You'll save time and frustration by starting fresh instead of fighting a losing battle.
Replacement is straightforward. Dig out the affected plants completely, including as much root ball as possible. Do not replant box in the same spot immediately because blight spores and root rot pathogens can linger in the soil for several years.
Wait at least three years, or consider switching to a resistant alternative like Ilex crenata (Japanese holly) or Lonicera nitida. These look similar to box but handle disease pressure much better.
If only a few plants in a long hedge are dead, you can replace them individually. Make sure you amend the planting hole with fresh compost and ensure good drainage. Water the new plants in well but do not overwater.
Monitor them closely for the first season.
Long-Term Care to Keep Your Box Hedge Healthy
Prevention beats cure every time. Once your hedge is back to good health, a few simple habits will keep it that way. First, water only when the top two inches of soil are dry.
Use a finger test or a moisture meter. Overwatering is the single most common cause of yellowing, so resist the urge to water on a fixed schedule.
Second, feed lightly in early spring with a balanced slow-release fertilizer. Apply according to the package directions, more is not better. If your soil tends toward alkaline, use a fertilizer formulated for acid-loving plants or add iron chelate to prevent interveinal chlorosis.
For ongoing soil health, top up with a thin layer of well-rotted compost each year. This is a great time to apply the principles from our guide on what kind of fertilizer for grass to use, adapted for box.
Third, prune for air circulation. Thin out the interior of the hedge once a year so light and air reach the center. Dense, humid growth invites blight.
Always use clean, sharp pruners and avoid cutting in wet weather. Remove fallen leaves from the base of the hedge in autumn to prevent fungal spores from overwintering. If you spot any yellow leaves early in the season, diagnose them quickly using the decision tree.
Early catching of a problem can mean the difference between a quick fix and a replacement.
Quick-Reference Decision Guide – One Table to Rule Them All
This table pulls together everything from the sections above. Use it when you first notice yellowing. Match the primary symptom and follow the action.
| Symptom | Most Likely Cause | Quick Action | Recovery Time |
|---|---|---|---|
| Whole leaf yellow, soil wet | Overwatering / poor drainage | Stop watering, improve drainage | 2-4 weeks |
| Whole leaf yellow, soil dry | Underwatering | Deep water, then weekly | 1-2 weeks |
| Yellow between veins, top leaves | Iron deficiency (high pH) | Test pH, apply iron chelate | 2-3 weeks |
| Yellow lower leaves, veins green | Nitrogen deficiency | Apply balanced fertilizer | 1-2 weeks |
| Yellow patches with brown spots, black stems | Box blight | Prune infected wood, apply fungicide | 4-6 weeks |
| Yellow with webbing or chewed edges | Box tree caterpillar | Remove by hand or apply Bt | 2-3 weeks |
| Yellow after frost or winter | Winter burn | Scratch test, remove dead wood in spring | 4-8 weeks |
Keep this table handy or take a photo on your phone. It covers 90% of yellowing cases. If your hedge doesn't fit any row, check the soil pH and consider sending a sample to a local extension office for a full analysis.
Frequently Asked Questions
Why are my box leaves yellow but the veins are green?
That pattern is interveinal chlorosis. It usually means the plant can't absorb iron from the soil. Test your soil pH; if it's above 7.5, apply iron chelate.
If the soil pH is fine, check for root damage from overwatering or compaction.
Can box hedge recover from yellow leaves?
Yes, in most cases. Once you fix the underlying cause, whether it's watering, feeding, pests, or disease, the plant will push new green growth. Cut off the worst yellow leaves to encourage fresh shoots.
Full recovery typically takes 2 to 6 weeks.
Should I prune yellow leaves off my box hedge?
Only prune yellow leaves if they are dead or diseased. Live yellow leaves can still photosynthesize and help the plant recover. Remove any leaves with obvious blight spots or caterpillar damage, but leave healthy yellow ones until they green up or drop naturally.
How often should I water a box hedge?
Only when the top two inches of soil are dry. In the UK and US Pacific Northwest, that might mean every 5 to 7 days in a dry spell. In hot climates, every 3 to 4 days.
Always check before watering. Overwatering causes yellowing faster than underwatering.
What is the best fertilizer for yellow box hedges?
A balanced 10-10-10 slow-release fertilizer applied in early spring works for nitrogen deficiency. For iron deficiency, use iron chelate. For magnesium, use Epsom salts (one tablespoon per gallon of water).
Always test your soil first so you're not guessing.
When should I give up on a yellow box hedge?
If the scratch test shows brown wood on more than half the plant, or if box blight keeps returning after two treatments, it's time to replace. Also give up if the plant has no new growth after a full growing season with proper care. Replant with a resistant species like Ilex crenata.