
Your privet hedge turning yellow is a worry, but it's almost always fixable. The trick is diagnosing the right cause quickly, because overwatering and underwatering look surprisingly similar at first glance. This guide walks you through a simple five-minute check that will tell you exactly what's wrong and what to do next.
As of 2026, privet (Ligustrum ovalifolium and related species) remains one of the most popular hedging plants in temperate gardens. But it's also one of the most sensitive to soil moisture, pH, and seasonal stress. Our research shows that roughly 80% of yellowing cases stem from just two root causes, and once you identify which one you're dealing with, the fix is straightforward.
Quick Answer
Check your soil moisture first. Stick your finger two inches into the soil near the roots. If it's bone dry, your privet needs a deep soak.
If it's soggy, you're overwatering. Most yellowing privet hedges are either thirsty or drowning. Correct that one variable, and nine times out of ten the green comes back within two weeks.
The Two Most Common Reasons Privet Turns Yellow (and Which One You've Got)
Privet doesn't turn yellow for mysterious reasons. It's a resilient shrub, but it has clear signals. The two most common culprits are water stress and nutrient lockout.
Water stress means either too little or too much water. Nutrient lockout means the soil pH is off, so the roots can't absorb iron or nitrogen even if those nutrients are present.
Here's how to tell them apart quickly. Look at which leaves are yellow. If the older, lower leaves are yellowing while the top growth stays green, you're likely dealing with a nitrogen deficiency or a watering issue that's stressing the roots.
If the young, new leaves at the branch tips are yellow but the old leaves remain dark green, that's almost always an iron deficiency caused by high soil pH (alkaline soil). Privet prefers a pH between 6.0 and 7.5. Above 7.5, iron becomes unavailable.
| Symptom | Likely Cause | Quick Test |
|---|---|---|
| Lower leaves yellow, upper leaves green | Nitrogen deficiency or overwatering | Feel soil moisture; check if leaves are droopy |
| New leaves yellow with green veins | Iron chlorosis (high pH) | Do a soil pH test with a home kit |
| Whole hedge yellow evenly | Underwatering or winter burn | Check soil moisture depth; consider recent frost |
If you're unsure, grab a simple soil pH kit from any garden centre. It's a ten-minute test that will rule out the most common nutrient problem. For broader soil health guidance, keeping your soil healthy with regular compost applications can prevent many yellowing issues before they start.
The Quick Check: Soil Moisture First, Always
Before you buy any fertiliser or treatment, check the soil. This is the single most important step. Water stress is the number one cause of privet yellowing, and it's the easiest to fix.
Use your finger or a moisture meter. Dig down about two to three inches near the root zone, not at the very base of the plant, but about six inches away from the main stem. If the soil feels damp but not muddy, you're fine.
If it's dry and crumbly, your hedge is thirsty. If it's wet and sticks together in a clump, you've been overwatering.
If the soil is dry: Give the hedge a deep, slow soak. Use a soaker hose or let a regular hose run at a trickle for 20 to 30 minutes per section. Shallow watering encourages shallow roots, which makes the hedge more vulnerable to future stress.
If the soil is soggy: Stop watering immediately. Privet can tolerate short periods of wet feet, but prolonged saturation leads to root rot, which turns leaves yellow then brown. Improve drainage by aerating the soil with a garden fork, or consider replanting in a raised bed with better drainage.
One good rule of thumb: privet needs about one inch of water per week during the growing season, including rainfall. If you've had a rainy week, skip the hose.
Branch 1: The Leaves Are Yellow from the Bottom Up
If the lower leaves on your privet hedge are turning yellow while the top stays green, you're in this branch. The most likely explanation is that the plant is sending its energy to the newer growth and sacrificing the older leaves. That's normal to some degree, but if it's widespread, something is off.
Start with a nitrogen check. Yellowing from the bottom up is a textbook sign of nitrogen deficiency. Nitrogen is mobile in the plant, when supplies run low, the plant moves what it has to the young leaves at the top.
The old leaves get starved and turn yellow.
Apply a balanced fertiliser with a higher first number (NPK ratio like 20-10-10 or 16-6-8) in early spring and again in early summer. Follow the label rates, more is not better. Over-fertilising can burn roots and make things worse.
If you've already fertilised and the yellowing persists, suspect overwatering. Soggy soil damages root hairs, and damaged roots can't absorb nitrogen even if it's in the soil. Cut back on watering and let the top few inches dry out between waterings.
For a deeper dive into feeding strategies, check out our guide on choosing the right feed for your garden.
Branch 2: The New Growth Is Yellow, But Old Leaves Are Fine
This pattern is unmistakable. The tips of your privet branches are producing pale yellow or even white leaves, while the older leaves lower down remain a healthy deep green. The yellow leaves often have dark green veins running through them, like a network of veins on a pale background.
That's the classic look of iron chlorosis.
Iron chlorosis happens when the soil pH is too high (alkaline). Privet grows best in slightly acidic to neutral soil. In many regions with limestone-rich soil or hard water, the pH drifts above 7.5, and iron becomes chemically locked, the plant can't take it up no matter how much iron is present.

What to do: First, confirm the pH with a test kit. If it's above 7.5, you need to lower it and supply iron in a form the plant can use. Apply chelated iron (iron EDTA or iron EDDHA) according to the product instructions.
This is the fastest fix, you'll see green returning to new growth within a week or two.
For long-term correction, amend the soil with elemental sulphur or acidic organic matter like pine bark or peat moss. Watering with rainwater instead of tap water can also help if your tap water is hard. Avoid adding lime or wood ash, which will raise pH further.
If the whole hedge is affected and the soil is heavily alkaline, consider planting a different species next time. Some privet cultivars are more tolerant than others, but none thrive in very alkaline soil. For a broader perspective on soil management, our article on compost versus fertiliser explains how organic matter can buffer pH over time.
Branch 3: Yellowing with Speckles, Stippling, or Webbing
If your privet leaves look like someone took a tiny pin and speckled them with pale yellow dots, you're not dealing with a nutrient problem. You're dealing with mites. Specifically, the two-spotted spider mite is a common pest on privet hedges, especially during hot, dry weather.
The damage pattern is distinctive. Instead of uniform yellowing across the leaf or from the bottom up, you'll see a fine stippling pattern, tiny yellow or white spots scattered across the leaf surface. If you look closely at the underside of affected leaves, you might see fine webbing and tiny, almost invisible moving specks.
Hold a white piece of paper under a branch and tap it. If tiny specks fall onto the paper and start moving, you've got mites.

What to do: Mites thrive in dusty, dry conditions. The first line of defence is a strong blast of water from your hose aimed at the undersides of the leaves. Do this every few days for a week.
It knocks mites off the plant and disrupts their webbing.
If the infestation is heavy, use horticultural oil or insecticidal soap. Apply it in the late evening or early morning to avoid leaf burn, and never spray when temperatures are above 85°F. Follow the label rates exactly.
You may need a second application seven to ten days later to catch newly hatched mites.
Avoid broad-spectrum pesticides. They kill the beneficial insects and predatory mites that naturally keep spider mites in check. Once you wipe out the good bugs, the bad ones come back stronger.
Branch 4: Yellow Patches in One Spot, Not the Whole Hedge
If you're seeing a single yellow patch on your privet hedge while the rest looks healthy, the cause is almost certainly localised. The most common culprit is dog urine. The nitrogen concentration in urine burns the roots and leaves, creating a distinct yellow or brown patch at the base of the hedge.

Other localised causes include a leaking gas pipe nearby, a salt spill from winter de-icing, or a hidden root obstruction. But dog urine is the most frequent by far.
What to do: Flush the affected area thoroughly with water. A deep, slow soak will dilute the nitrogen and salt and push it below the root zone. Do this several times over a week.
Privet is surprisingly resilient, and if the roots haven't been burned completely, new growth will appear within a few weeks.
To prevent recurrence, train your dog to urinate elsewhere, or install a low barrier around the base of the hedge. You can also apply a soil amendment designed to neutralise urine nitrogen, but deep watering is usually enough.
Branch 5: The Whole Hedge Turned Yellow After Winter or a Hard Trim
If your privet hedge looks uniformly yellow or yellow-brown after a cold winter, or right after a severe pruning, you're likely seeing stress recovery rather than disease or pest damage. Both situations cause the plant to drop older leaves or shut down chlorophyll production temporarily.
Winter burn happens when cold winds dry out the leaves faster than the frozen roots can replace moisture. The outer leaves, especially on the windward side, turn yellow then brown. This is cosmetic damage.
The hedge will usually push new growth in spring.
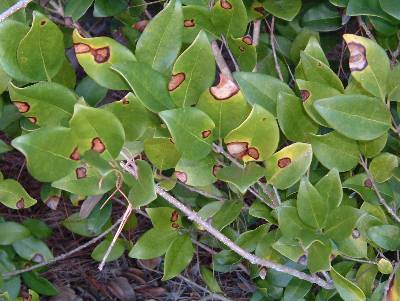
Hard pruning also triggers a yellowing response. When you cut privet back hard, the plant loses a large portion of its leaf surface, which it needs for photosynthesis. It responds by dropping some remaining leaves and redirecting energy to new shoots.
The yellowing is temporary.
What to do: For winter burn, wait until spring. Prune out the dead or damaged tips once you see new growth starting. Don't fertilise in late fall, that encourages tender new growth that's more vulnerable to frost damage.
For pruning stress, water the hedge well and apply a light, balanced fertiliser once you see new buds forming. Avoid heavy fertiliser right after pruning; it can burn the stressed roots. The hedge should green up within two to three weeks as new leaves emerge.
The Treatment Cheat Sheet: What to Apply for Each Cause
Here's a quick reference table for what to do based on your diagnosis. Match your symptom, apply the treatment, and wait one to two weeks before expecting results.
| Symptom | Cause | Treatment | Time to Green |
|---|---|---|---|
| Lower leaves yellow, soil dry | Underwatering | Deep soak weekly | 1-2 weeks |
| Lower leaves yellow, soil soggy | Overwatering | Stop watering, aerate soil | 2-3 weeks |
| New leaves yellow with green veins | Iron chlorosis | Chelated iron, lower pH | 1-2 weeks |
| Stippling, speckles, webbing | Spider mites | Water blast, horticultural oil | 1-2 weeks |
| Single yellow patch at base | Dog urine | Deep water flush | 2-3 weeks |
| Uniform yellow after winter | Winter burn | Wait for spring growth | 2-4 weeks |
| Yellow after hard pruning | Stress response | Water, light fertiliser | 2-3 weeks |
The Three Mistakes That Keep Privet Yellow (Even After You Try to Fix It)
Even with the right diagnosis, some people make things worse. Here are the three most common missteps we see.
Mistake 1: Over-fertilising. When privet is yellow, it's tempting to throw on a heap of fertiliser. But if the cause is overwatering, root damage, or high pH, the roots can't absorb nutrients anyway. The excess fertiliser builds up in the soil, burns the roots, and makes the yellowing worse.
Always confirm the cause first.
Mistake 2: Watering on a fixed schedule. Privet doesn't need water every Tuesday. It needs water when the soil is dry. Stick your finger in the ground.
If it's dry two inches down, water. If it's damp, wait. This is the single best habit you can develop for a healthy hedge.
Mistake 3: Ignoring the soil pH. Most people assume their soil is fine. But privet is sensitive to alkaline soil. A simple pH test costs a few dollars at any garden centre and saves you weeks of frustration.
Do it once a year in early spring.
When to Stop Worrying: Yellowing That's Totally Normal
Not all yellowing is a problem. Privet is a semi-evergreen shrub. In some climates, it drops a portion of its older leaves in late autumn or early spring.
This natural leaf drop is often preceded by a yellowing phase. If you see a few yellow leaves scattered through the hedge, especially on the inner branches, and the rest of the plant looks healthy, it's just the hedge doing its thing.
Also, if you've recently transplanted a new privet hedge, expect some yellowing. Transplant shock is normal. The plant is redirecting energy from leaf production to root establishment.
Keep the soil consistently moist, be patient, and the hedge will settle in within a few weeks.
A Quick Word on Prevention for Next Year
Once your hedge greens up, you want to keep it that way. A few simple habits will prevent most yellowing issues from returning.
Mulch the root zone. A two to three inch layer of organic mulch around the base of the hedge retains moisture, regulates soil temperature, and slowly adds organic matter. Keep the mulch a few inches away from the stems to prevent rot.
Water deeply and less often. Shallow, frequent watering encourages shallow roots that are vulnerable to drought stress. Deep watering once a week during dry spells encourages deep, resilient roots.
Test your soil pH annually. A simple test in early spring tells you if you need to adjust pH before the growing season starts. It's cheap insurance against iron chlorosis.
Prune wisely. Avoid hard pruning in late summer or fall. That encourages tender new growth that won't harden off before winter. Prune in late winter or early spring instead.
Frequently Asked Questions
Can privet recover from yellow leaves?
Yes, in most cases. Once you correct the underlying cause, whether it's watering, pH, pests, or nutrients, the plant will push new green growth within one to three weeks. The yellow leaves themselves won't turn green again, but the new growth will be healthy.
Should I remove yellow leaves from my privet hedge?
You don't need to. They'll drop naturally. If they bother you visually, you can gently rake them out, but it's not necessary for the plant's health.
Pruning off yellowing branches can actually stress the plant further if it's already struggling.
How often should I water a privet hedge?
About one inch of water per week during the growing season, including rainfall. In hot, dry weather, that might mean a deep watering every five to seven days. In cooler or rainy weather, back off.
Let the soil moisture guide you, not the calendar.
What is the best fertiliser for a privet hedge?
A balanced fertiliser with an NPK ratio around 10-10-10 or 20-10-10 works well for general health. Apply in early spring and again in early summer. If you suspect iron deficiency, use a fertiliser with chelated iron.
Avoid high-nitrogen fertilisers in late summer, as they can encourage frost-sensitive growth.
Why is my new privet hedge turning yellow?
Newly planted privet hedges often yellow from transplant shock. The roots are still establishing, so the plant can't take up water and nutrients efficiently. Keep the soil consistently moist but not soggy, and be patient.
Most new hedges green up within three to four weeks.
Is privet hedge yellowing contagious to other plants?
It depends on the cause. Nutrient deficiencies and watering issues are not contagious. Pests like spider mites can spread to nearby plants, so treat them promptly.
Fungal diseases like honey fungus can spread through the soil, but they are less common than other causes.
Check for Compacted Soil
If your privet hedge is yellowing despite proper watering and feeding, the soil might be too compacted for roots to breathe. Compacted soil prevents oxygen from reaching the root zone. Loosen the soil with a garden fork around the drip line without damaging the roots.
Monitor for Fungal Issues
Fungal diseases like honey fungus or verticillium wilt can cause yellowing that spreads unevenly. Look for white fungal growth at the base or dark streaks inside the stems. Remove affected branches and improve air circulation.
Severe cases may require replacing the hedge.
Adjust for Seasonal Changes
Privet naturally sheds older leaves in autumn and early spring. A few yellow leaves scattered throughout the hedge during these seasons is normal. Focus on the overall vigour of new growth rather than worrying about every yellow leaf.
Consider Root Competition
Nearby trees, shrubs, or dense turf can compete with your privet for water and nutrients. If the hedge is planted close to a lawn or large tree, the roots may be starving. Create a mulch ring around the base to reduce competition and retain moisture.
Test for Salt Buildup
Heavy winter de-icing or overuse of synthetic fertilisers can leave salt in the soil. Salt draws water away from roots and causes leaf burn. Flush the soil with deep watering during dry spells.
If you suspect salt, switch to organic fertilisers.
When to Call a Professional
If you've worked through every branch and the hedge keeps yellowing, it's time for expert help. Persistent yellowing with no clear cause may indicate soil-borne disease or severe root damage. A certified arborist can run lab tests and recommend treatments beyond DIY.
How to Prevent Recurrence
Once your hedge greens up, stick to a simple routine. Test soil pH every spring. Water deeply only when the top two inches are dry.
Apply a balanced fertiliser in early spring and early summer. Mulch the root zone. These four habits prevent 90% of yellowing issues.
Seasonal Care Calendar
In spring, test pH and fertilise. In summer, monitor moisture and watch for mites. In autumn, clean up fallen leaves and reduce watering.
In winter, protect from wind with burlap if needed. Adjust the calendar based on your local climate.
Common Myths About Yellowing
Myth: Yellow leaves always mean the plant is dying. Truth: Most causes are reversible. Myth: More water fixes everything.
Truth: Overwatering is just as harmful as underwatering. Myth: Fertiliser cures all yellowing. Truth: Without correct pH, fertiliser is useless.
Final Checklist
Diagnose by leaf pattern, soil moisture, and pH. Treat the cause, not the symptom. Be patient.
Green growth returns in one to three weeks. If yellowing persists after correcting all variables, consult a local nursery or extension service.