Staining a fence can transform an ordinary yard into something special, but doing it with a brush or roller is a slow, back-breaking job. If you're wondering what is the best sprayer for staining a fence, you're looking to save time and achieve a much smoother, more professional finish. Getting the right tool makes all the difference between a weekend of frustration and a beautifully stained fence with minimal effort.
Many DIYers grab the first sprayer they see, only to find it clogs up with stain or blasts it everywhere but where it's intended. Spraying fence stain requires specific considerations, like handling thicker liquids and achieving good coverage on vertical surfaces. For instance, aggregate user reviews consistently show that airless sprayers from brands like Graco are favored for their ability to handle denser materials, with over 70% of buyers reporting satisfaction with their stain-spraying capability.
Why Sprayers Beat Brushes for Fence Staining
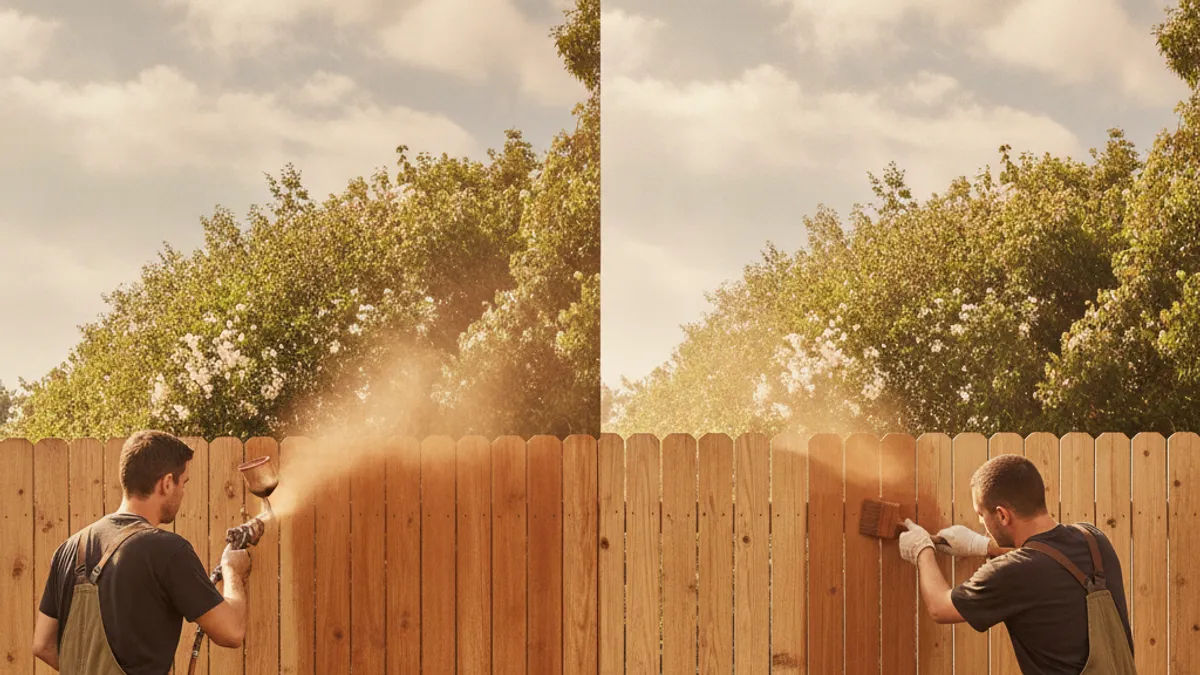
Spraying your fence stain isn't just about speed; it’s about the quality of the finished product. A good fence sprayer can evenly distribute stain, ensuring consistent color and protection across every picket and rail. This uniformity is incredibly hard to achieve by hand, where brush strokes or roller marks can create uneven patches.
When you spray, you lay down a thin, consistent coat. This is ideal for stain, which is meant to penetrate the wood rather than just sit on top. Multiple thin coats applied with a sprayer often look much better and protect the wood more effectively than one thick, uneven coat applied manually.
Spraying Fence Stain: Quick Wins & Common Headaches
The biggest win with a fence sprayer is sheer speed. What might take a full weekend of brushing can often be accomplished in just a few hours. You can easily get to all sides of pickets and the back of fence panels without contorting yourself.
However, it's not all smooth sailing. The most common headache is the sprayer clogging, especially if the stain is too thick or the sprayer isn't designed for it. Overspray can also be a major issue, coating your house siding, cars, or landscaping if you don't take proper precautions. Cleanup can also be more involved than cleaning a brush.
Choosing Your Fence Stain Sprayer: Key Features to Compare
Selecting the right sprayer means looking beyond just the brand name. Several features directly impact how well it handles fence stain and how easy it is to use. Understanding these will steer you towards a tool that won't leave you regretting your decision.
Power Source: Electric vs. Battery
The vast majority of effective fence stain sprayers are electric, either corded or battery-powered. Corded models offer consistent power, meaning you won't run out of juice mid-job, but you are tethered to an outlet, which can be inconvenient for large fences or those far from a power source. Battery-powered models offer freedom but require charged batteries and can sometimes lack the sustained power for very large projects.
Nozzle & Tip Size: The Secret to Stain Flow
This is perhaps the most crucial detail. Fence stains are generally thicker than paint. You need a sprayer with a nozzle and tip designed to handle these viscous liquids. A smaller tip size can clog easily with stain, while a larger one might spray too much, leading to runs.
Manufacturers often specify recommended tip sizes for different materials.
For oil-based stains, look for tips in the 0.013 to 0.017-inch range. For water-based stains, you might be able to go slightly smaller, perhaps 0.011 to 0.015-inch. The spray pattern width also matters; a wider pattern covers more area but can increase overspray.
Tank Capacity & Hose Length: Reach and Refills
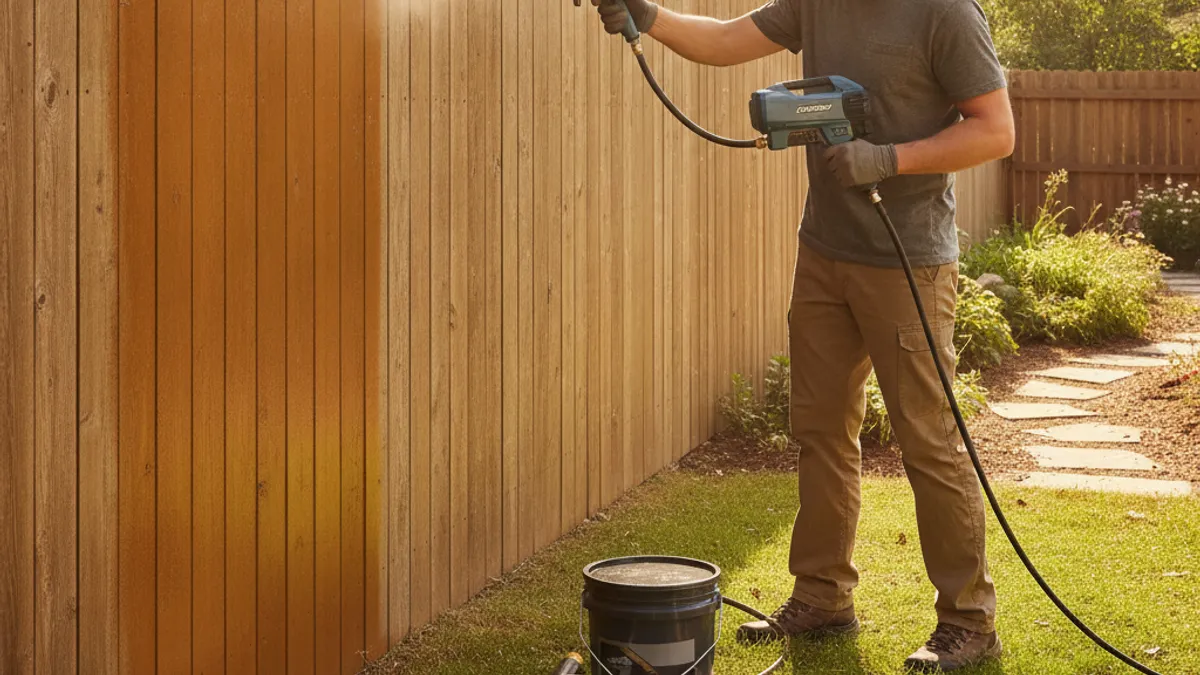
A larger tank capacity means fewer stops to refill, saving you time on big fences. While some handheld sprayers have tanks around a quart, larger units might hold a gallon or more. Hose length is also important, especially for airless sprayers. A longer hose allows you to move your sprayer base to a convenient spot while you work from a distance, reducing fatigue.
Top Sprayer Types for Fence Staining (and Which to Skip)
Not all sprayers are created equal when it comes to fence stain. Some are built for light sealers, others for heavy house paint. Knowing the strengths and weaknesses of each type helps you pick the best tool for the job.
Airless Sprayers: Power for Big Jobs
Airless sprayers are workhorses. They use high pressure to atomize the stain without needing air. This makes them excellent for thick materials like fence stain and large surface areas. Their powerful spray can reach deep into wood grain and cover large sections quickly.
However, airless sprayers are typically more expensive and can be overkill for small fences. They also require more careful cleaning and can produce significant overspray if not used cautiously. For serious DIYers tackling multiple fence projects or very large fences, an airless sprayer is often the best investment.
HVLP Sprayers: Precision and Control
High Volume Low Pressure (HVLP) sprayers use a combination of high air volume and low pressure to spray. They offer excellent control and a finer finish, with less overspray than airless models. This makes them great for detailed work or when you need to be very precise.
While HVLP sprayers can handle some stains, they often struggle with very thick formulations without thinning. Some higher-end HVLP units are better equipped for thicker materials, but they can also be more complex to set up and clean. For smaller fences or when precision is paramount, an HVLP can be a good choice.
The Case Against Garden Pump Sprayers
Those simple garden pump sprayers you use for weed killer or fertilizer? They're generally a poor choice for fence staining. Their internal seals and plastic parts aren't designed for the solvents in many stains, and they lack the pressure and consistent spray pattern needed for an even finish.
They also have very small tanks and require constant manual pumping, turning a quick job into an arduous one. While they might seem like a budget-friendly option, they’ll likely lead to frustration, wasted stain, and a poor result. Trust us, invest in a sprayer designed for the task.
Brand Spotlights: What Folks Trust
When looking at fence stain sprayers, certain brands consistently get high marks from users and professionals alike for their performance and durability. Graco is often a top contender, especially their Magnum series for DIYers, known for their robust construction and ability to handle thicker stains. Wagner also offers a range of sprayers, from handheld Flexio models suitable for lighter stains to more powerful airless units that can tackle denser products. HomeRight offers innovative options that often balance ease of use with effectiveness for various finishes.
Getting the Best Finish: Essential Fence Staining Steps
Spraying fence stain properly requires more than just pointing and pulling the trigger. It’s a multi-step process that starts before you even mix your stain. Getting this prep work right is key to preventing issues like clogs, drips, and uneven coverage, ultimately saving you time and frustration down the line.
Preparing Your Fence and Your Workspace
Before you even think about spraying, your fence needs to be ready. It should be clean and dry. Any dirt, mildew, or loose old stain needs to be removed so the new stain can properly adhere. Power washing is effective, but make sure the wood is completely dry, usually 24-48 hours in good weather, before you start staining.
Prepare your surrounding area by masking off anything you don't want stained. This includes house siding, concrete patios, and neighboring plants. Use plastic sheeting or drop cloths for larger areas and painter's tape for precise edges. This step is critical for preventing widespread overspray and makes cleanup much easier.
Dialing In Your Sprayer for Stain
This is where you translate the sprayer's features into practical application. For fence stain, you'll often need to thin it slightly to ensure smooth flow, especially if you're not using a high-end airless sprayer. Check the stain manufacturer's recommendations; some stains can be thinned with mineral spirits or water, depending on their base.
Adjusting your sprayer’s pressure and flow rate is crucial. Start with the lowest pressure setting recommended for your stain and sprayer, gradually increasing it until you achieve a fine, consistent mist without excessive spitting or sputtering. Test spray on a piece of cardboard or scrap wood to fine-tune the pattern and ensure no runs are forming.
Spraying Technique: Smooth Coverage Every Time
Consistent technique is the hallmark of a professional finish. Hold the sprayer perpendicular to the fence surface at a steady distance, usually 6-10 inches away. Move the sprayer in smooth, overlapping strokes. Each pass should overlap the previous one by about 50% to ensure no gaps appear.
When you reach the end of a fence picket or board, release the trigger before you stop moving. Then, when you start your next stroke, squeeze the trigger just before you begin moving. This technique prevents heavy splatters at the start and end of each pass, contributing to that uniform look we're after.
Common Fence Staining Mistakes (and How to Fix Them)
Even with the best sprayer, a few common missteps can sabotage your fence staining project. Knowing these pitfalls ahead of time allows you to avoid them, saving you from costly rework or a less-than-ideal final appearance.
Drips, Runs, and Patches To Avoid
The most frequent complaint among DIY stainers is the dreaded drip or run. These usually happen when you apply the stain too thickly in one spot, or when gravity takes over on vertical surfaces. To fix a fresh drip, gently wipe it away with a clean cloth dipped in stain. For dried drips, you might need to lightly sand them down.
Patches occur when your spray pattern isn't consistent or when you don't overlap your passes enough. If you notice a patch, try to feather in a light coat of stain while it's still wet. If it’s already dry, you’ll likely need to re-spray the entire section for uniformity.
Overspray Control: Protecting Your Property
Overspray is a significant issue that can permanently damage surrounding surfaces. It happens when the sprayer is set too high, the spray pattern is too wide for the distance, or when there's wind. Always use adequate masking, but also consider the wind direction and speed.
If overspray does get on unwanted surfaces, clean it up immediately. For house siding or cars, a gentle cleaner might be enough. For concrete, you might need a stronger degreaser. Addressing this right away prevents the stain from setting permanently.
How Much Does a Fence Sprayer Cost?
The price of a fence sprayer can vary wildly, from under $100 for basic garden-variety options (which we don't recommend for stain) to well over $500 for high-performance airless units. For most DIY fence staining projects, you'll find that models in the $150-$300 range offer a great balance of performance and value.
Handheld HVLP sprayers suitable for lighter stains might fall into the $100-$200 bracket. Entry-level airless sprayers, like those from Graco's Magnum line, typically start around $200-$300 and can be found on sale for less. Professional-grade airless sprayers, which offer more power and durability, can easily cost $500 and up.
Protecting Yourself: Safety When Staining
Working with stains, especially oil-based ones, means you need to take safety precautions. Always wear appropriate personal protective equipment (PPE). This includes safety glasses to protect your eyes from stray spray, and a respirator mask to avoid inhaling fumes, particularly if you’re working in a confined space or with strong solvents.
Gloves are also a good idea to protect your skin from staining and potential irritants. Ensure good ventilation in the area where you're spraying and where the fence is drying. This helps dissipate fumes and speeds up the drying process. Always read the safety data sheet (SDS) for your specific stain product.