
Your fence likely isn't as old as you think, but years of sun, rain, and neglect can certainly make it look that way. If you're wondering what to spray on fence to make look new, you're in the right place. The right product can work wonders, transforming a weathered, dull barrier into a vibrant focal point for your yard.
Choosing the correct fence resurfacer or coating is key to achieving that fresh-look effect without a lot of hassle. According to aggregate buyer feedback and manufacturer specifications, typical wood fence rejuvenating sprays aim to restore color and provide a protective layer, often lasting 1-3 years depending on the product and climate. We'll break down your best options to help you decide.
Why Is My Fence Looking Dull and Weathered?
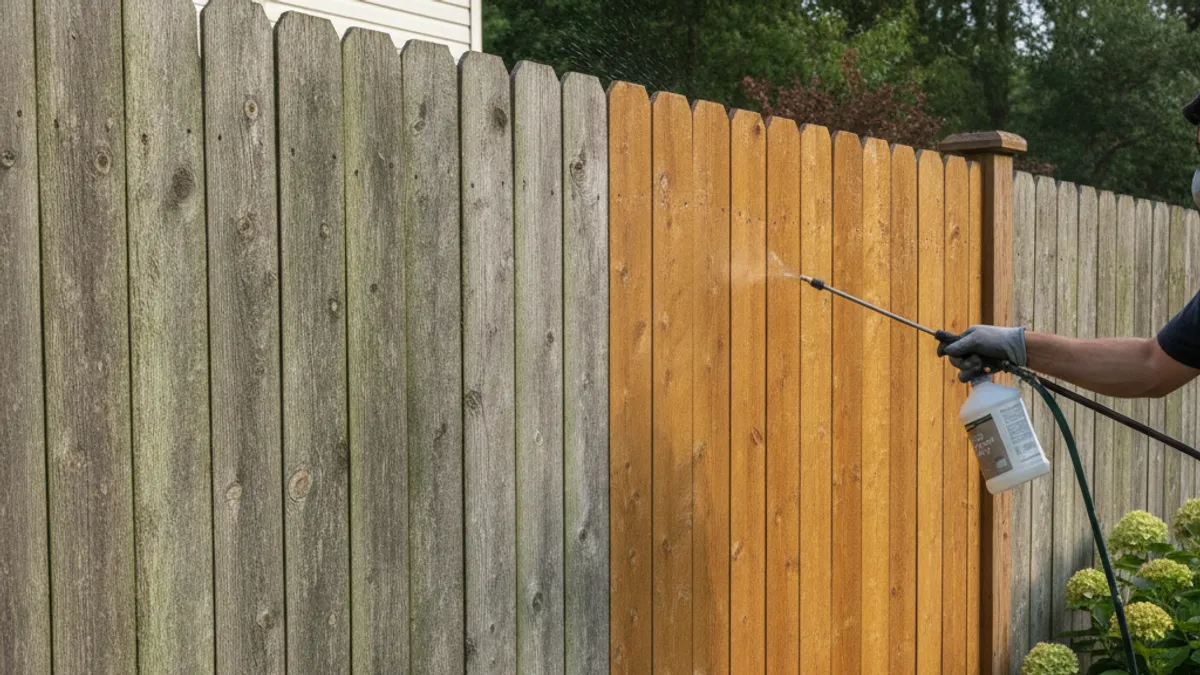
That tired, grayish hue and general lackluster appearance on your fence isn't just about age. It's a visual indicator of the elements taking their toll. Direct sunlight, specifically ultraviolet (UV) radiation, breaks down the lignin in wood, causing it to degrade and turn gray. Moisture, whether from rain, dew, or even humidity, can lead to mold, mildew, and algae growth, which further stains and discolors the surface.
Freeze-thaw cycles in colder climates can cause wood to expand and contract, leading to cracking and splintering. For vinyl and composite fences, dirt and atmospheric pollutants can build up, dulling their original sheen.
Bringing Your Fence Back to Life: What to Spray for a "New" Look
The goal is to revitalize the fence’s appearance and protect it from future damage. Sprays offer a convenient way to apply a new finish, often with less effort than brushing or rolling. Depending on your fence material and desired outcome, you'll be looking at a few main categories: fence stains, fence sealers, and specialized fence cleaners or restorers. We've analyzed specs from leading manufacturers such as Behr, Cabot, and Thompson's WaterSeal to identify what works best.
Choosing the Right Spray for Your Fence Material: Wood, Vinyl, Composite & More
The best spray for your fence depends entirely on what it's made of and what you want to achieve. Applying a product designed for wood onto vinyl, for instance, won't give you the desired results and could potentially cause damage. Understanding your fence's material is the critical first step before you even grab a spray can.
Wood Fence Sprays: Reviving Natural Beauty
For wood fences, sprays often fall into the stain or sealer categories. Stains penetrate the wood fibers to add color and protection, offering everything from a transparent finish that highlights the natural grain to an opaque solid color that completely covers imperfections. Sealers, on the other hand, primarily form a protective barrier on top of the wood to repel water and block UV rays, usually without adding significant color. Many products are designed to do both, offering color and protection in one.
Our research indicates transparent stains are favored for showcasing natural wood grain, while solid stains mimic the look of paint but are formulated to penetrate better.
Vinyl & Composite Fence Sprays: Cleaning and Refreshing
Vinyl and composite fences don't weather like wood, but they still accumulate dirt, grime, and can develop mildew. For these materials, a powerful cleaner designed to cut through surface contaminants is often the best first step. Many products are specifically formulated as cleaners and brighteners for vinyl and composite, lifting away oxidation and discoloration without harsh scrubbing. Some may offer a light refresh to the color or a protective coating against future buildup.
Look for low-VOC (Volatile Organic Compound) formulas when possible; the U.S. Environmental Protection Agency (EPA) notes that lower VOCs contribute to better indoor and outdoor air quality.
Metal Fence Sprays: Protection and Shine
Metal fences, like aluminum or wrought iron, benefit most from rust-inhibiting sprays and protective coatings. If your metal fence has started to rust, you'll need a rust converter or a primer specifically designed to treat and seal rust before applying a top coat. For fences that are in good condition but faded, a direct-to-metal (DTM) spray paint can restore color and add a protective layer against the elements, preventing future rust and corrosion. These often come in durable finishes that can withstand outdoor exposure for years.
How to Prepare Your Fence for a Spray Application
Getting your fence ready is just as important as picking the right product. Skipping preparation can lead to poor adhesion, an uneven finish, and a treatment that doesn't last. Think of it like prepping a canvas before painting, a clean, smooth surface is essential for the best outcome.
Cleaning and Degreasing Your Fence
Before you spray, your fence needs to be thoroughly clean. For wood, this means removing dirt, cobwebs, loose splinters, and any existing mold or mildew. A dedicated fence cleaner or a mixture of water and a mild detergent often works well. For stubborn stains or mildew, a solution containing a bleach alternative or a dedicated mold and mildew remover might be necessary.
For vinyl and composite, a good quality outdoor cleaner or even a diluted household cleaner can lift away surface grime. Always rinse your fence thoroughly with a hose or pressure washer on a low setting after cleaning and let it dry completely. Manufacturer specs for many outdoor cleaners suggest a drying time of at least 24-48 hours in good weather before applying other treatments.
Sanding and Stripping Old Finishes (If Necessary)
If your fence has old, peeling paint or a flaking stain, sanding or stripping is often a necessary step for a smooth and lasting finish. For wood fences, light sanding can also help open the pores of the wood, allowing a new stain or sealer to penetrate better. You don't need to achieve a perfectly smooth surface like you would for furniture; a moderately rough texture is often ideal for stain adhesion. If you're applying a solid stain over a previous paint job, ensure all loose paint is scraped and sanded away.
For vinyl or composite, sanding is generally not recommended; focus on thorough cleaning to ensure good adhesion of any restorative product.
Top Fence Sprays and Restorers: A Comparative Look
When it comes to refreshing your fence, you've got several choices beyond just a basic cleaner. The products you'll likely encounter fall into a few key categories, each offering different benefits for appearance and protection. Understanding these differences helps you pick the one that best suits your needs and your fence's material.
Fence Stains: Color and Protection
Fence stains are fantastic for adding or reviving color while also providing a protective layer. They differ from paint because they soak into the wood rather than just sitting on the surface. This means they tend to look more natural, and they won't peel or chip in the same way paint can.
- Transparent Stains: These allow the wood grain to show through, offering a natural, light tint. They're great for new wood or fences in good condition where you want to enhance, not hide, the natural beauty.
- Semi-Transparent Stains: These offer more color than transparent stains, hiding some of the wood grain but still allowing some of its natural texture to peek through. They provide a bit more UV protection.
- Solid Stains: These look very much like paint and will completely hide the wood grain. They offer the most color, coverage, and UV protection, making them ideal for older fences with imperfections or a desired painted look.
Fence Sealers: Water and UV Defense
Fence sealers focus primarily on protection. Their main job is to repel water, which helps prevent rot, warping, and mildew. They also often contain UV inhibitors to prevent the sun's rays from graying and degrading the wood.
Unlike stains, most sealers don't add significant color. They dry clear or with a slight sheen, preserving the natural look of the wood. If your fence is already the color you like but is weathering, a clear sealer can be an excellent choice for protection without altering its appearance. Many products, however, are actually stain-sealer combinations, offering both color and robust protection.
Dedicated Fence Sprays and Cleaners: Targeted Solutions
Beyond stains and sealers, you'll find a category of products specifically marketed as "fence sprays" or "fence restorers." These can encompass a range of formulations, from deep-cleaning solutions for removing stubborn grime and mildew to more advanced products designed to revive faded colors and protect surfaces. For instance, some composite fence restorer sprays are formulated to chemically brighten the material, lifting away oxidation without abrasive scrubbing. When researching options from brands like Wet & Forget or Deckmate, aggregate buyer feedback often highlights their effectiveness on specific issues like algae and mildew.
How to Prepare Your Fence for a Spray Application
Getting your fence ready is just as important as picking the right product. Skipping preparation can lead to poor adhesion, an uneven finish, and a treatment that doesn't last. Think of it like prepping a canvas before painting, a clean, smooth surface is essential for the best outcome.
Cleaning and Degreasing Your Fence
Before you spray, your fence needs to be thoroughly clean. For wood, this means removing dirt, cobwebs, loose splinters, and any existing mold or mildew. A dedicated fence cleaner or a mixture of water and a mild detergent often works well. For stubborn stains or mildew, a solution containing a bleach alternative or a dedicated mold and mildew remover might be necessary.
For vinyl and composite, a good quality outdoor cleaner or even a diluted household cleaner can lift away surface grime. Always rinse your fence thoroughly with a hose or pressure washer on a low setting after cleaning and let it dry completely. Manufacturer specs for many outdoor cleaners suggest a drying time of at least 24-48 hours in good weather before applying other treatments.
Sanding and Stripping Old Finishes (If Necessary)
If your fence has old, peeling paint or a flaking stain, sanding or stripping is often a necessary step for a smooth and lasting finish. For wood fences, light sanding can also help open the pores of the wood, allowing a new stain or sealer to penetrate better. You don't need to achieve a perfectly smooth surface like you would for furniture; a moderately rough texture is often ideal for stain adhesion. If you're applying a solid stain over a previous paint job, ensure all loose paint is scraped and sanded away.
For vinyl or composite, sanding is generally not recommended; focus on thorough cleaning to ensure good adhesion of any restorative product.
Step-by-Step Guide: Spraying Your Fence Like a Pro
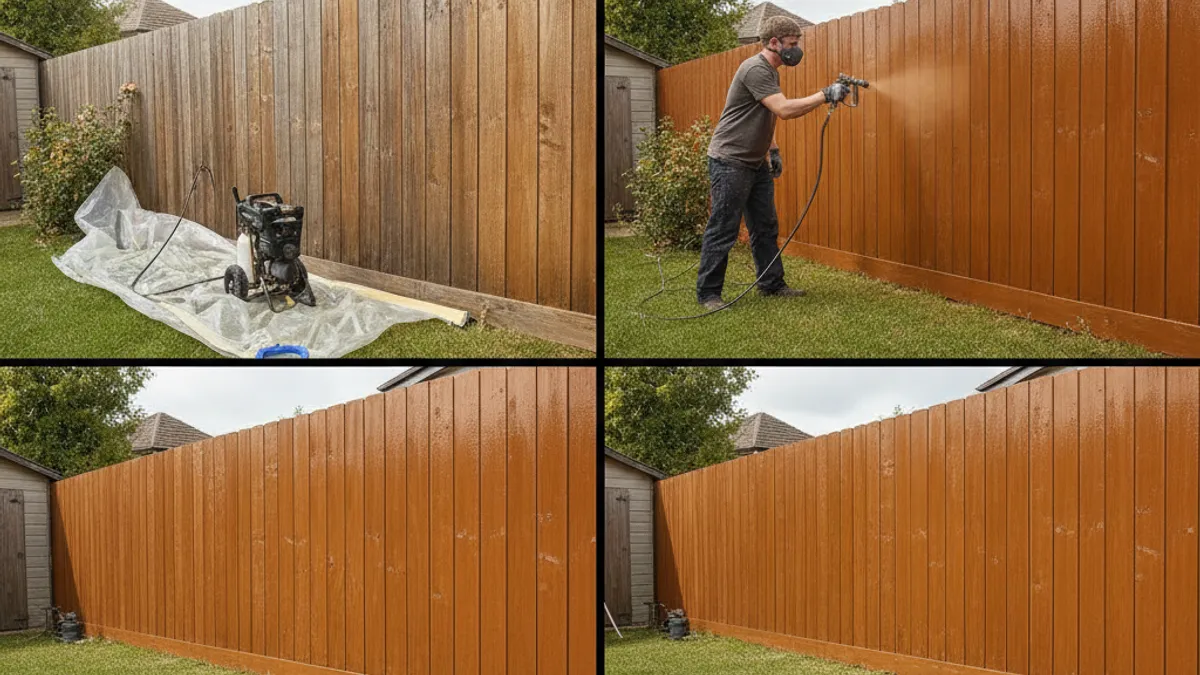
Armed with the right product and a clean fence, you’re ready to spray. The key here is even application, which prevents streaks and ensures consistent protection. It might seem straightforward, but a few techniques can make a big difference in the final look.
Application Techniques for Even Coverage
Start by reading the product's label carefully. Most sprayable fence treatments recommend holding the sprayer a consistent distance from the surface, often between 12 to 18 inches. Begin spraying at the top of a fence board and move downwards in smooth, overlapping strokes. Overlap each pass by about 25-50% to avoid visible lines.
Work in manageable sections so the product doesn't start to dry before you can back-brush or roll it out, especially with stains. Some users prefer to lightly back-brush behind the spray to ensure deep penetration and eliminate any puddling or unevenness.
Fence Sprays vs. Brushes and Rollers: Which is Best?
When it comes to applying fence finishes, spraying is fast, but it’s not always the best method for every situation or product. Brushes and rollers offer more control, which can be crucial for achieving a specific look or dealing with certain fence types. Many sources, including guides on spray or brush paint for fences, highlight these differences.
| Application Method | Pros | Cons | Best For |
|---|---|---|---|
| Spraying | Fastest application; great for large areas; reaches nooks and crannies. | High potential for overspray; requires masking; can be uneven without back-brushing. | Solid stains, sealers on smooth wood, quick touch-ups, large linear fences. Requires careful masking of surroundings. |
| Brushing | Excellent control; forces product into grain; best for intricate details. | Slowest method; labor-intensive for large fences. | Transparent/semi-transparent stains on detailed wood; touching up small areas; applying primer or specialized coatings. Ensures deep penetration. |
| Rolling | Faster than brushing; good for flat surfaces; provides even coverage. | Less control than brushing; may not reach crevices effectively. | Solid stains on flat wooden panels, composite fencing. Can be used in conjunction with spraying for blended results. |
Common Mistakes When Spraying Your Fence (and How to Avoid Them)
Even with the right product, a few common missteps can lead to a disappointing finish. These aren't difficult to avoid if you know what to look out for. Understanding these pitfalls can save you time and the frustration of a less-than-perfect outcome.
- Skipping Prep Work: As we discussed, cleaning and proper drying are crucial. Applying
on a wet or dirty fence is a recipe for peeling and peeling.
- Using the Wrong Product: Applying a wood stain to vinyl, or a harsh cleaner to delicate wood, can cause damage. Always verify the product is meant for your specific fence material.
- Inconsistent Application: Trying to spray too quickly or not overlapping your passes will result in streaks and patchy coverage. Take your time, especially on detailed areas.
- Ignoring Wind or Weather: Spraying on a windy day means overspray will end up everywhere. Conversely, spraying in direct, hot sun can cause the product to dry too quickly, leading to lap marks.
Maintaining Your Refreshed Fence for Long-Lasting Results
You've put in the work to make your fence look new again, and with a little ongoing care, that fresh look can last. Regular maintenance is far easier than a full recoat or repair, saving you time and money down the road. It's about consistent, small efforts that add up.
Regular Cleaning
Periodically rinse your fence with a garden hose to wash away dust, pollen, and light dirt. This prevents buildup that can lead to mold or mildew. For tougher grime, a soft brush and a mild soap solution can be used. This simple step can remove contaminants before they have a chance to etch into the finish.
Inspect for Damage
Make it a habit to walk around your fence a couple of times a year. Look for any signs of peeling, chipping, or fading in the finish. Check for any new cracks in wood, or loose components in vinyl or composite fencing. Addressing minor issues early, like touching up a scratch with matching stain, prevents them from becoming bigger problems that require extensive repair.
Reapplication Schedule
Most fence stains and sealers won't last forever. Depending on the product and your climate, you might need to reapply a fresh coat every 1-3 years. Solid stains typically last longer than semi-transparent ones, and clear sealers might need the most frequent attention. Check the manufacturer's recommendations for their specific product's lifespan.
Early reapplication, when the original finish is still mostly intact, is much easier than trying to fix a completely failed finish.
Expert Tips for the Best Fence Spray Results
To take your fence's appearance from good to great, a few insider tips can really help. These observations come from understanding how different products behave and how to best achieve a professional-looking finish, even if you're doing it yourself. They're the kind of advice that saves you headaches and makes your project shine.
- Test Spray in an Inconspicuous Area: Before tackling the whole fence, spray a small, hidden section. This helps you gauge coverage, drying time, and how the color looks in different light conditions. It’s a crucial step for color matching and technique refinement.
- Work with the Weather: Choose a mild, overcast day with low wind. This allows the product to dry evenly without being affected by direct sun, extreme heat, or blowing debris. Ideally, aim for temperatures between 50°F and 85°F (10°C and 29°C), as recommended by many paint and stain manufacturers.
- Don't Skimp on Multiple Thin Coats: For deeper color and better protection, applying two thin coats is almost always better than one thick, goopy coat. Thin coats dry faster, adhere better, and reduce the risk of drips and runs. Allow adequate drying time between coats as specified by the product.
- Consider Back-Brushing or Rolling: Especially with stains, lightly going over sprayed areas with a brush or roller can ensure the product is worked into the wood grain and all surfaces are covered uniformly. This is a common technique that significantly improves the final look and durability.
Safety First: Protecting Yourself and Your Property
Working with sprays, especially those containing chemicals for cleaning or finishing, requires attention to safety. Following proper precautions protects your health and the surrounding environment. It’s not just good practice; it’s essential to avoid potential hazards.
Personal Protective Equipment (PPE)
Always wear appropriate personal protective equipment (PPE). This includes:
- Safety Glasses or Goggles: To protect your eyes from splashes and airborne particles.
- Gloves: Chemical-resistant gloves, like nitrile or neoprene, prevent skin irritation and absorption of chemicals. Check the product label for recommended glove types.
- Mask or Respirator: When spraying, especially in enclosed or poorly ventilated areas, a mask or respirator rated for organic vapors can prevent inhalation of fumes and fine mists.
Protecting Surroundings
Mask off any areas you don't want to be sprayed, such as adjacent buildings, plants, or walkways. Use plastic sheeting or drop cloths for this. If using a pressure washer for cleaning, be mindful of overspray and potential damage to nearby delicate plants or siding. Always rinse your equipment and clean up any spills promptly to prevent environmental contamination.
Many government regulatory bodies, such as the U.S. Environmental Protection Agency (EPA), highlight the importance of proper product disposal and minimizing environmental release.