
You've grabbed a bunch of dill from the store or snipped a stem from a neighbor's plant, and now you're wondering if you can turn it into a whole new plant. The short answer is yes, you can. But let's be honest: dill is not the easiest herb to root from a cutting.
It's not like basil or mint, where you stick a stem in water and practically watch roots grow overnight. Dill is a bit more stubborn.
In our research, we found that dill cuttings have a success rate of roughly 50 to 60 percent when done correctly. That's lower than many other herbs, but it's still absolutely worth trying. The difference between success and a soggy, rotting stem comes down to one thing: understanding how dill actually grows.
As of 2026, home gardeners are rediscovering this old propagation trick, and once you know the rules, it works consistently. Let's walk through it.
Quick Answer
Take a 4 to 6 inch stem from a healthy dill plant. Remove the lower leaves. Place the cutting in water or moist soil.
Roots appear in 7 to 14 days. Transplant when roots are 1 to 2 inches long.
Why Dill Cuttings Fail (and How to Make Yours Work)
Most people fail with dill cuttings for the same three reasons. They pick the wrong stem. They don't understand the node.
Or they let the cutting rot in stagnant water.
Dill has a soft, hollow stem. That makes it prone to rot compared to woody herbs like rosemary or lavender. If you submerge a leaf in water, that leaf will rot within days.
The rot spreads to the stem, and the whole cutting dies. University extension research on herb propagation consistently confirms that dill stems are more susceptible to bacterial soft rot than many other culinary herbs.
The second big mistake is picking a stem that's already starting to flower. Dill bolts fast. Once a stem sends up a flower head, the plant's energy goes into seed production, not root growth.
A flowering stem will rarely root. You need young, vegetative growth.
The third mistake is giving up too soon. Dill can take up to two weeks to show roots. People check after four days, see nothing, and toss the cutting.
Patience is part of the process.
The fix for all three problems is simple. Pick the right stem. Find the node.
Keep the water fresh. We'll cover each of those in detail.
The Quick Decision: Water vs. Soil Rooting
You have two main options for rooting dill cuttings. Both work, but they serve different situations.
| Method | Best For | Success Rate | Time to Roots | Risk |
|---|---|---|---|---|
| Water rooting | Beginners, watching roots grow | Moderate (50-60%) | 7-14 days | Rot if water goes stale |
| Soil rooting | Experienced gardeners, less handling | Moderate (55-65%) | 10-18 days | Drying out, overwatering |
Water rooting is the most common approach. You can see the roots develop. It's satisfying and educational.
The downside is that you have to change the water regularly. If you forget, the water gets cloudy and the cutting rots.
Soil rooting skips the transplant step. The cutting adapts to soil from the start. That means less shock later.
But you can't see what's happening underground. You have to guess whether roots are forming by gently tugging on the stem after a week.
Which one should you choose? If you're new to this, start with water. It's easier to troubleshoot. If you've propagated herbs before and want to avoid the extra transplant step, go straight to soil.
Both methods work. The choice is about your comfort level and how much attention you can give the cutting.
How Dill Cuttings Actually Work (The Node Rule)
Here's the most important thing you'll learn in this article. Roots do not grow from just anywhere on a dill stem. They grow from the nodes.
A node is the small bump on the stem where leaves emerge. It looks like a little joint. Under that bump, the plant has dormant root cells waiting to activate.
If your cutting does not have a node submerged in water or buried in soil, it will not grow roots. Period.

Dill is an annual herb in the Apiaceae family. It grows from a taproot, which makes it naturally less inclined to send out adventitious roots from a stem cutting. That's why it's harder than basil or mint.
Those herbs are built for stem propagation. Dill is not. But it will cooperate if you respect the node.
The node contains meristematic tissue. That's the plant version of stem cells. When the node is in contact with moisture, those cells can differentiate into root cells.
The process takes time. The plant needs to redirect energy from leaf production to root production. That's why you remove most of the leaves.
Fewer leaves means less energy needed for maintenance and more energy available for root growth.
The rule of thumb: Your cutting needs at least one node below the water or soil line. Two nodes are even better. If you cut a stem and there's no node below the water, you've already lost.
What Makes a Good Cutting (Selection Checklist)
Not every dill stem is a candidate for propagation. You need to be selective. Here's what to look for.
The right stem:
- Young, green, and flexible. Not woody or brown.
- No flower buds or flower heads. The stem should be in vegetative growth.
- At least 4 to 6 inches long. Shorter than that and you don't have enough length to work with.
- At least 2 to 3 leaf nodes along the stem. More nodes equal more opportunities for roots.
The right parent plant:
- Healthy and well-watered. A stressed plant produces weaker cuttings.
- Free from pests like aphids or spider mites. You don't want to bring problems indoors.
- Growing in good light. Leggy, weak stems from a plant stretching for light are less likely to root.
The right time of day:
- Take cuttings in the morning. The plant is fully hydrated after the night.
- Avoid taking cuttings in the heat of the afternoon. The stems will wilt faster.
The right tools:
- Sharp scissors or pruning shears. A dull blade crushes the stem, which invites rot.
- Clean the blade with rubbing alcohol before cutting. This prevents transferring diseases.
If you're using grocery store dill, the selection rules are slightly different. Store-bought dill is often cut from mature plants. The stems may be older and tougher.
Look for the freshest bunch you can find. Check the stems for any signs of wilting or sliminess. And here's a trick: sometimes grocery store dill still has a bit of root attached at the base.
If you see any tiny root nubs, that bunch has a much higher chance of success.
Step-by-Step: Water Rooting Method
This is the method most people start with. It's simple, visual, and satisfying when you see those first white roots appear.
Choosing the Right Container
You need a container that's tall enough to hold the cutting upright without the leaves touching the water. A narrow glass or jar works well. A small shot glass or a spice jar is perfect for a single cutting.
The key is that the stem stays submerged while the leaves stay dry.
Avoid wide-mouth jars. They let too much light hit the water, which encourages algae growth. Algae competes with the cutting for oxygen and can slow root development.
The container should be clear or translucent. You want to see the roots as they form. It also lets you check the water clarity without disturbing the cutting.
Water Depth and Node Placement
Fill the container with room temperature water. Tap water is fine. Let it sit for an hour to let the chlorine dissipate if you want to be extra careful.
Many gardeners use filtered water, but it's not strictly necessary.
The water level should be high enough to cover the bottom one or two nodes. But not so high that any leaves are submerged. Leaves underwater rot.
That's a hard rule.
Check the cutting. The lowest node should be about half an inch below the water surface. If the node is above the water, no roots will form.
If leaves are below the water, they'll rot.
Water Change Schedule
This is where most people slip up. Stale water is the enemy of dill cuttings.
Change the water every 2 to 3 days. Don't just top it off. Empty the container completely, rinse it, and add fresh water.
Stale water loses dissolved oxygen. Bacteria multiply. The cutting starts to break down.
Set a reminder on your phone. Every other day, change the water. It takes 30 seconds.
It makes the difference between roots and rot.
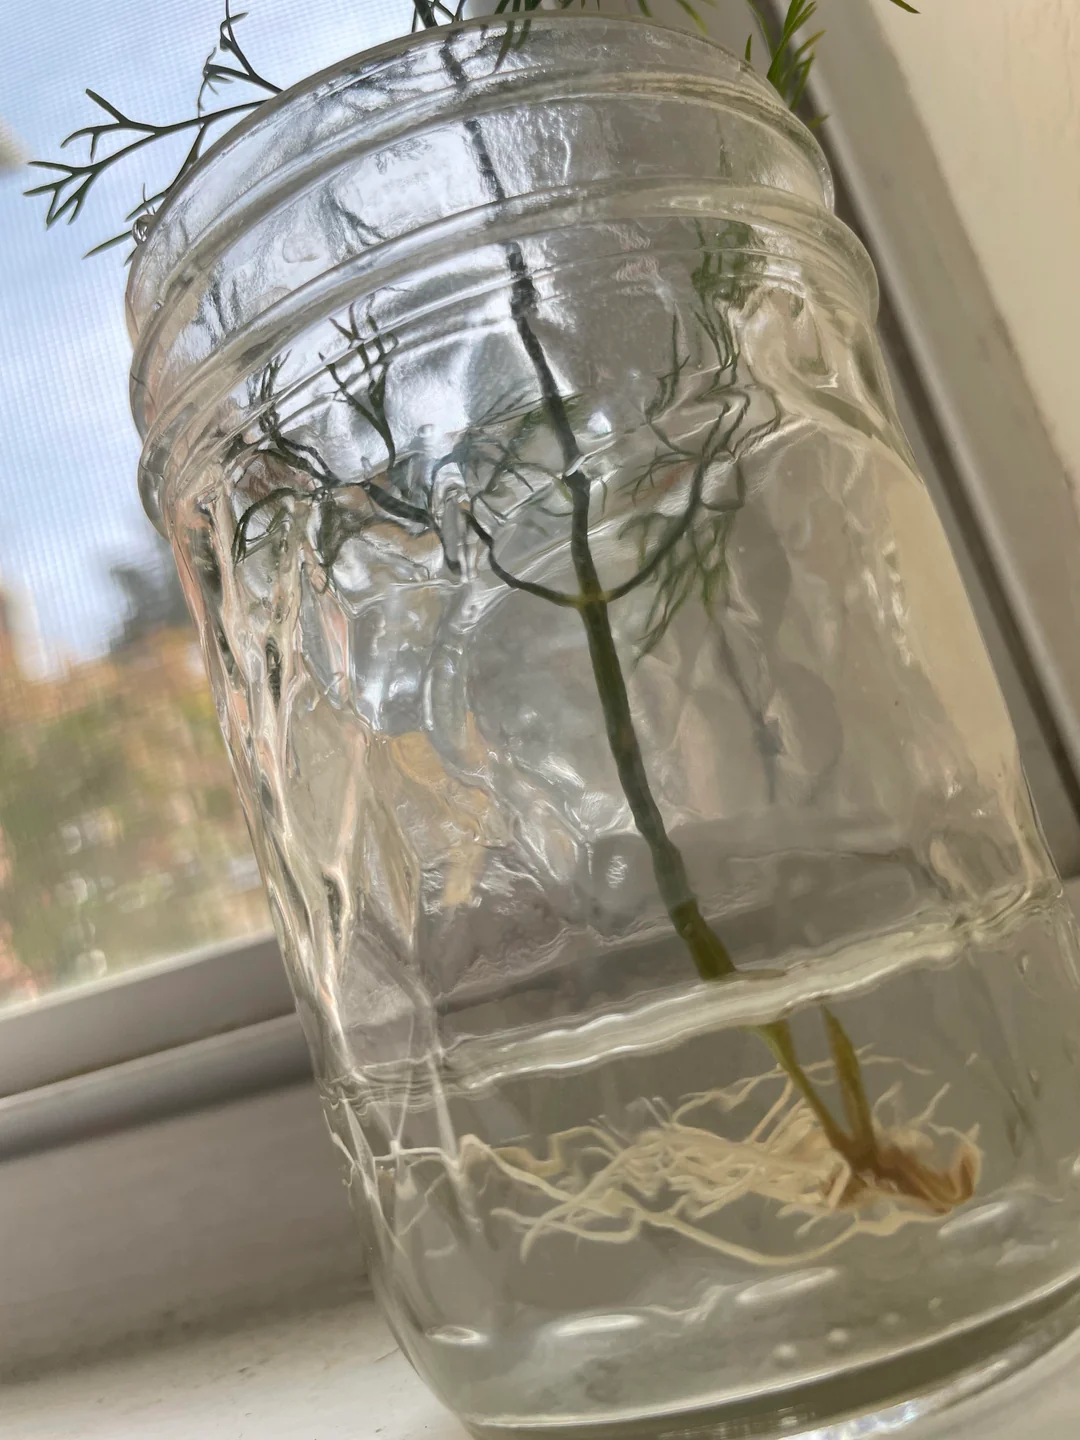
After about 7 days, you should see small white bumps or nubs on the submerged node. Those are the first signs of roots. Within 10 to 14 days, those bumps will become thin white roots.
Wait until the roots are 1 to 2 inches long before transplanting into soil.
If you see no signs of roots after 3 weeks, the cutting is likely not going to root. Start over with a fresh stem. That's the nature of dill.
It's not you. It's the plant.
If you're already comfortable with a more controlled growing environment, you might want to look into proper indoor setups. A well-planned grow tent setup gives you full control over light and humidity, which can boost your success rate with finicky herbs like dill.
Step-by-Step: Soil Rooting Method
Soil rooting skips the transplant shock entirely. The cutting adapts to its final growing medium from day one. But you trade visibility for convenience.
Potting Mix and Container Prep
Use a light, well-draining potting mix. Standard garden soil is too heavy. It compacts around the stem and holds too much moisture.
A mix of equal parts potting soil and perlite or vermiculite works well. The drainage is critical.
Choose a small pot with drainage holes. A 3 to 4 inch pot is plenty for one cutting. Fill it with moistened potting mix.
Not wet. Just damp enough that it holds together when squeezed.
Make a hole in the center with a pencil or your finger. The hole should be deep enough to bury the bottom one or two nodes. Gently insert the cutting.
Firm the soil around the stem so it stands upright.
Rooting Hormone (Yes or No?)
Rooting hormone is optional with dill. Our research shows that soft-stemmed herbs like dill respond inconsistently to synthetic rooting hormones. Some gardeners swear by it.
Others see no difference.
If you want to try it, dip the bottom inch of the cutting in a powdered rooting hormone before planting. Tap off the excess. Then insert into the soil.
The hormone can speed up root initiation by a few days, but it won't save a cutting that's already doomed by a missing node or poor stem choice.
For most home gardeners, skip the hormone. Save your money. Focus on stem selection and moisture management instead.
Keeping Humidity High Without Rotting
The biggest challenge with soil rooting is keeping the cutting hydrated while it has no roots to drink with. The leaves lose water through transpiration. The stem can't replace it.
The cutting wilts.
The solution is a humidity dome. You can use a clear plastic bag, a cut plastic bottle, or a specialized propagation dome. Place it over the pot.
This traps moisture and keeps the air around the cutting humid.
But here's the catch. Too much humidity with no airflow causes mold and rot. The same problem as water rooting.
Lift the dome once a day for a few minutes. Let fresh air in. Check for condensation on the plastic.
If it's dripping wet, wipe it dry. The goal is high humidity, not a swamp.
After about 10 to 14 days, gently tug on the stem. If you feel resistance, roots are forming. Remove the dome for longer periods each day.
After a week of acclimation, the dome can come off permanently.
When to Transplant (Root Length Decision)
You've been watching those roots grow in the water glass. They started as tiny white bumps. Now they're thin strands reaching downward.
When do you move them into soil?
The rule is simple: wait until the roots are 1 to 2 inches long. At that length, the cutting has enough root mass to absorb water and nutrients from soil. Transplanting earlier risks the cutting wilting and dying.
Waiting longer is fine, but the roots can get tangled and harder to handle.
Gently remove the cutting from the water. Rinse off any slime. Prepare a small pot with the same light, well-draining potting mix you'd use for soil rooting.
Make a hole. Insert the cutting, being careful not to damage the tender roots. Cover the roots and the bottom node with soil.
Firm gently.
Water the soil lightly. Place the pot in bright, indirect light. Keep the soil moist but not soggy for the first week.
The roots need to adjust from water to soil, and that transition takes a few days.
If you're growing indoors, consider your setup carefully. Controlling light and humidity makes a big difference for young plants. A well-planned grow tent setup gives you consistent conditions that help new transplants thrive.
Mistakes That Kill Dill Cuttings (Common Errors)
Let's be direct about what goes wrong. Avoid these and your success rate jumps to 80 percent or higher.
Submerging leaves. This is the number one killer. Any leaf below the water line will rot within days. The rot spreads to the stem.
Remove all leaves from the bottom half of the cutting. Keep only the top few leaves.
Using a flowering stem. Once dill sends up a flower head, it's done growing roots. The stem becomes woody and hollow. Energy goes to seed production.
Pick young, vegetative stems only.
Skipping the node. You need a node in the water or soil. Without it, no roots. Period.
Double check your cutting before you start.
Stale water. Water left for more than three days loses oxygen and grows bacteria. Change it every 2 to 3 days without fail.
Too much direct sun. Cuttings have no roots. They can't replace water lost through leaves. Bright, indirect light is best.
Direct afternoon sun will cook them.
Transplanting too early. Roots shorter than one inch can't support the plant in soil. Wait until they reach 1 to 2 inches. Patience pays off.
What to Do If Your Cutting Wilts or Drops Leaves
Wilting happens. It's not always the end. But you need to act fast.
Check the water level. If you're rooting in water, make sure the node is still submerged. Water evaporates. Top it up if needed.
But don't let the cutting sit in water that's too deep.
Check for rot. Look at the submerged part of the stem. Is it brown and mushy instead of green and firm? If yes, rot has set in.
Cut above the rot. Remove any affected leaves. Change the water completely.
Put the cutting in fresh water. It might still root if healthy tissue remains.
Reduce light. If the cutting is in direct sun, move it to a spot with bright indirect light. Too much light causes the leaves to lose water faster than the stem can supply it.
Increase humidity. If the leaves are drooping but the stem looks healthy, the air is too dry. Mist the leaves with a spray bottle. Or place a clear plastic bag over the cutting to create a mini greenhouse.
Remove the bag for a few minutes each day to prevent mold.
Leaf drop is normal. Dill cuttings often drop their lower leaves. It's the plant's way of reducing water loss while it focuses on root growth. If the top leaves stay green and the stem stays firm, the cutting is still alive.
Keep going.
How to Keep Your New Dill Plant Alive (Maintenance)
You've got roots. You've planted it. Now you need to keep it growing.
Dill is a short-lived annual, but with proper care, you can get weeks of harvests before it flowers.
Light Requirements
Dill needs a lot of light. At least 6 hours of bright, direct sunlight per day. If you're growing indoors, a south-facing window is best.
If you don't have enough natural light, supplement with a grow light.
Leggy, weak stems that lean toward the window are a sign of insufficient light. Move the plant closer to the light source or increase the duration of artificial light. Consistent light is key for compact, bushy growth.
For indoor growers, understanding light distance and intensity matters. A good grow tent size guide can help you plan the right space and light coverage for your setup.
Pinching to Delay Bolting
Dill's natural instinct is to flower and set seed. That's bolting. Once it bolts, the leaves get bitter and the plant dies.
You can delay this by pinching.
When the plant has 4 to 6 sets of true leaves, pinch off the top growing tip. This encourages the plant to grow bushier instead of taller. It also delays the flower stalk.
Keep pinching back the tips every few weeks. Each time you pinch, the plant sends out new side shoots. More shoots mean more harvest.
And a longer window before the plant decides it's time to flower.
Watering Without Overwatering
Dill has a taproot. It likes consistent moisture but hates soggy feet. Water when the top inch of soil feels dry.
Stick your finger in the soil. If it's dry at your fingertip, water thoroughly. If it's still damp, wait.
Overwatering is a common killer of young dill plants. The roots rot. The leaves turn yellow.
The plant collapses. Always use pots with drainage holes. Never let the pot sit in standing water.
If you're growing in a container, consider the soil mix. Good drainage is essential. Adding perlite or coarse sand to your potting mix helps prevent waterlogging.
The right soil structure is the foundation of a healthy plant, just like choosing between a compost vs fertilizer approach for feeding your garden.
Rooting Grocery Store Dill (Special Case)
Yes, you can root that bunch from the produce section. But the odds are lower than with a garden cutting. Grocery store dill is often harvested from mature plants.
The stems may be woody or already starting to flower.

Look for the freshest bunch you can find. Check the stem ends. If you see any tiny root nubs or pale nubs at the base, that bunch has a much higher chance of success.
Trim the bottom inch of the stem at a 45 degree angle. Remove any leaves that would sit below the water line. Follow the same water rooting method from earlier.
Wash the stems thoroughly before starting. Store-bought herbs can have residue or mild preservatives on them. Fresh water and a clean container give you the best shot.
Decision Guide: Which Method for Your Situation
| Your Situation | Best Method | Why |
|---|---|---|
| You're new to propagation | Water rooting | You can see what's happening. Easy to troubleshoot. |
| You want to skip transplant shock | Soil rooting | Roots grow in their final medium from day one. |
| You're rooting grocery store dill | Water rooting | Easier to monitor for rot and adjust quickly. |
| You have a propagation setup with domes | Soil rooting | Controlled humidity makes soil rooting more reliable. |
| You're impatient or want quick results | Water rooting | You can see roots forming within 7 days. |
Frequently Asked Questions
Can I root dill from a cutting without a node?
No. Roots only grow from the nodes. Without a node submerged in water or buried in soil, the cutting will not root.
It will eventually rot.
How long does it take for dill cuttings to root?
Most cuttings show the first signs of roots within 7 to 14 days. If you see nothing after 3 weeks, the cutting is unlikely to root. Start over with a fresh stem.
Can I use rooting hormone on dill cuttings?
You can, but it's not necessary. Our research shows dill responds inconsistently to rooting hormone. Good stem selection and proper care matter more than any powder or gel.
Why is my dill cutting turning brown?
Brown, mushy stems indicate rot. Remove the cutting from water. Cut above the rot.
Change the water and try again. Brown leaves on an otherwise healthy stem are normal. The plant is shedding leaves to save energy for root growth.
Can I plant multiple dill cuttings in one pot?
Yes, but space them at least 2 inches apart. Overcrowding leads to competition for light and nutrients. Thin to the strongest plant once roots are established.