Is it better to spray or brush stain a fence? It's a question many homeowners face when tackling exterior wood protection, and the answer isn't a simple one-size-fits-all. The method you choose directly impacts the speed of application, the quality of the finish, and even the longevity of the stain itself.
Our research indicates that while spraying offers undeniable speed for large areas, brushing provides superior penetration and control, which is crucial for deep, lasting protection. For instance, aggregate buyer feedback and manufacturer specifications for many semi-transparent stains, like those from brands such as Cabot or Behr, suggest that a brush application often leads to better wood saturation, a key factor in preventing premature graying and weathering. This becomes especially important for drier or more porous wood types.
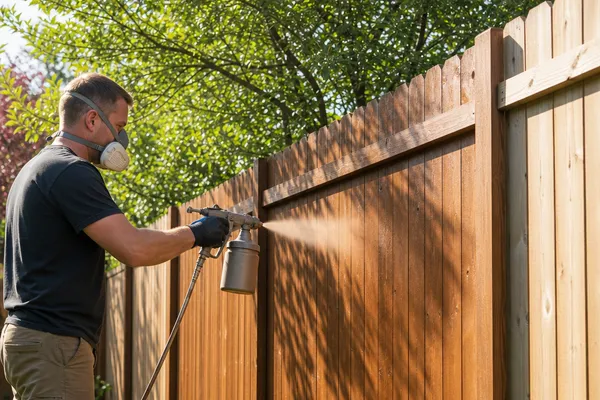
Spraying Fence Stain: The Speed Demon
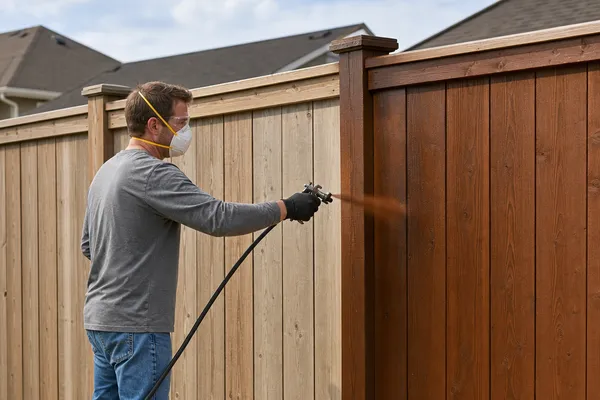
Harnessing the power of a sprayer can dramatically cut down the time it takes to stain an entire fence, especially if you have a lot of linear footage or large, uninterrupted sections. Airless sprayers, in particular, move a high volume of stain quickly. This makes them appealing for large weekend projects.
Pros of Spraying
The most significant advantage is certainly speed. You can cover large fence panels in a fraction of the time it would take with a brush. Spraying also excels at reaching intricate details like lattice work or tight corners that brushes struggle with. The finish can appear very uniform if applied correctly.
Cons of Spraying
Overspray is the primary drawback. Wind can easily carry stain away from your fence, onto your house siding, landscaping, or walkways, requiring extensive masking. Achieving good penetration can also be tricky, as the stain might just sit on the surface if the wood is very dry or the spray pressure is too high. Runs and drips are common if you're not careful.
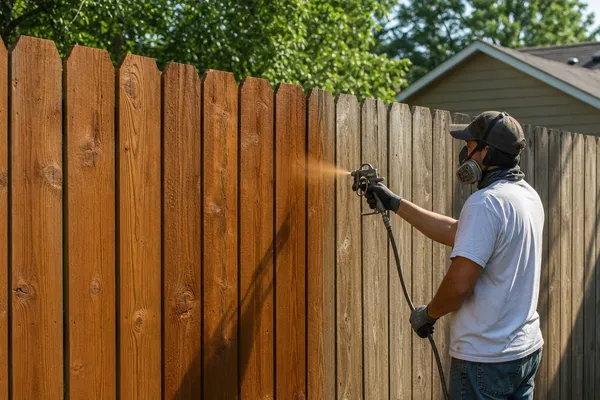
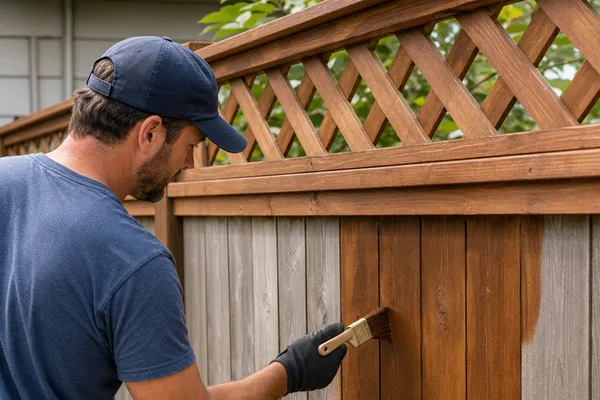
Brushing Fence Stain: The Precision Pro
When you need control and a finish that truly soaks into the wood grain, brushing is the tried-and-true method. This approach allows for more deliberate application, ensuring every board gets adequate attention and the stain is worked into the wood. It’s often the preferred method for achieving a deep, rich color.
Pros of Brushing
Brushing offers unmatched precision. You can ensure the stain penetrates deeply into the wood pores, creating a more durable protective layer. It’s also far easier to manage overspray, making it ideal for windy days or when you’re working near sensitive surfaces. You get a more consistent, mark-free finish this way.
Cons of Brushing
The biggest downside to brushing is the time and effort it demands. Staining a large fence by hand can be physically taxing and take significantly longer than spraying. You might also notice some subtle brush marks if you're not using a high-quality brush and consistent technique.
Spraying vs. Brushing: Head-to-Head Comparison
Let's put these two methods head-to-head to see how they stack up across key factors. Your project's specific needs will determine which one is the better fit.
| Feature | Spraying | Brushing |
|---|---|---|
| Speed | Faster for large, open areas | Slower, more deliberate |
| Penetration | Can be less deep, prone to runs | Deeper, better for dry wood grain |
| Coverage | Wide spray pattern, good for intricate areas | Controlled, precise |
| Overspray Risk | High | Low |
| Labor Intensity | Less physical strain for large jobs | More physical strain, detailed work |
| Finish Quality | Can be slick, but prone to runs/drips | Consistent, rich color, fewer marks |
| Wind Tolerance | Poor – requires calm conditions | Good – manageable in light breezes |
When to Choose Spraying for Your Fence
Spraying is your go-to method if time is your biggest constraint and your fence is in good condition. It's ideal for large, open fences with minimal detail or for a quick refresh of a fence that's already relatively smooth. If you're comfortable with masking and have a windless day, spraying can make a big job feel much more manageable. This approach is particularly effective for applying a single coat of a thinner, more transparent stain, as the spray can help ensure even distribution quickly.
When Brushing is Your Best Bet
Brushing shines when the quality of the finish and the depth of protection are your top priorities. If your fence has a lot of detailed woodwork, intricate pickets, or if you're applying a thicker, more opaque stain, brushing allows for the necessary control. It's also the superior choice for older, drier wood that needs the stain worked into the grain for maximum longevity. If you're aiming for a rich, even color and minimal risk of drips or uneven patches, grab your brush.
Essential Prep Work for Either Method
No matter if you’re reaching for a sprayer or a brush, excellent preparation is the bedrock of a successful fence staining project. Skipping these steps can lead to a finish that peels, fades, or just doesn't look right. Think of this as the crucial groundwork that ensures your hard work and stain investment pay off.
Cleaning and Drying Your Fence
A clean fence is a receptive fence. Before you apply any stain, you'll want to thoroughly clean the wood. This often involves power washing or scrubbing to remove dirt, mildew, and old flaking stain. For a deep clean, consider a dedicated fence cleaner.
After cleaning, it's vital to let the fence dry completely for at least 24-48 hours, depending on humidity and temperature. Wood that’s too wet won't absorb the stain properly, leading to poor adhesion and premature failure.
Gathering Your Tools and Gear
Having everything ready beforehand makes the staining process much smoother. For spraying, this means having your airless sprayer or pump sprayer, the correct nozzle, masking tape, and plastic sheeting for protecting surrounding areas. For brushing, you'll need high-quality stain brushes (natural bristles for oil-based stains, synthetic for water-based), possibly a roller for large flat areas, and an extension pole if needed. Always have safety glasses, gloves, and work clothes ready, regardless of your chosen method.
The Actual Application: Step-by-Step
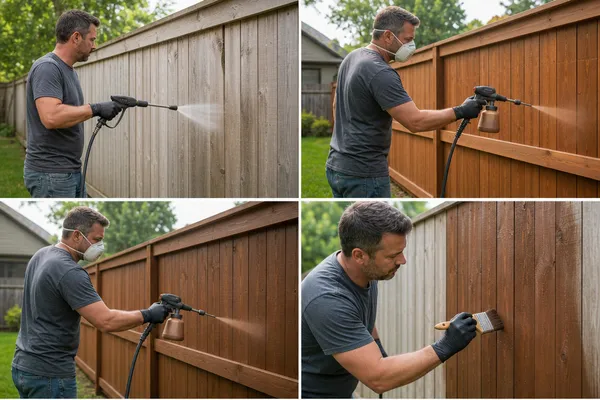
Once your fence is prepped and your tools are gathered, you're ready to apply the stain. The techniques differ significantly between spraying and brushing, so understanding these steps is key to achieving the desired outcome. This is where your careful prep work really pays off.
How to Spray Stain Properly
Start by thinning your stain if the manufacturer's instructions recommend it for spraying, this is common for airless sprayers. Begin fifty percent farther away from the fence than you think you need to be, then slowly move closer to achieve even coverage. Apply in steady, horizontal strokes, overlapping each pass by about 50%. Always work from top to bottom to manage drips.
As soon as you're done spraying a section, use a brush or roller to immediately back-brush any runs or puddles.
How to Brush Stain Effectively
With a brush, work in manageable sections, applying the stain generously but evenly. Use long, even strokes that follow the grain of the wood. Ensure you're working the stain into the wood's texture, not just laying it on top. For semi-transparent or solid stains, you'll typically apply a thick, even coat and then wipe off any excess after about 15-20 minutes with a clean cloth or brush.
This "back-brushing" or "wiping off" step is crucial for achieving a natural look and preventing lap marks.
Common Fence Staining Mistakes to Dodge
Even with the best intentions, a few common missteps can derail your fence staining project. Being aware of these pitfalls can help you avoid them, saving you time, money, and frustration down the road. Most issues stem from rushing preparation or skipping vital application steps.
- Applying stain on damp wood: As mentioned, this is a recipe for disaster. Manufacturers like Sherwin-Williams and Benjamin Moore always stress the importance of dry wood for proper stain adhesion and penetration.
- Skipping stain thinning (when required for spraying): Too-thick stain will clog your sprayer and lead to poor coverage. Too-thin stain can lead to streaky results. Always check your product’s recommendations.
- Not back-brushing or wiping excess: Many stains require this step to achieve an even finish and prevent unsightly marks. Skipping it is a frequent error, especially for beginners.
- Painting in the wrong weather: Applying stain in direct, hot sun can cause it to dry too fast, leading to lap marks. High humidity or rain can prevent proper drying. Ideal conditions are often between 50°F and 85°F (10°C to 29°C) with low humidity.
Choosing the Right Stain for Your Application Method
The type of stain you select significantly influences which application method is best and how you approach it. Stains come in various opacities, from transparent to solid, and each has different viscosity and drying properties. Transparent stains offer minimal color but highlight the wood grain, often requiring careful brushing for evenness.
Semi-transparent stains provide noticeable color while still showing wood grain, and they can be applied by both brushing and spraying, though brushing often yields better penetration. Solid stains act more like paint, offering full coverage and typically requiring a more painterly approach, sometimes even a roller alongside a brush. Always read the manufacturer's label; it will often specify recommended application methods. For example, some oil-based stains are best brushed to ensure deep penetration for maximum UV protection.
When to Choose Spraying for Your Fence
Spraying is your best bet if speed is paramount and your fence is mostly flat, open surfaces. Think long runs of standard pickets or large expanses of privacy fencing without much decorative detail. It’s an excellent choice for a quick refreshing coat of dye-based stains or if you're applying a less viscous, water-based product. For instance, if you're simply trying to add a touch more color to an already existing stain and the wood is in good shape, a sprayer can cover a lot of ground fast.
This method works well when you want a more uniform, lighter color or when the fence material itself is less crucial than the overall coverage. You might also lean towards spraying if you have a very large fence and limited time, provided you're prepared for thorough masking. Many homeowners find it more efficient for large projects like a 6-foot privacy fence spanning their entire backyard.
When Brushing is Your Best Bet
Brushing shines when the quality of the finish and the depth of protection are your top priorities. If your fence has a lot of detailed woodwork, intricate pickets, or if you're applying a thicker, more opaque stain, brushing allows for the necessary control. It's also the superior choice for older, drier wood that needs the stain worked into the grain for maximum longevity. If you're aiming for a rich, even color and minimal risk of drips or uneven patches, grab your brush.
This hands-on approach ensures that you maintain direct contact with the wood, allowing you to feel if the stain is penetrating properly. It’s the preferred method for premium stains or when you’re working with hardwoods like cedar or redwood that benefit from careful application. For homeowners who value a meticulously finished product over sheer speed, brushing is undeniably the way to go.
Essential Prep Work for Either Method
No matter if you’re reaching for a sprayer or a brush, excellent preparation is the bedrock of a successful fence staining project. Skipping these steps can lead to a finish that peels, fades, or just doesn't look right. Think of this as the crucial groundwork that ensures your hard work and stain investment pay off.
Cleaning and Drying Your Fence
A clean fence is a receptive fence. Before you apply any stain, you'll want to thoroughly clean the wood. This often involves power washing or scrubbing to remove dirt, mildew, and old flaking stain. For a deep clean, consider a dedicated fence cleaner.
After cleaning, it's vital to let the fence dry completely for at least 24-48 hours, depending on humidity and temperature. Wood that’s too wet won't absorb the stain properly, leading to poor adhesion and premature failure.
Gathering Your Tools and Gear
Having everything ready beforehand makes the staining process much smoother. For spraying, this means having your airless sprayer or pump sprayer, the correct nozzle, masking tape, and plastic sheeting for protecting surrounding areas. For brushing, you'll need high-quality stain brushes (natural bristles for oil-based stains, synthetic for water-based), possibly a roller for large flat areas, and an extension pole if needed. Always have safety glasses, gloves, and work clothes ready, regardless of your chosen method.
The Actual Application: Step-by-Step
Once your fence is prepped and your tools are gathered, you're ready to apply the stain. The techniques differ significantly between spraying and brushing, so understanding these steps is key to achieving the desired outcome. This is where your careful prep work really pays off.
How to Spray Stain Properly
Start by thinning your stain if the manufacturer's instructions recommend it for spraying, this is common for airless sprayers. Begin fifty percent farther away from the fence than you think you need to be, then slowly move closer to achieve even coverage. Apply in steady, horizontal strokes, overlapping each pass by about 50%. Always work from top to bottom to manage drips.
As soon as you're done spraying a section, use a brush or roller to immediately back-brush any runs or puddles.
How to Brush Stain Effectively
With a brush, work in manageable sections, applying the stain generously but evenly. Use long, even strokes that follow the grain of the wood. Ensure you're working the stain into the wood's texture, not just laying it on top. For semi-transparent or solid stains, you'll typically apply a thick, even coat and then wipe off any excess after about 15-20 minutes with a clean cloth or brush.
This "back-brushing" or "wiping off" step is crucial for achieving a natural look and preventing lap marks.