Deciding whether to stain a fence with a brush or a roller can feel like a big choice. The truth is, there isn't a single "better" way for every situation. It really depends on what you're trying to achieve, the type of fence you have, and how much time and effort you want to put in.
Aggregate user reviews and manufacturer application guides suggest that both methods have their unique strengths for applying wood stain. Understanding these differences helps you pick the right tool for a durable and attractive finish, as opposed to a rushed job that might need redoing sooner than you'd like.
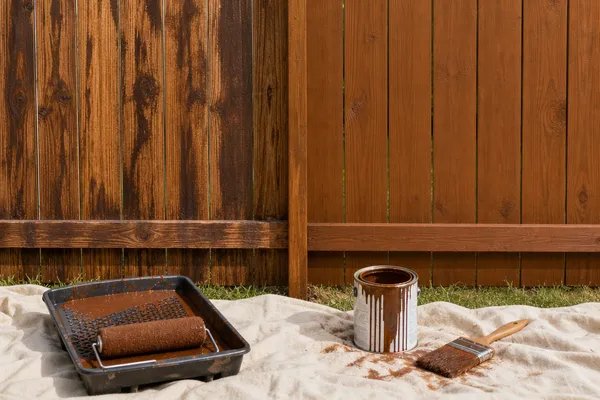
Brushing vs. Rolling Your Fence: Which Method Truly Wins?
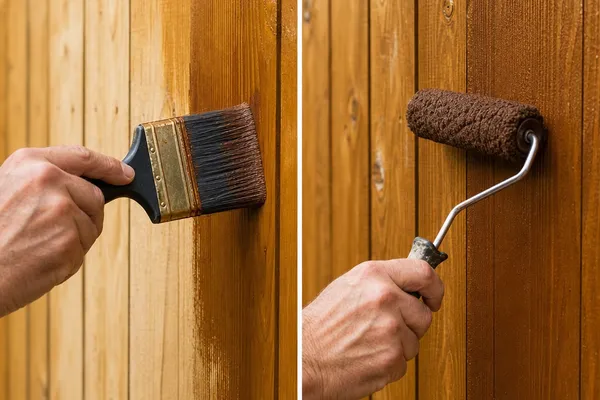
In our research, we've found that the debate between using a brush or a roller for fence staining often comes down to a trade-off between precision and speed. Neither is definitively superior; instead, each excels in different aspects of the staining process. Knowing when to deploy each tool, or even use them in combination, is key to a successful project. The goal is a finish that protects your fence from the elements and looks great for years.
The choice hinges on factors like fence condition and your desired aesthetic. For instance, a heavily textured fence might benefit more from a brush, while a large, flat fence could be efficiently covered by a roller. The most important thing is consistent application to ensure even color and adequate protection against UV rays and moisture.
Why Fence Staining Matters (Beyond Just Pretty)
Fence staining isn't just about curb appeal, though it certainly boosts that. It's a critical part of protecting your investment. Wood is vulnerable to harsh weather, think sun damage, rain saturation, and temperature fluctuations. Without a protective coat like stain, fences can quickly succumb to rot, warping, and mildew.
A quality stain penetrates the wood, creating a barrier against moisture and UV radiation. According to many wood treatment manufacturers, this barrier helps prevent the wood fibers from breaking down, significantly extending the fence’s lifespan. Choosing the right application method ensures this protective layer is applied evenly and effectively.
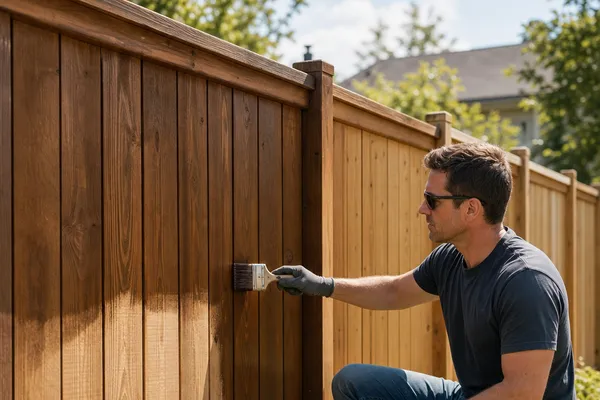
Brush It On: Getting into the Nitty-Gritty
When you're aiming for meticulous detail and deep wood penetration, a good quality brush is often your best friend. Brushes offer unparalleled control, allowing you to work the stain into every groove, crack, and surface imperfection. This is particularly important for older fences or those with a rough, unplaned texture.
Using a brush means you can apply the stain precisely where you want it, avoiding drips and ensuring thorough coverage, especially on vertical surfaces like fence pickets. While it takes more time than rolling, the superior finish and protection it can provide for intricate areas are often worth the extra effort.
When a Brush Is Your Best Fence-Staining Buddy
A brush truly shines when you encounter complex fence designs or need to ensure every single inch of wood is saturated with stain. Think of fences with intricate lattice work, decorative post caps, or even just the rough, uneven grain of aged cedar or redwood. In these scenarios, the bristle tips can get into spaces a roller simply can't reach.
Also, if you're working with a particularly thick or opaque stain, a brush helps to really work that product into the wood grain. This ensures a uniform color and depth that might be difficult to achieve with a roller, which can sometimes just skim over textured surfaces.
The Upside of Using a Brush
- Precision Control: You can easily maneuver around nails, knots, and different wood textures.
- Deep Penetration: Bristles push stain into the wood grain, offering better protection.
- Even Finish: Less chance of splotches or missed spots, especially on irregular surfaces.
- Edge Work Mastery: Perfect for getting stain right up to the edges of pickets and rails without bleeding.
The Downside of Using a Brush
- Time Consuming: Covering large fence areas can take significantly longer compared to rollers.
- Labor Intensive: Can lead to hand and arm fatigue over extended periods.
- Potential for Strokes: If not applied evenly, visible brush marks can appear.
- Dripping Risk: Requires careful technique to avoid excess stain dripping down the fence.
Roll It Out: Speeding Up the Staining Job
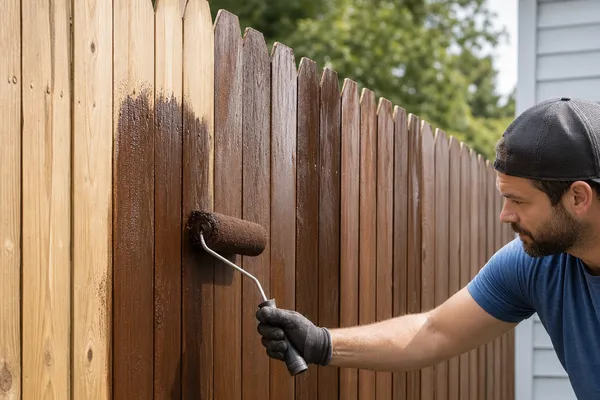
For large, relatively flat expanses of fencing, a roller can dramatically speed up your staining project. Rollers cover wider areas quickly, making them ideal for straight runs of fence pickets or large fence sections. You can achieve a smooth, consistent coat over these large surfaces much faster than you could with a brush.
When using a roller, the key is to select the right nap length for your stain type and fence surface. A shorter nap is good for smooth surfaces, while a thicker nap can help lift stain out of rougher wood. Even with a roller, consider a smaller brush for touch-ups along edges and in corners.
When a Roller Makes More Sense for Your Fence
Rollers are a game-changer when your fence is made up of long, straight pickets or has large, accessible areas without too much intricate detail. Imagine a simple privacy fence stretching across your backyard. Using a roller here can cut your staining time by more than half, making the job feel far less daunting.
It’s also a great choice if you’re reapplying stain to an already uniformly coated fence. The roller can quickly lay down a fresh, even layer over the existing finish. This method is particularly effective with semi-transparent or solid stains that are designed to provide broad coverage.
The Upside of Using a Roller
- Speed and Efficiency: Significantly faster for large, open fence areas.
- Uniform Coverage: Great for laying down a consistent coat over wide surfaces.
- Less Fatigue: Requires less fine motor control, reducing strain on hands and arms.
- Smoother Finish: Can produce a cleaner, more modern look on smooth wood.
The Downside of Using a Roller
- Limited Detail Work: Struggles with intricate carvings, tight gaps, or rough textures.
- Penetration Challenges: May not push stain as deeply into rough wood grain as a brush.
- Overspray Potential: Can create overspray on very windy days or if overloaded.
- Messy Edges: Requires careful work with a brush to finish edges and corners neatly.
Beyond Brush and Roller: Other Fence Staining Options
While brushes and rollers are the most common tools for fence staining, they aren't your only choices. For very large projects or if you’re looking for maximum speed, a paint sprayer can be an option. Sprayers apply stain quickly and can cover complex surfaces efficiently, but they require careful masking of surrounding areas to prevent overspray.
Another option gaining popularity is the pad applicator. These are flat, absorbent pads attached to a handle, sometimes with a built-in reservoir for the stain. They can offer a good balance between the speed of a roller and the control of a brush, making them versatile for various fence designs.
Your Fence Staining Toolkit: What You'll Need
Before you start, gathering the right tools is crucial. For either brushing or rolling, you’ll need:
- Stain: Choose one appropriate for exterior wood and your climate.
- Brushes: A few angled synthetic-bristle brushes in various sizes (e.g., 2-inch and 3-inch) are versatile.
- Rollers: A medium-nap roller (3/8" to 1/2") for general use, plus a roller frame and an extension pole.
- Drip cloths/tarps: To protect surrounding surfaces.
- Gloves: To protect your hands.
- Safety glasses: To protect your eyes from drips.
- Bucket or paint tray: For holding stain.
- Extension pole: For rollers, reaching higher or further.
- Scrubber or stiff brush: For cleaning the fence before staining.
- Ladder: If your fence is tall or you can't reach all areas from one side.
Prep Work is Key: Getting Your Fence Ready for Stain
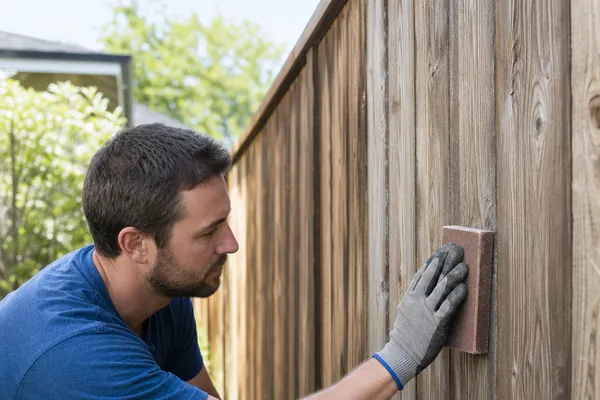
Skipping fence preparation is a common mistake that leads to poor stain adhesion and a shorter lifespan for your finish. You need a clean, dry surface for the stain to properly penetrate and bond. This involves several steps.
First, thoroughly clean the fence. Use a stiff brush and a cleaner specifically designed for wood, or a mild detergent solution. For stubborn mildew or dirt, a pressure washer on a low setting can be effective, but be cautious not to damage the wood grain. After cleaning, allow the fence to dry completely, which can take 24, 48 hours depending on humidity and temperature.
If there are any peeling or flaking old finishes, or if the wood is very rough, light sanding can improve adhesion. A clean surface is essential, regardless of whether you plan to brush or roll your stain.
The Staining Process: Step-by-Step for a Flawless Finish
Once your fence is prepped and you've chosen your application tool, be it a brush or a roller, it's time to apply that stain. The goal here is consistent saturation for maximum protection and visual appeal. When working with oil-based stains, you’ll often find that applying them on a cool, overcast day is best. This prevents the stain from drying too quickly before it can penetrate the wood properly.
Water-based stains, on the other hand, are more forgiving and can often be applied in a wider range of temperatures. Regardless of the stain type, always read the manufacturer's specific instructions for application temperature ranges and drying times. This information is usually found on the product label and is your best guide for a successful outcome.
Applying the Stain: Your Chosen Method
If you opted for a brush, load it with a moderate amount of stain. Don't overload it to the point of dripping. Start at the top of a fence picket and apply the stain in long, even, slightly overlapping strokes, working your way down. Ensure you cover the entire surface of the picket, including the edges and any grooves.
If you’re using a roller, load it evenly in your paint tray. Roll it across the fence in long, smooth strokes, maintaining consistent pressure. Use the extension pole to reach different heights without straining. For both methods, it’s crucial to maintain a "wet edge," meaning you overlap your strokes with the previously stained section while it's still wet.
This prevents lap marks.
Smart Techniques for Even Coverage
To achieve a truly professional and even finish, several techniques can help. For rollers, consider a technique called "back-brushing." As soon as you've rolled a section, follow immediately with a brush to smooth out any roller marks and ensure the stain is fully worked into the wood grain. This combines the speed of rolling with the refinement of brushing.
Another key is to work in manageable sections. Don't try to stain the entire fence at once. Instead, complete one or two pickets at a time, or a five-foot section of fence. This allows you to maintain that wet edge and ensures a uniform look from picket to picket.
For horizontal top rails, a liberal but controlled application with gentle brushing to even it out works best.
Common Fence Staining Mistakes (And How to Dodge Them)
Even with the best intentions, a few common pitfalls can derail your fence staining project. One of the most frequent errors is applying stain in direct, hot sunlight. This causes the stain to dry too quickly, leading to uneven coverage, lap marks, and poor penetration. Always aim for an overcast day or stain during cooler morning or late afternoon hours.
Another mistake is not stirring the stain thoroughly before and during application. Stains often contain pigments that settle at the bottom of the can. Failure to mix them back in will result in inconsistent color across your fence, with lighter streaks where the pigment has separated. Regularly stir your stain throughout the entire project.
- Staining in direct sun: Leads to rapid drying and uneven color.
- Not stirring stain properly: Results in inconsistent pigment distribution.
- Applying stain too thickly: Can lead to puddling, dripping, and a sticky surface that attracts dirt.
- Failing to prep the fence: Leads to poor adhesion and premature failure of the finish.
- Not maintaining a wet edge: Causes visible lap marks and an unappeclike appearance.
Keeping Your Newly Stained Fence Looking Great
Your work doesn't stop once the last picket is coated. Proper maintenance is essential to ensure your fence continues to look its best and withstand the elements for years to come. Regular cleaning is your first line of defense against mildew and dirt buildup. A simple hose-down and light scrubbing with a soft brush can remove surface grime.
About every two to three years, it’s a good idea to inspect the stain's condition. Look for any signs of fading, peeling, or wear, particularly on surfaces exposed to the most direct sunlight or heavy rain. If the fence appears dull or the water-beading effect is gone, it's likely time for a fresh coat of stain before significant wood damage occurs.
Expert Tips for a Professional-Looking Fence Job
To elevate your fence staining from a simple DIY task to a truly professional result, consider these expert insights. Always test the stain color and coverage on an inconspicuous area of your fence first. This allows you to see how the stain looks on your specific wood type and under your local lighting conditions.
When brushing, use a quality brush with angled bristles; these are designed to get into corners and tight spots more effectively. For rolling, a 3/8-inch or 1/2-inch nap roller is generally a good starting point for most fence stains. Remember that using an extension pole can save your back and make the job much more manageable. If you're using a deep-penetrating stain, consider a quick back-brush after rolling to ensure it’s worked deep into the wood fibers, as recommended by several wood treatment manufacturers.