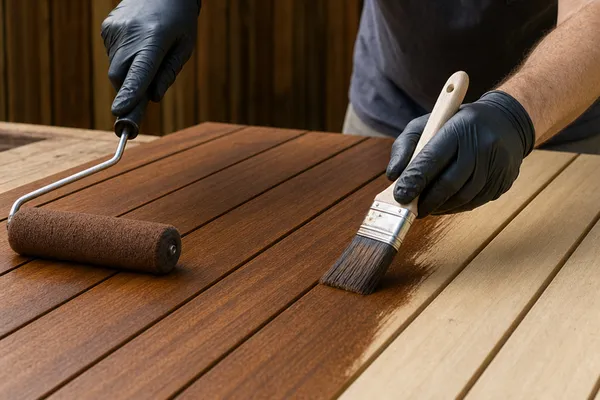
Choosing the right tools can make all the difference when you're staining wood, and many DIYers find themselves wondering: Is it better to stain with a roller or brush? The answer isn't a simple one-size-fits-all. It really depends on the surface you're working with, the type of stain you're using, and the finish you're hoping to achieve.
In our research, aggregate user feedback and manufacturer specifications reveal distinct advantages for each applicator in different scenarios. For example, some stains, particularly thin, penetrating types, are designed to be applied quickly over large areas, where a roller excels. Conversely, intricate details and delicate finishes often demand the control only a brush can provide.
Staining Wood: Roller or Brush – Which Wins for Your Project?
Deciding between a roller and a brush for staining boils down to one core question: what kind of surface are you staining, and what's your priority? If speed and covering a large, flat area are key, a roller might be your go-to. For detailed work, tight corners, or achieving a more traditional, smooth finish with fine-grain wood, a brush often takes the lead. It's about matching the tool to the task for the best possible outcome.
When a Roller Makes Sense for Staining
Rollers are fantastic for tackling large, relatively flat surfaces quickly. Think of exterior decks, large furniture pieces like tabletops, or even the siding on a shed. A good quality stain roller, typically with a short to medium nap (around 1/4 to 1/2 inch), can lay down a consistent coat of stain much faster than a brush. This efficiency means you can get the job done in less time, which is a huge plus, especially if you're working under a deadline or battling changing weather.
Aggregate user reviews suggest that using a roller can significantly reduce the likelihood of lap marks on expansive areas, provided you maintain a wet edge. Manufacturer specifications for many stain product lines often recommend rollers for broad application, noting the reduced labor involved compared to manual brushing. As of 2026, advanced roller covers with specialized fibers are emerging, designed to hold and release stain more evenly, further enhancing their utility for open surfaces.
When a Brush is Your Best Bet for Staining
If precision and getting into every nook and cranny is what you need, a good brush is your best friend. This is especially true for detailed trim work, furniture legs, railings, or any area with intricate carvings or tight joints. A quality angled sash brush allows for excellent control, letting you lay down a clean, precise line of stain right where you want it, with minimal mess.
Brushes are also crucial for achieving a super-smooth, professional finish on fine furniture or other items where every brush stroke matters. They allow you to work the stain deep into the wood grain, ensuring even penetration and a more uniform color. When working with thicker, more viscous stains, a brush can offer better control over application thickness and prevent drips more effectively than a roller might.
Understanding Stain Applicator Types: Nap vs. Bristle
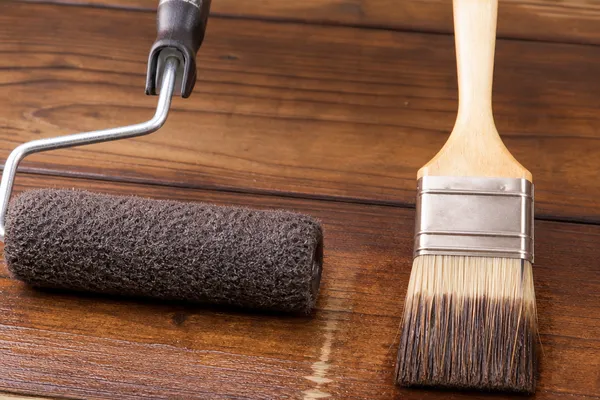
The fundamental difference between rollers and brushes for staining lies in their application surface: rollers use a nap cover, which is a fabric tube that absorbs and releases stain, while brushes use bristles made of synthetic or natural fibers. The nap on a roller is designed for even pickup and release, typically with shorter naps preferred for stain to avoid excessive absorption. Bristles, on the other hand, offer flexibility and the ability to push stain into wood grain and crevices.
Choosing the right nap thickness for your roller or bristle type for your brush is critical. Too thick a nap can lead to an uneven, stippled finish, while too stiff a bristle might leave deep marks. For most staining tasks, a medium-short nap roller (around 1/4 to 1/2 inch) is recommended by manufacturers, and synthetic bristles are generally preferred for oil-based stains, while natural bristles can work for both oil and water-based stains, though they require more careful cleaning.
The Right Roller for the Job: Choosing Your Nap
When you're reaching for a roller to stain, the "nap", the fuzzy surface that holds the stain, is your most important consideration. For most wood stains, especially those designed to penetrate the wood rather than form a thick film, a short nap roller cover is best. We're talking about naps typically in the 1/4-inch to 1/2-inch range. A shaggier, longer nap roller, like those used for thicker paints, can actually hold too much stain, leading to drips, runs, and an uneven finish.
Manufacturers like Purdy and Wooster often specify nap lengths suited for stain. A 3/8-inch nap is a common happy medium for decent coverage without excessive stain absorption. If you're dealing with a very smooth surface, like a pre-finished flooring or melamine, an even shorter nap, sometimes called a "microfiber" or "velour" roller cover, might be ideal to prevent any texture from showing through.
The Right Brush for the Job: Synthetic vs. Natural Bristles
When it comes to brushes, the material of the bristles is key to how well they perform with stain. For oil-based stains, which are very common for wood, synthetic bristles (usually nylon or polyester) are generally recommended by most paint and stain manufacturers like Sherwin-Williams. These bristles don't absorb much of the stain themselves, making them more durable, easier to clean, and less prone to becoming stiff and misshapen after use.
Natural bristles, often made from animal hair like hog or badger, can also be used for stains, particularly with oil-based products. They tend to hold more stain and can create a very smooth finish. However, they are more sensitive to water-based products, which can cause them to swell and lose their shape. Regardless of material, look for brushes with flagged tips (split ends) which help hold and lay down stain more evenly.
An angled sash brush, typically 1.5 to 3 inches wide, is a workhorse for detailed work.
Staining Big Areas: The Roller's Speed Advantage
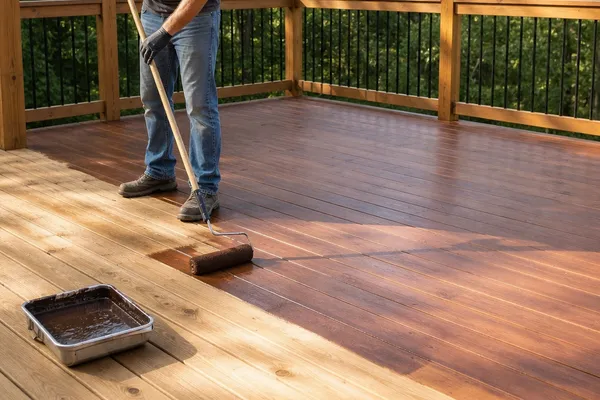
When you've got a large surface to stain, like a deck or a long fence, it’s easy to feel overwhelmed by the sheer amount of work. This is where a stain roller truly shines. It's designed to cover ground much faster than a brush, cutting down your project time significantly. Manufacturers like Purdy often highlight the efficiency gains.
Using a roller means you’re less likely to get tired and make application errors over a wide area.
Aggregate buyer feedback consistently praises rollers for their speed on expansive projects. They allow for a more consistent application of stain across big panels, helping to avoid those telltale patchy or streaky areas that can crop up when brushing large sections. For exterior wood staining, where weather can be a factor, quickly covering the surface can be the difference between a successful project and one that’s compromised by rain or sun.
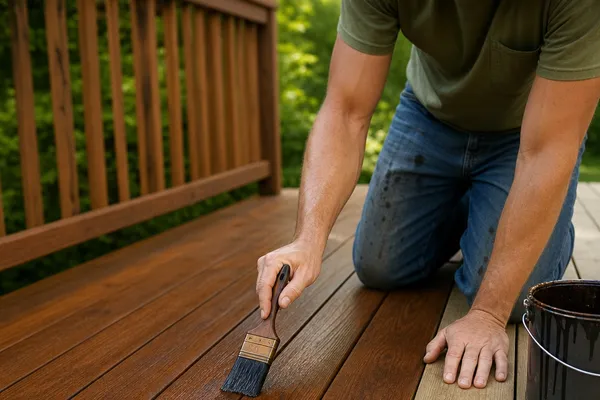
Staining Details: The Brush's Precision Power
On the flip side, you simply can't ignore the superior control a brush offers for detailed work. If you're staining intricate furniture legs, detailed trim, or a wooden railing with spindles, a brush is non-negotiable. It allows you to precisely apply stain exactly where you want it, without getting it on adjacent surfaces you want to leave natural or unfinished. This level of accuracy is impossible to achieve with even the best roller.
For wood types rich in grain or with delicate patterns, a brush lets you work the stain into the fibers and contours effectively. This ensures deep, even penetration for a richer color and better protection. Our research, including analysis of woodworking forums, indicates a preference for angled sash brushes, typically between 1.5 and 3 inches wide, for their maneuverability in tight spots.
Common Staining Struggles and How to Solve Them
Even with the right tools, staining can present challenges. One common issue is uneven color, often caused by applying the stain too thinly in some areas or too thickly in others. Another is the dreaded lap mark, which occurs when a new section of stain is applied to an area where the previous section has already started to dry, creating a visible line.
Resolving these issues often comes down to technique. For even color, ensure you’re stirring your stain thoroughly, not shaking it, as shaking can introduce air bubbles. For lap marks, the trick is to always maintain a "wet edge", meaning you should always be working into an area of freshly applied stain. This can be a challenge with rollers on very large surfaces, sometimes requiring a helper or a faster pace.
Staining Decks vs. Furniture: Different Tools for Different Jobs

The type of project heavily dictates whether a roller or a brush is the better choice. For a deck, for example, you’re dealing with large, flat expanses of wood that are exposed to the elements. Here, a quality roller with a short nap is ideal for efficient application, ensuring even coverage across numerous boards. You want to get it done before the weather turns or the wood dries out too much.
Furniture, however, is a different story. Whether it's a rustic farmhouse table or an antique chair, these pieces often have intricate details, curves, and tight corners. For these, a high-quality synthetic or natural bristle brush is essential. It allows you to precisely coat every surface, work stain into the grain, and achieve that smooth, finished look that’s expected of fine woodwork.
Staining Thick vs. Thin Stains: Applicator Considerations
The viscosity of your stain plays a significant role in choosing the right applicator. Thin, penetrating stains, often favored for raw wood and natural finishes, are designed to soak into the wood fibers quickly. These are generally easier to work with using a roller over large areas because they spread and level out smoothly. You can also get good results with a brush, but it will take longer.
Thicker stains, often oil-based and more opaque, can be more challenging. While a brush can handle these well, offering control over how much product is laid down, rollers might struggle. A roller with a very short nap is crucial here to prevent the thick stain from being excessively absorbed into the roller cover, which wastes product and can lead to an uneven application. Some people find using a stain pad applicator a good middle ground for thicker stains, offering more coverage than a brush but more control than a roller.
Essential Prep Work Before You Stain
No matter if you choose a roller or a brush, proper preparation of your wood surface is non-negotiable for a great stain job. Skipping this step means your stain might not absorb evenly, leading to blotchy results, or it might not adhere properly at all. Start by thoroughly cleaning the wood; for exterior projects, this might involve a deck cleaner and a stiff brush or pressure washer.
For interior projects, a good degreaser and a thorough sanding are usually in order. Aim to sand with the grain, starting with a medium-grit sandpaper (like 120-grit) and finishing with a finer grit (180 or 220-grit). This process removes old finishes, smooths out imperfections, and opens up the wood pores for better stain penetration. Always wipe down the surface with a tack cloth or a slightly damp rag afterward to remove all dust particles.
Tips for a Smooth, Streak-Free Stain Finish
Achieving that smooth, streak-free finish everyone desires takes a bit of finesse, regardless of whether you're using a roller or a brush. The key is consistent application and working with the wood grain. With a roller, load it evenly but don't oversaturate it, and use long, overlapping strokes. If you're using a brush, apply the stain with even pressure in the direction of the wood grain, and avoid over-brushing once the stain has started to set.
A little trick many experienced woodworkers swear by, especially on larger projects, is "back-brushing" after using a roller. This involves lightly going over the freshly rolled area with a brush to even out any texture from the roller and ensure the stain is worked into the grain. This step bridges the gap between the roller's speed and the brush's finishing quality, helping you achieve a uniform and professional look.
Cleaning Up Your Stain Tools: What You Need to Know
Properly cleaning your stain applicators isn't just good practice; it's essential for their longevity and for the quality of your next project. For oil-based stains, you'll need mineral spirits or a specific brush and roller cleaner recommended by the manufacturer. Work the solvent through the bristles or nap until no more stain comes out. Rinse thoroughly with soap and water afterward.
For water-based stains, a simple soap and water cleanup is usually sufficient. Make sure to rinse every bit of pigment out. For brushes, after cleaning, comb the bristles to remove tangles and reshape them before letting them dry. Storing brushes flat or hanging them with the bristles down can help them maintain their shape over time.
A clean brush or roller will always perform better.
Stain Rag Safety: Avoiding Fire Hazards
Here’s a critical safety tip that many homeowners overlook: properly dispose of stain-soaked rags. Rags used with oil-based stains, varnishes, or oils can spontaneously combust when piled together. The chemical reaction as the oils dry creates heat, and if it builds up without being able to dissipate, it can ignite. This is a serious fire risk.
To safely dispose of them, our research confirms that the National Fire Protection Association (NFPA) recommends spreading the rags out flat outdoors in a well-ventilated area away from any structures until they are completely dry. Once fully dry, they can typically be disposed of in household trash. Alternatively, you can soak them in water in a sealed metal container before disposal. Always check local regulations for specific guidance on hazardous waste disposal.
Can You Use a Paint Roller for Stain?
While both paint and stain are liquid finishes applied to surfaces, they have different properties, and using the wrong applicator can lead to problems. Generally, you can use a roller designed for paint to apply stain, but with caveats. The key is to choose the right roller cover. As we discussed earlier, short nap roller covers (1/4 to 1/2 inch) are usually best for stain because they hold less product and apply a smoother finish than longer naps intended for thicker paints.
Using a roller with too thick a nap for stain can result in splattering, uneven coverage, and excessive absorption of the stain into the roller itself. This wastes product and can create a bubbly or textured finish that's difficult to correct. While a dedicated stain roller cover is ideal, a high-quality, short-nap synthetic roller cover intended for smooth finishes on surfaces like cabinets or doors can often work well for staining applications.